- Huggingface
- 结束
Huggingface
![]()

Hugging face 简介
Hugging Face 是一家总部位于纽约的聊天机器人初创服务商,开发的应用在青少年中颇受欢迎,相比于其他公司,Hugging Face更加注重产品带来的情感以及环境因素。
2016年1月1日,Clément Delangue、Julien Chaumond和Thomas Wolf 在美国纽约创立Hugging Face,最初面向青少年开发聊天机器人应用。
发展历程
- 2017 年 3 月 5 日,完成种子轮融资 。3 月 9 号,Hugging Face App 在 iOS App Store 正式推出,并获得 120 万美元的天使投资.
- 2018 年,公司开始在网上免费分享应用程序底层代码,受到谷歌、微软等科技公司研究人员的积极回应.
- 2019 年 12 月 18 日,完成 A 轮融资.
- 2021 年实现收入 1 千万美元,并完成 B 轮融资.
- 2022 年 5 月,完成由 Lux Capital 领投、红杉资本参投的 1 亿美元 C 轮融资,估值达到 20 亿美元.
- 2023 年 8 月 25 日,进行 D 轮融资,英伟达、亚马逊等投资,估值 45 亿美元.
- 2024 年 1 月 25 日,与谷歌云建立战略合作伙伴关系
Hugging Face专注于NLP技术,拥有大型的开源社区。尤其是在github上开源的自然语言处理,预训练模型库 Transformers,已被下载超过一百万次,github上超过24000个star。
Transformers 提供了NLP领域大量state-of-art的 预训练语言模型结构的模型和调用框架。
PyTorch实现了从语言中识别情绪情感反讽的DeepMoji模型:https://github.com/huggingface/torchMoji
【2022-9-7】注册账户后申请token才能下载模型
【2024-1-25】huggingface官方介绍及测试题
Transformers 库
Transformers库 GitHub
介绍
- 最初的名称是
pytorch-pretrained-bert,随着BERT一起应运而生。 - Google 2018年10月底, 开源了BERT 的tensorflow实现。当时,BERT以其强劲的性能,引起NLPer的广泛关注。
- 几乎与此同时,
pytorch-pretrained-bert也开始了第一次提交。pytorch-pretrained-bert用当时已有大量支持者的pytorch框架复现了BERT的性能,并提供预训练模型的下载,使没有足够算力的开发者们也能够在几分钟内就实现 state-of-art-fine-tuning。
- 2019年7月16日,在repo上已经有了包括 BERT,GPT,GPT-2,Transformer-XL,XLNET,XLM在内六个预训练语言模型,这时候名字再叫 pytorch-pretrained-bert 就不合适了,于是改成了
pytorch-transformers,势力范围扩大了不少。 - 2019年6月, Tensorflow2的beta版发布,Huggingface也闻风而动。为了立于不败之地,又实现了TensorFlow 2.0和PyTorch模型之间的深层互操作性,可以在TF2.0/PyTorch框架之间随意迁移模型。
- 2019年9月, 发布了2.0.0版本,同时正式更名为
transformers。到目前为止,transformers 提供了超过100种语言的,32种预训练语言模型,简单,强大,高性能,是新手入门的不二选择。
Huggingface名字演进
安装
安装:
- transformers 包所需的 tensorflow 版本至少为2.2.0,而该版本对应的CUDA版本可能不同,如笔者使用的2.4.0版本tensorflow对应的CUDA是11版本
pip install transformers==2.2.0
pip install tensorflow
pip install numpy
# tf环境
pip install tensorflow-gpu==2.4.0
# pytorch环境
pip install torch
# 或 pytorch+transformers一起安装
pip install transformers[torch]
# 或 TensorFlow+transformers一起安装
pip install transformers[tf-cpu]
# 或源码安装
pip install git+https://github.com/huggingface/transformers
# 指定源
pip install transformers --trusted-host pypi.tuna.tsinghua.edu.cn
测试:
import transformers
transformers.__version__
import pipeline
print(pipeline('sentiment-analysis')('I hate you'))"
框架理解
源码
Auto 核心类
transformers 开源库核心组件包括3个:
Configuration:配置类,继承自PretrainedConfig,保存model或tokenizer的超参数,例如词典大小,隐层维度数,dropout rate等。配置类主要可用于复现模型。Tokenizer:切词类,继承自PreTrainedTokenizer,主要存储词典(from_pretrained()部分),token到index映射关系等。- 三件事情:①分词、②扩展词汇表、③识别并处理特殊token。
- model-specific的特性,如特殊token,
[SEP],[CLS]等处理,token的type类型处理,语句最大长度等 - 因此tokenizer通常和模型是一对一适配。比如BERT模型有BertTokenizer。
- Tokenizer 实现方式有多种,如 word-level, character-level或者subword-level,其中subword-level包括Byte-Pair-Encoding,WordPiece。subword-level的方法目前是transformer-based models的主流方法,能够有效解决OOV问题,学习词缀之间的关系等。
- Tokenizer主要为了将原始的语料编码成适配模型的输入。
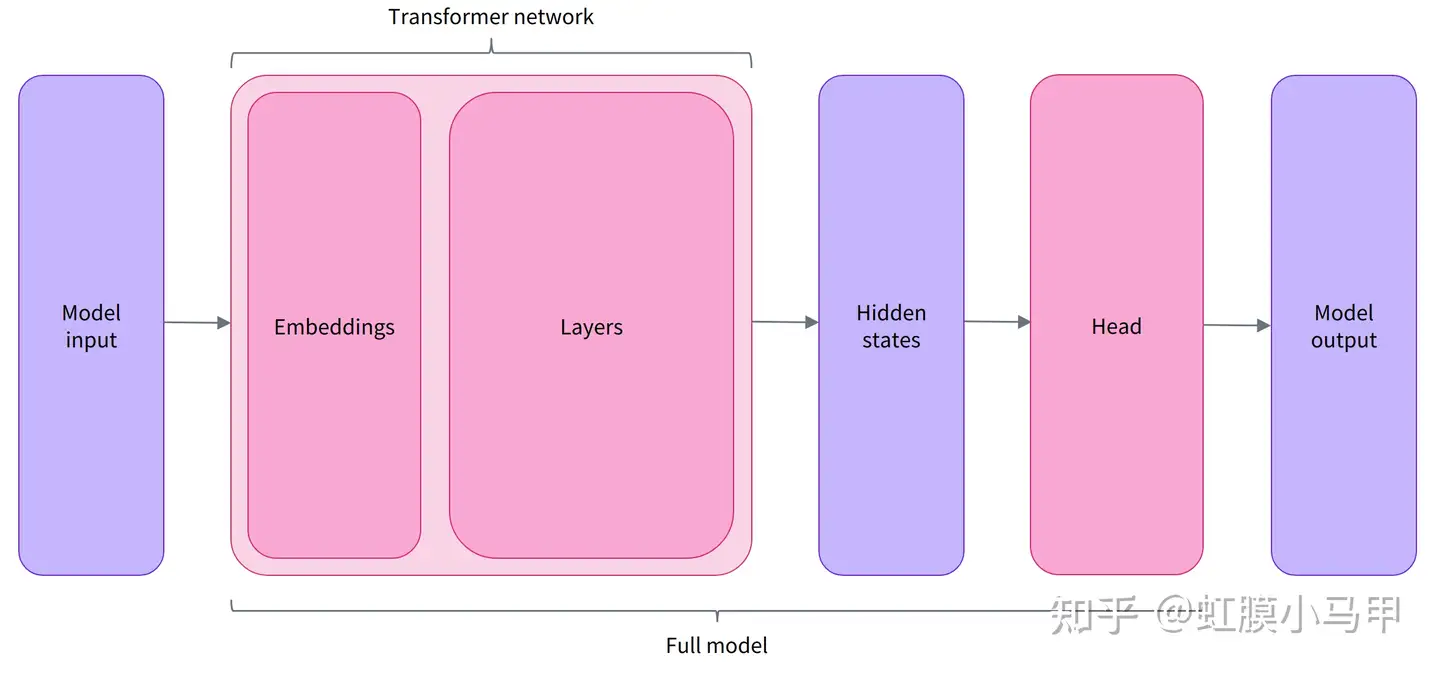
Model: 模型类。封装了预训练模型的计算图过程,遵循着相同的范式,如根据token ids进行embedding matrix映射,紧接着多个self-attention层做编码,最后一层task-specific做预测。- 除此之外,Model还可以做一些灵活扩展,用于下游任务,例如在预训练好的Base模型基础上,添加task-specific heads。
- 比如,language model heads,sequence classification heads等。在代码库中通常命名为,XXXForSequenceClassification or XXXForMaskedLM,其中XXX是模型的名称(如Bert), 结尾是预训练任务的名称 (MaskedLM) 或下游任务的类型(SequenceClassification)。
transformer 额外封装了AutoConfig, AutoTokenizer,AutoModel
- 通过模型命名就能定位所属的具体类
- 比如 ’bert-base-cased’,要加载BERT模型相关的配置、切词器和模型。
所有相关类都衍生自这三个类,都有from_pretained()方法和save_pretrained()方法。
通常上手时都会用Auto封装类来加载切词器和模型。
示例
# 加载与保存分词器
from transformers import BertTokenizer

tokenizer = BertTokenizer.from_pretrained("bert-base-cased")
tokenizer.save_pretrained("./models/bert-base-cased/")
# 加载与保存模型
from transformers import AutoModel
# 所有存储在 HuggingFace Model Hub 上的模型都可以通过 Model.from_pretrained() 来加载权重,参数可以是 checkpoint 的名称,也可以是本地路径(预先下载的模型目录)
model = AutoModel.from_pretrained("bert-base-cased")
model.save_pretrained("./models/bert-base-cased/") # 保存模型

inputs = tokenizer(["来到美丽的大自然,我们发现"], return_tensors="pt")
# {'input_ids': tensor([[    1, 68846, 68881, 67701, 67668, 98899, 91935]]), 'attention_mask': tensor([[1, 1, 1, 1, 1, 1, 1]])}

gen_kwargs = {"max_length": 128, "top_p": 0.8, "temperature": 0.8, "do_sample": True, "repetition_penalty": 1.1}
output = model.generate(**inputs, **gen_kwargs)
# decode the new tokens
output = tokenizer.decode(output[0].tolist(), skip_special_tokens=True)
print(output)
模型扩展
Transformer-based Pre-trained models
基础 Transformer架构加上不同的head模块组成,部分例子如下:
基础模型:只输出隐层状态
- *
Model(retrieve the hidden states):基础模型,只输出隐状态 - *
ForCausalLM:常规语言模型(自回归),典型的有GPT系列
扩展模型:增加层,适配下游应用
- *
ForMaskedLM:掩码语言模型,典型的有BERT、RoBERTa、DeBERTa - *
ForMultipleChoice:多项选择模型 - *
ForQuestionAnswering:问答模型,一般是抽取式问答 - *
ForSequenceClassification:序列分类模型 - *
ForTokenClassification:token分类模型,如命名实体识别和关系抽取
关系
开源库实现的模型,包括了BERT,GPT2,XLNet,RoBERTa,ALBERT,ELECTRA,T5等家喻户晓的预训练语言模型。
CONFIG_MAPPING = OrderedDict(
    [
        ("retribert", RetriBertConfig,),
        ("t5", T5Config,),
        ("mobilebert", MobileBertConfig,),
        ("distilbert", DistilBertConfig,),
        ("albert", AlbertConfig,),
        ("camembert", CamembertConfig,),
        ("xlm-roberta", XLMRobertaConfig,),
        ("marian", MarianConfig,),
        ("mbart", MBartConfig,),
        ("bart", BartConfig,),
        ("reformer", ReformerConfig,),
        ("longformer", LongformerConfig,),
        ("roberta", RobertaConfig,),
        ("flaubert", FlaubertConfig,),
        ("bert", BertConfig,),
        ("openai-gpt", OpenAIGPTConfig,),
        ("gpt2", GPT2Config,),
        ("transfo-xl", TransfoXLConfig,),
        ("xlnet", XLNetConfig,),
        ("xlm", XLMConfig,),
        ("ctrl", CTRLConfig,),
        ("electra", ElectraConfig,),
        ("encoder-decoder", EncoderDecoderConfig,),
    ]
参考
- 【2020-7-5】Transformers源码阅读和实践
代码示例
tokenizer = AutoTokenizer.from_pretrained(checkpoint)
model = AutoModelForSequenceClassification.from_pretrained(checkpoint)
sequences = ["I've been waiting for a HuggingFace course my whole life.", "So have I!"]
tokens = tokenizer(sequences, padding=True, truncation=True, return_tensors="pt")
print(tokens)
#{
#    'input_ids': tensor([
#        [  101,  1045,  1005,  2310,  2042,  3403,  2005,  1037, 17662, 12172,2607,  2026,  2878,  2166,  1012,   102],
#        [  101,  2061,  2031,  1045,   999,   102,     0,     0,     0,     0, 0,     0,     0,     0,     0,     0]
#    ]),
#    'attention_mask': tensor([
#        [1, 1, 1, 1, 1, 1, 1, 1, 1, 1, 1, 1, 1, 1, 1, 1],
#        [1, 1, 1, 1, 1, 1, 0, 0, 0, 0, 0, 0, 0, 0, 0, 0]
#    ])
#}
output = model(**tokens)
print(output)
# SequenceClassifierOutput(
#    loss=None,
#    logits=tensor([[-1.5607,  1.6123],[-3.6183,  3.9137]], grad_fn=<AddmmBackward0>),
#    hidden_states=None,
#    attentions=None
#)
生态系统
HuggingFace主干库:
- Transformer 模型库
- Tokenizer 分词库:将sequence转变为一个id序列
- Hub 社区
- Datasets 数据集库:下载/预处理
- Evaluate 评估
- Accelerate 加速库(软件)
- Optimum 加速卡(硬件)
- Diffusers 扩散模型
- Timm
- PEFT
- Chat-UI
- Safetensors
- starcoder
- SetFit
【2023-6-14】HuggingFace Ecosystem 生态系统进展 b站视频
时间线
- 2022-7,BLOOM开源,评测效果不及GPT-3
- 2022-8,Stable Diffusion
- 2022-11,ChatGPT发布
- 2023-2,META FAIR开源LLaMA
- 发布 LLM Leaderboeard
- 开源 HuggingChat,以及 Chat-UI
- 发布 BigCodr,以及 StarCoder,基于github许可代码,可以通过opt-out工具剔除自己的代码
- 2023-5,发布 StarChat,辅助编程
hf 使用方法
多种模式
pipeline方式: 直接用预训练模型,不训练 —— 最简单AutoXXX 方式: 使用已有模型, 灵活性增加finetune: 微调方式 Trainer、tensorflow、pytorch
Transformers 中有许多不同的架构可用,每一种架构都围绕着处理特定任务而设计:
Model(retrieve the hidden states)ForCausalLMForMaskedLMForMultipleChoiceForQuestionAnsweringForSequenceClassificationForTokenClassification- and others
hf 整体流程
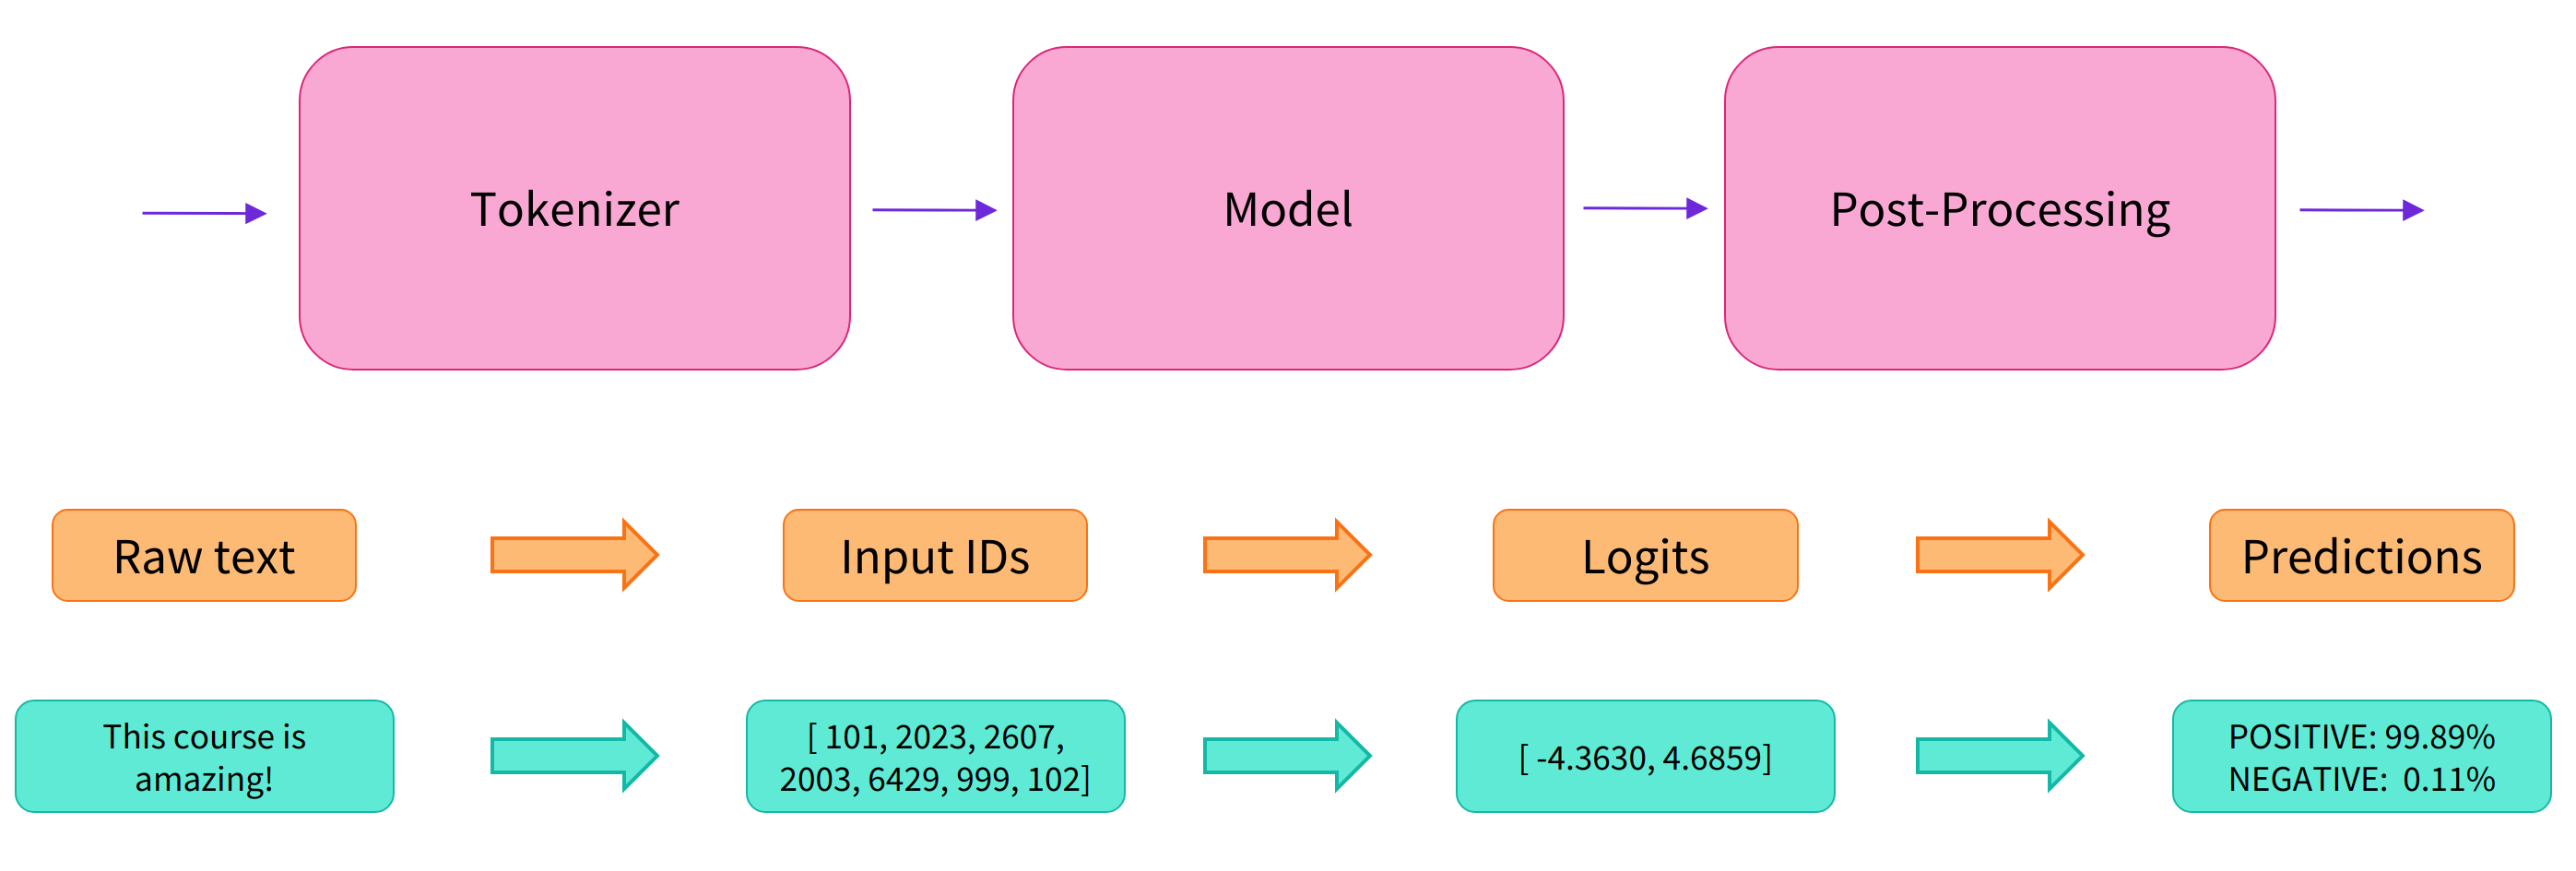
接收文本后,有三步:preprocess (Tokenizer) -> fit model(训练模型) -> postprocessing
- (1)预处理
- 将输入文本进行分词(Tokenizer)
- 变成:words,subwords,或者symbols,这些统称为token
- 将每个token映射为一个 integer
- 为输入添加模型需要的特殊字符。
- 将输入文本进行分词(Tokenizer)
- (2)传入模型
- (3)预测结果后处理
注意:
- 所有预处理阶段(Preprocessing)都要与模型预训练阶段保持一致,所以要从 Model Hub 中下载预处理的信息。
- 用
AutoTokenizer的from_pretrained方法进行tokenizer的加载,通过把 tokenizer 的 checkpoint 导入,自动获取tokenizer需要的数据并进行缓存(下次无需下载)。
示例
from transformers import AutoTokenizer
from transformers import AutoModel

checkpoint = "distilbert-base-uncased-finetuned-sst-2-english"
tokenizer = AutoTokenizer.from_pretrained(checkpoint) # 加载分词器
model = AutoModel.from_pretrained(checkpoint) # 加载模型

raw_inputs = [
    "I've been waiting for a HuggingFace course my whole life.",
    "I hate this so much!",
]
# ----- 文本id化 -----
# 指定返回的张量类型(PyTorch、TensorFlow 或 NumPy),用 return_tensors 参数
inputs = tokenizer(raw_inputs, padding=True, truncation=True, return_tensors="pt")
print(inputs) # 返回一个包含两个键的字典,input_ids和attention_mask
# ----- 模型 ------
outputs = model(**inputs)  # dict 展开, 提取 input_ids 和 attention_mask 参数
print(outputs.last_hidden_state.shape)
# 输出 torch.Size([2, 16, 768])
返回
{
    'input_ids': tensor([
        [  101,  1045,  1005,  2310,  2042,  3403,  2005,  1037, 17662, 12172, 2607,  2026,  2878,  2166,  1012,   102],
        [  101,  1045,  5223,  2023,  2061,  2172,   999,   102,     0,     0,     0,     0,     0,     0,     0,     0]
    ]),
    'attention_mask': tensor([
        [1, 1, 1, 1, 1, 1, 1, 1, 1, 1, 1, 1, 1, 1, 1, 1],
        [1, 1, 1, 1, 1, 1, 1, 0, 0, 0, 0, 0, 0, 0, 0, 0]
    ])
}
后处理
3)Post-Processing
- 模型最后一层输出的原始非标准化分数。
- 要转换为概率,需要经过一个SoftMax层(所有 Transformers 模型都输出 logits,因为用于训练的损耗函数一般会将最后的激活函数(如SoftMax)与实际损耗函数(如交叉熵)融合
import torch

predictions = torch.nn.functional.softmax(outputs.logits, dim=-1)
print(predictions)
pipeline
pipeline API 可快速体验 Transformers。
- 它将模型的预处理、后处理等步骤包装起来,直接定义好任务名称后输出文本,得到结果。
- 这是一个高级API,可以领略到transformers 这个库的强大且友好。
最简单,不进行finetune,直接完成任务,bert提供了pipeline的功能
用 pipeline API,输入任务名称,默认会选择特定已经存好的模型文件,然后会进行下载并且缓存。
主要模型:
- 自回归:GPT2、Transformer-XL、XLNet
- 自编码:BERT、ALBERT、RoBERTa、ELECTRA
- Seq2Seq:BART、Pegasus、T5
各种任务的代表模型
| Model | Examples | Tasks |
|---|---|---|
Encoder 编码器模型 |
ALBERT, BERT, DistilBERT, ELECTRA, RoBERTa | Sentence classification, named entity recognition, extractive question answering 适合需要理解完整句子的任务,例如句子分类、命名实体识别(以及更一般的单词分类)和提取式问答 |
Decoder 解码器模型 |
CTRL, GPT, GPT-2, Transformer XL | Text generation 解码器模型的预训练通常围绕预测句子中的下一个单词。这些模型最适合涉及文本生成的任务 |
Encoder-decoder 序列到序列模型 |
BART, T5, Marian, mBART | Summarization, translation, generative question answering 序列到序列模型最适合围绕根据给定输入生成新句子的任务,例如摘要、翻译或生成式问答。 |
pipeline 任务
目前支持的pipeline 如下:
- feature-extraction (get the vector representation of a text) 特征抽取
- fill-mask 掩码回复(填补空缺)
- ner (named entity recognition) 命名实体识别
- question-answering 问答
- sentiment-analysis 情感分析
- summarization 文本摘要
- text-generation 文本生成
- translation 机器翻译
- zero-shot-classification 零样本分类
最新pipeline类型:详见官网介绍
- AudioClassificationPipeline
- AutomaticSpeechRecognitionPipeline
- ConversationalPipeline
- FeatureExtractionPipeline
- FillMaskPipeline
- ImageClassificationPipeline
- ObjectDetectionPipeline
- QuestionAnsweringPipeline
- SummarizationPipeline
- TableQuestionAnsweringPipeline
- TextClassificationPipeline
- TextGenerationPipeline
- Text2TextGenerationPipeline
- TokenClassificationPipeline
- TranslationPipeline
- ZeroShotClassificationPipeline
所有的API都可以通过 搜索,并且在线测试
pipeline 函数
pipeline(task: str, model: Optional = None, \
    config: Union[str, transformers.configuration_utils.PretrainedConfig, NoneType] = None, \
    tokenizer: Union[str, transformers.tokenization_utils.PreTrainedTokenizer, NoneType] = None, \
    framework: Union[str, NoneType] = None, revision: Union[str, NoneType] = None,  \
    use_fast: bool = True, model_kwargs: Dict[str, Any] = {}, **kwargs) \
-> transformers.pipelines.base.Pipeline
pipeline 参数
- task 下游任务
- model 预训练模型
- config 对应模型的具体配置。
- tokenizer 分词器。
- framework:pt或者tf用于指定模型使用torch还是tensorflow版的
- use_fast: 是否使用优化后的分词器
示例
from transformers import pipeline

# 分类任务流水线
# classifier = pipeline("sentiment-analysis")
classifier = pipeline(task='sentiment-analysis', model="nlptown/bert-base-multilingual-uncased-sentiment")

# 单句测试
classifier("I've been waiting for a HuggingFace course my whole life.")
# [{'label': 'POSITIVE', 'score': 0.9598047137260437}]
# 多句测试
classifier(
    ["I've been waiting for a HuggingFace course my whole life.", "I hate this so much!"]
)
# [{'label': 'POSITIVE', 'score': 0.9598047137260437},
#  {'label': 'NEGATIVE', 'score': 0.9994558095932007}]
Text classification 文本分类
默认 checkpoint 是 distilbert-base-uncased-finetuned-sst-2-english
from transformers import pipeline

#checkpoint = "distilbert-base-uncased-finetuned-sst-2-english"
#tokenizer = AutoTokenizer.from_pretrained(checkpoint)
classifier = pipeline("sentiment-analysis")
# 指定模型,硬件环境
pipe = pipeline("sentiment-analysis", model=model_name, device=0)
# 单句
classifier("I've been waiting for a HuggingFace course my whole life.")
# 多句
classifier([
    "I've been waiting for a HuggingFace course my whole life.",
    "I hate this so much!"
])
段落关系判断
## ------------ PYTORCH CODE ------------
from transformers import AutoTokenizer, AutoModelForSequenceClassification
import torch

model_name = "bert-base-cased-finetuned-mrpc"
tokenizer = AutoTokenizer.from_pretrained(model_name)
model = AutoModelForSequenceClassification.from_pretrained(model_name)

classes = ["not paraphrase", "is paraphrase"]

sequence_0 = "The company HuggingFace is based in New York City"
sequence_1 = "Apples are especially bad for your health"
sequence_2 = "HuggingFace's headquarters are situated in Manhattan"

# The tokenizer will automatically add any model specific separators (i.e. <CLS> and <SEP>) and tokens to
# the sequence, as well as compute the attention masks.
paraphrase = tokenizer(sequence_0, sequence_2, return_tensors="pt")
not_paraphrase = tokenizer(sequence_0, sequence_1, return_tensors="pt")

paraphrase_classification_logits = model(**paraphrase).logits
not_paraphrase_classification_logits = model(**not_paraphrase).logits

paraphrase_results = torch.softmax(paraphrase_classification_logits, dim=1).tolist()[0]
not_paraphrase_results = torch.softmax(not_paraphrase_classification_logits, dim=1).tolist()[0]

# Should be paraphrase
for i in range(len(classes)):
    print(f"{classes[i]}: {int(round(paraphrase_results[i] * 100))}%")

# Should not be paraphrase
for i in range(len(classes)):
    print(f"{classes[i]}: {int(round(not_paraphrase_results[i] * 100))}%")

## ------------ TENSORFLOW CODE ------------
from transformers import AutoTokenizer, TFAutoModelForSequenceClassification
import tensorflow as tf

model_name = "bert-base-cased-finetuned-mrpc"
tokenizer = AutoTokenizer.from_pretrained(model_name)
model = TFAutoModelForSequenceClassification.from_pretrained(model_name)

classes = ["not paraphrase", "is paraphrase"]

sequence_0 = "The company HuggingFace is based in New York City"
sequence_1 = "Apples are especially bad for your health"
sequence_2 = "HuggingFace's headquarters are situated in Manhattan"

# The tokenizer will automatically add any model specific separators (i.e. <CLS> and <SEP>) and tokens to
# the sequence, as well as compute the attention masks.
paraphrase = tokenizer(sequence_0, sequence_2, return_tensors="tf")
not_paraphrase = tokenizer(sequence_0, sequence_1, return_tensors="tf")

paraphrase_classification_logits = model(paraphrase).logits
not_paraphrase_classification_logits = model(not_paraphrase).logits

paraphrase_results = tf.nn.softmax(paraphrase_classification_logits, axis=1).numpy()[0]
not_paraphrase_results = tf.nn.softmax(not_paraphrase_classification_logits, axis=1).numpy()[0]

# Should be paraphrase
for i in range(len(classes)):
    print(f"{classes[i]}: {int(round(paraphrase_results[i] * 100))}%")

# Should not be paraphrase
for i in range(len(classes)):
    print(f"{classes[i]}: {int(round(not_paraphrase_results[i] * 100))}%")
NLI 句子关系推断
from transformers import pipeline
classifier = pipeline('zero-shot-classification', model='roberta-large-mnli')

sequence_to_classify = "one day I will see the world"
candidate_labels = ['travel', 'cooking', 'dancing']
classifier(sequence_to_classify, candidate_labels)
Zero-shot classification 零样本分类
文本分类标注非常耗时,huggingface 提供了0样本分类的pipeline
- 用户只需要传入文本内容,以及可能的分类标签,就可以得到每个标签的概率
自定义候选标签
candidate_labels候选标签集合
from transformers import pipeline

classifier = pipeline("zero-shot-classification")
# 指定候选标签
classifier(
    "This is a course about the Transformers library",
    candidate_labels=["education", "politics", "business"],
)

# {'sequence': 'This is a course about the Transformers library',
#  'labels': ['education', 'business', 'politics'],
#  'scores': [0.8445963859558105, 0.111976258456707, 0.043427448719739914]}
Text generation 文本生成
文本生成任务: 输入开头的话术(prompt),机器自动生成完剩下的句子。
Text generation 中包含了一些随机因子,因此每次生成的结果都可能不同。
直接启动生成任务
- model 可以选择 模型中心上模型
参数
num_return_sequences控制生成多少个不同的序列max_length控制输出文本总长度
from transformers import pipeline
# 初始化
generator = pipeline("text-generation")
generator = pipeline("text-generation", model="distilgpt2") # 指定 ModelHub 上的模型
# 执行生成任务
# 简易用法
generator("In this course, we will teach you how to")
# 复杂用法
generator(
    "In this course, we will teach you how to",
    max_length=30, # 最大长度
    num_return_sequences=2, # 返回两个结果
)
# [{'generated_text': 'In this course, we will teach you how to understand and use '
#                     'data flow and data interchange when handling user data. We '
#                     'will be working with one or more of the most commonly used '
#                     'data flows — data flows of various types, as seen by the HTTP'}]
fill-mask pipeline: 填充给定文本中的空白
- 模型填充了特殊的
<mask>词,掩码标记。其他模型掩码填充可能不同
参数
top_k一次返回哪些结果
from transformers import pipeline

unmasker = pipeline("fill-mask")

unmasker("This course will teach you all about <mask> models.", top_k=2)

# [{'sequence': 'This course will teach you all about mathematical models.',
#   'score': 0.19619831442832947,
#   'token': 30412,
#   'token_str': ' mathematical'},
#  {'sequence': 'This course will teach you all about computational models.',
#   'score': 0.04052725434303284,
#   'token': 38163,
#   'token_str': ' computational'}]
top_k 参数控制要显示的结果有多少种。请注意,这里模型填充了特殊的<mask>词,掩码标记。其他掩码填充模型可能有不同的掩码标记,因此在探索其他模型时要验证正确的掩码字是什么。检查它的一种方法是查看小组件中使用的掩码。
Mask filling
掩码恢复是将一个句子中随机遮掩
例如:
from transformers import pipeline

unmasker = pipeline("fill-mask")
unmasker("This course will teach you all about <mask> models.", top_k=2)
[{'sequence': 'This course will teach you all about mathematical models.',
  'score': 0.19619831442832947,
  'token': 30412,
  'token_str': ' mathematical'},
 {'sequence': 'This course will teach you all about computational models.',
  'score': 0.04052725434303284,
  'token': 38163,
  'token_str': ' computational'}]
Named entity recognition NER 命名实体识别
命名实体识别 (NER) : 找到输入文本的实体, 如人员、位置或组织之类
- Sylvain 是一个人 (PER),Hugging Face 是一个组织 (ORG),而布鲁克林是一个位置 (LOC)
参数
grouped_entities=True: 对应于同一实体的句子部分重新组合在一起
“Hugging” and “Face” 是一个实体organization,所以聚合起来。
数据预处理: Sylvain 被拆解为4 pieces: S, ##yl, ##va, and ##in. 这边后处理也会将这些给聚合起来。
from transformers import pipeline

ner = pipeline("ner", grouped_entities=True)
# 测试
ner("My name is Sylvain and I work at Hugging Face in Brooklyn.")
# [{'entity_group': 'PER', 'score': 0.99816, 'word': 'Sylvain', 'start': 11, 'end': 18},
#  {'entity_group': 'ORG', 'score': 0.97960, 'word': 'Hugging Face', 'start': 33, 'end': 45},
#  {'entity_group': 'LOC', 'score': 0.99321, 'word': 'Brooklyn', 'start': 49, 'end': 57}
# ]
注意
- 此pipeline通过从提供的上下文中提取信息来工作;它不会凭空生成答案。
Question answering 问答系统
阅读理解: 通过文本内容,以及问题得到答案:
问答 pipeline 使用来自给定上下文的信息回答问题:
- 从 context 中抽取片段作答
from transformers import pipeline

question_answerer = pipeline("question-answering")
question_answerer(
    question="Where do I work?",
    context="My name is Sylvain and I work at Hugging Face in Brooklyn",
)
# {'score': 0.6385916471481323, 'start': 33, 'end': 45, 'answer': 'Hugging Face'}
Summarization 文本摘要
将文本缩减为较短文本的任务,同时保留文本中的主要(重要)信息。
参数
- max_length
- min_length
from transformers import pipeline

summarizer = pipeline("summarization")
summarizer(
    """
    America has changed dramatically during recent years. Not only has the number of
    graduates in traditional engineering disciplines such as mechanical, civil, .....
    Both China and India, respectively, graduate
    six and eight times as many traditional engineers as does the United States.
    Other industrial countries at minimum maintain their output, while America
    suffers an increasingly serious decline in the number of engineering graduates
    and a lack of well-educated engineers.
"""
)
Translation 翻译
与文本生成和摘要一样,指定结果的 max_length 或 min_length
- 如 法翻英模型, Helsinki-NLP/opus-mt-fr-en
from transformers import pipeline

translator = pipeline("translation", model="Helsinki-NLP/opus-mt-fr-en")
translator("Ce cours est produit par Hugging Face.")

# [{'translation_text': 'This course is produced by Hugging Face.'}]
AutoXXX 方式
用 nn.module + class 方式构建可训练的model。
pipeline 封装代码主要用 autoXXX 实现,这种方式和现有 torch 以及 tf.keras 框架结合起来,本质上把这些预训练模型当作一个大型的model,相对于pipeline来说,封装的程度小一点
automodelforXXX 实际上帮你把下游对应的任务层搭建好
self.model = BertForSequenceClassification.from_pretrained(pretrain_Model_path,config=config)
# ==== auto 模式 ====
# pytorch
self.model = AutoModelForSequenceClassification.from_pretrained(pretrain_Model_path,config=config)
# tensorflow
from transformers import AutoTokenizer, TFAutoModelForSequenceClassification
model = TFAutoModelForSequenceClassification.from_pretrained(model_name)
# tf_model = TFAutoModelForSequenceClassification.from_pretrained(pt_save_directory, from_pt=True)
tokenizer = AutoTokenizer.from_pretrained(model_name)
完整代码
from transformers import AutoTokenizer, AutoModelForSequenceClassification
import torch

tokenizer = AutoTokenizer.from_pretrained("bert-base-cased-finetuned-mrpc")
model = AutoModelForSequenceClassification.from_pretrained("bert-base-cased-finetuned-mrpc")

classes = ["not paraphrase", "is paraphrase"]
sequence_0 = "The company HuggingFace is based in New York City"
sequence_1 = "Apples are especially bad for your health"
sequence_2 = "HuggingFace's headquarters are situated in Manhattan"

paraphrase = tokenizer(sequence_0, sequence_2, return_tensors="pt")
not_paraphrase = tokenizer(sequence_0, sequence_1, return_tensors="pt")

paraphrase_classification_logits = model(**paraphrase).logits
not_paraphrase_classification_logits = model(**not_paraphrase).logits

paraphrase_results = torch.softmax(paraphrase_classification_logits, dim=1).tolist()[0]
not_paraphrase_results = torch.softmax(not_paraphrase_classification_logits, dim=1).tolist()[0]
# Should be paraphrase
for i in range(len(classes)):
    print(f"{classes[i]}: {int(round(paraphrase_results[i] * 100))}%")
# Should not be paraphrase
for i in range(len(classes)):
    print(f"{classes[i]}: {int(round(not_paraphrase_results[i] * 100))}%")
finetune
官方示例代码: section4.ipynb
环境准备
!pip install datasets evaluate transformers[sentencepiece]
!pip install accelerate
bert finetune 代码
import torch
from torch.utils.data import DataLoader
from datasets import load_dataset
from tqdm.auto import tqdm

from transformers import AutoModelForSequenceClassification
from transformers import AutoTokenizer, DataCollatorWithPadding
from transformers import AdamW, get_scheduler

raw_datasets = load_dataset("glue", "mrpc")

checkpoint = "bert-base-uncased"
tokenizer = AutoTokenizer.from_pretrained(checkpoint)

def tokenize_function(example):
    return tokenizer(example["sentence1"], example["sentence2"], truncation=True)

tokenized_datasets = raw_datasets.map(tokenize_function, batched=True)
data_collator = DataCollatorWithPadding(tokenizer=tokenizer)
# 格式矫正: 提出冗余字段, label 重命名为 labels
tokenized_datasets = tokenized_datasets.remove_columns(["sentence1", "sentence2", "idx"])
tokenized_datasets = tokenized_datasets.rename_column("label", "labels")
tokenized_datasets.set_format("torch")
tokenized_datasets["train"].column_names

# 训练集
train_dataloader = DataLoader(
    tokenized_datasets["train"], shuffle=True, batch_size=8, collate_fn=data_collator
)
# 验证集
eval_dataloader = DataLoader(
    tokenized_datasets["validation"], batch_size=8, collate_fn=data_collator
)

# 模型初始化
model = AutoModelForSequenceClassification.from_pretrained(checkpoint, num_labels=2)
# 学习率衰减策略
optimizer = AdamW(model.parameters(), lr=3e-5)
outputs = model(**batch)
print(outputs.loss, outputs.logits.shape)

# 优化器
optimizer = AdamW(model.parameters(), lr=5e-5)
# 训练参数
num_epochs = 3
num_training_steps = num_epochs * len(train_dataloader)
lr_scheduler = get_scheduler(
    "linear",
    optimizer=optimizer,
    num_warmup_steps=0,
    num_training_steps=num_training_steps,
)
print(num_training_steps)

# cpu/gpu
device = torch.device("cuda") if torch.cuda.is_available() else torch.device("cpu")
model.to(device)
# 流式读取数据
progress_bar = tqdm(range(num_training_steps))
# 开启训练模式
model.train()
# 训练开始
for epoch in range(num_epochs):
    for batch in train_dataloader:
        batch = {k: v.to(device) for k, v in batch.items()}
        outputs = model(**batch)
        loss = outputs.loss
        loss.backward() # 计算梯度
        optimizer.step() # 梯度更新
        lr_scheduler.step() # 学习率更新
        optimizer.zero_grad() # 梯度重置
        progress_bar.update(1) # 数据batch更新

# 评估
import evaluate

metric = evaluate.load("glue", "mrpc")
model.eval()
for batch in eval_dataloader:
    batch = {k: v.to(device) for k, v in batch.items()}
    with torch.no_grad():
        outputs = model(**batch)

    logits = outputs.logits
    predictions = torch.argmax(logits, dim=-1)
    metric.add_batch(predictions=predictions, references=batch["labels"])

metric.compute()
accelerate 包
# -------------- accelerate --------------
from accelerate import Accelerator
from transformers import AdamW, AutoModelForSequenceClassification, get_scheduler

accelerator = Accelerator()

model = AutoModelForSequenceClassification.from_pretrained(checkpoint, num_labels=2)
optimizer = AdamW(model.parameters(), lr=3e-5)

train_dl, eval_dl, model, optimizer = accelerator.prepare(
    train_dataloader, eval_dataloader, model, optimizer
)

num_epochs = 3
num_training_steps = num_epochs * len(train_dl)
lr_scheduler = get_scheduler(
    "linear",
    optimizer=optimizer,
    num_warmup_steps=0,
    num_training_steps=num_training_steps,
)

progress_bar = tqdm(range(num_training_steps))

model.train()
for epoch in range(num_epochs):
    for batch in train_dl:
        outputs = model(**batch)
        loss = outputs.loss
        accelerator.backward(loss)

        optimizer.step()
        lr_scheduler.step()
        optimizer.zero_grad()
        progress_bar.update(1)
简易示例
import torch
from transformers import AdamW, AutoTokenizer, AutoModelForSequenceClassification

# Same as before
checkpoint = "bert-base-uncased"
tokenizer = AutoTokenizer.from_pretrained(checkpoint)
model = AutoModelForSequenceClassification.from_pretrained(checkpoint)
# 数据集
sequences = [
    "I've been waiting for a HuggingFace course my whole life.",
    "This course is amazing!",
]
batch = tokenizer(sequences, padding=True, truncation=True, return_tensors="pt")
# 定义 label
batch["labels"] = torch.tensor([1, 1])
# 定义 优化器
optimizer = AdamW(model.parameters())
# 计算 loss
loss = model(**batch).loss
# 计算梯度
loss.backward()
# 更新梯度
optimizer.step()
Trainer
from transformers import TrainingArguments, Trainer
import numpy as np
import evaluate
from transformers import AutoModelForSequenceClassification

model = AutoModelForSequenceClassification.from_pretrained("google-bert/bert-base-cased", num_labels=5)

# training_args = TrainingArguments(output_dir="test_trainer")
training_args = TrainingArguments(output_dir="test_trainer", evaluation_strategy="epoch")

metric = evaluate.load("accuracy")

def compute_metrics(eval_pred):
    logits, labels = eval_pred
    predictions = np.argmax(logits, axis=-1)
    return metric.compute(predictions=predictions, references=labels)

trainer = Trainer(
    model=model,
    args=training_args,
    train_dataset=small_train_dataset,
    eval_dataset=small_eval_dataset,
    compute_metrics=compute_metrics,
)
trainer.train()
分词
常见分词器
- Byte-level
BPE, 用于 GPT-2 WordPiece, 用于 BERTSentencePieceorUnigram, 用于多个多语言模型
详见站内专题 分词
tokenizer 原理
图解
tokenizer
图解 img
Huggingface 官方教程: 标记器(Tokenizer)
AutoTokenizer 类默认先加载 Fast tokenizer
- Fast 适合海量数据
- 少量数据时,两者速度差异不大
Fast tokenizer 和 Slow tokenizer 区别:
Slow tokenizer是在 Transformer 库中用 Python 编写。Fast tokenizer是在 Tokenizers 库中用 Rust 编写的
支持 tensorflow, pytorch, numpy
- 参数
return_tensors= pt/tf/np pt(pytorch),tf(tensorflow),np(numpy)
sequences = ["I've been waiting for a HuggingFace course my whole life.", "So have I!"]
# Returns PyTorch tensors
model_inputs = tokenizer(sequences, padding=True, return_tensors="pt")
# Returns TensorFlow tensors
model_inputs = tokenizer(sequences, padding=True, return_tensors="tf")
# Returns NumPy arrays
model_inputs = tokenizer(sequences, padding=True, return_tensors="np")

pt_batch = tokenizer(
    ["We are very happy to show you the 🤗 Transformers library.", "We hope you don't hate it."],
    padding=True, # 是否填充
    truncation=True, # 是否截断
    max_length=512, # 最大长度
    return_tensors="pt", # tf, np, 返回格式
)
完整示例
import torch
from transformers import AutoTokenizer, AutoModelForSequenceClassification

checkpoint = "distilbert-base-uncased-finetuned-sst-2-english"
tokenizer = AutoTokenizer.from_pretrained(checkpoint)
model = AutoModelForSequenceClassification.from_pretrained(checkpoint)
sequences = ["I've been waiting for a HuggingFace course my whole life.", "So have I!"]

tokens = tokenizer(sequences, padding=True, truncation=True, return_tensors="pt")
output = model(**tokens)
单句操作
代码示例
from transformers import AutoTokenizer, AutoModel
from bertviz import model_view

# 模型名称
model_version = "distilbert-base-uncased"
model_version = 'bert-base-chinese'

local_model_path = 'model' # 本地模型目录

tokenizer = AutoTokenizer.from_pretrained(model_version)

# model 加载
model = AutoModel.from_pretrained(model_version)
# 获取注意力层 output_attentions
# model = AutoModel.from_pretrained(model_version, output_attentions=True) # 输出注意力结果
# 获取隐含层+注意力层
pt_outputs = pt_model(**pt_batch, output_hidden_states= True, output_attentions=True)
all_hidden_states ,all_attentions = pt_outputs[-2:]

model = AutoModel.from_pretrained(model_version, cache_dir=local_model_path, output_attentions=True)
model = AutoModel.from_pretrained(save_directory, from_tf=True) # tf 模型

# model/tokenizer 保存
tokenizer.save_pretrained(local_model_path)
model.save_pretrained(local_model_path)

# (1) 测试: 单条句子
input_text = "Using a Transformer network is simple"

# ----- 编码 -----
# [分词] str -> token
tokens = tokenizer.tokenize(sequence) # ['Using', 'a', 'transform', '##er', 'network', 'is', 'simple']
# [id化] token -> id
ids = tokenizer.convert_tokens_to_ids(tokens) # [7993, 170, 11303, 1200, 2443, 1110, 3014]
# 一步到位: str -> token -> id
# [str->id] 1: 直接使用
inputs = tokenizer(input_text, return_tensors='pt')
# [str->id] 2: encoder 方法
inputs = tokenizer.encode(input_text, return_tensors='pt')
# inputs 结果: 注意, 增加了一个维度!
# tensor([[  101,  1045,  1005,  2310,  2042,  3403,  2005,  1037, 17662, 12172,
#           2607,  2026,  2878,  2166,  1012,   102]])

# ----- 解码 -----
# id -> token -> str
# ids = [7993, 170, 11303, 1200, 2443, 1110, 3014]
decoded_string = tokenizer.decode(ids) # 'Using a Transformer network is simple'

# 模型推理
outputs = model(inputs)
attention = outputs[-1]  # Output includes attention weights when output_attentions=True
# id -> tokens
tokens = tokenizer.convert_ids_to_tokens(inputs[0])

# (2) 测试: 多条句子
sentence_a = "老爸叫小宏去买酱油,"
sentence_b = "回来慢了就骂他。"
# 得到tokens后输入BERT模型获取注意力权重(attention)
inputs = tokenizer.encode_plus(sentence_a, sentence_b, return_tensors='pt', add_special_tokens=True)
token_type_ids = inputs['token_type_ids']
input_ids = inputs['input_ids']

attention = model(input_ids, token_type_ids=token_type_ids)[-1]
input_id_list = input_ids[0].tolist() # Batch index 0
tokens = tokenizer.convert_ids_to_tokens(input_id_list)
复杂操作
问题:
- 如何处理多个序列?
- 批处理: 允许模型在输入多个句子时工作。使用多个序列就像使用单个序列构建批一样简单
- 如何处理多个序列不同长度?
- 填充:
- 词汇索引是让模型正常工作的唯一输入吗?
- 是否存在序列太长的问题?
Batch 批输入
单个句子并不能直接输入给模型, 而是要组成batch结构
注意
- batch 模式下, 要启动 padding/truncate 参数
import torch
from transformers import AutoTokenizer, AutoModelForSequenceClassification

checkpoint = "distilbert-base-uncased-finetuned-sst-2-english"
tokenizer = AutoTokenizer.from_pretrained(checkpoint)
model = AutoModelForSequenceClassification.from_pretrained(checkpoint)

sequence = "I've been waiting for a HuggingFace course my whole life."

tokens = tokenizer.tokenize(sequence) # str -> token
ids = tokenizer.convert_tokens_to_ids(tokens) # token -> id
input_ids = torch.tensor(ids) # 错误做法: 直接 id -> tensor
# input_ids = torch.tensor([ids]) # 正确做法, 增加1个维度
# 直接输入model, 报错
model(input_ids)
错误信息
IndexError: Dimension out of range (expected to be in range of [-1, 0], but got 1)
Transformers 模型默认要多个句子, 解法: 新增一个维度, 构成 batch
input_ids = torch.tensor([ids])
# Input IDs: [[ 1045,  1005,  2310,  2042,  3403,  2005,  1037, 17662, 12172,  2607, 2026,  2878,  2166,  1012]]
output = model(input_ids)
# Logits: [[-2.7276,  2.8789]]
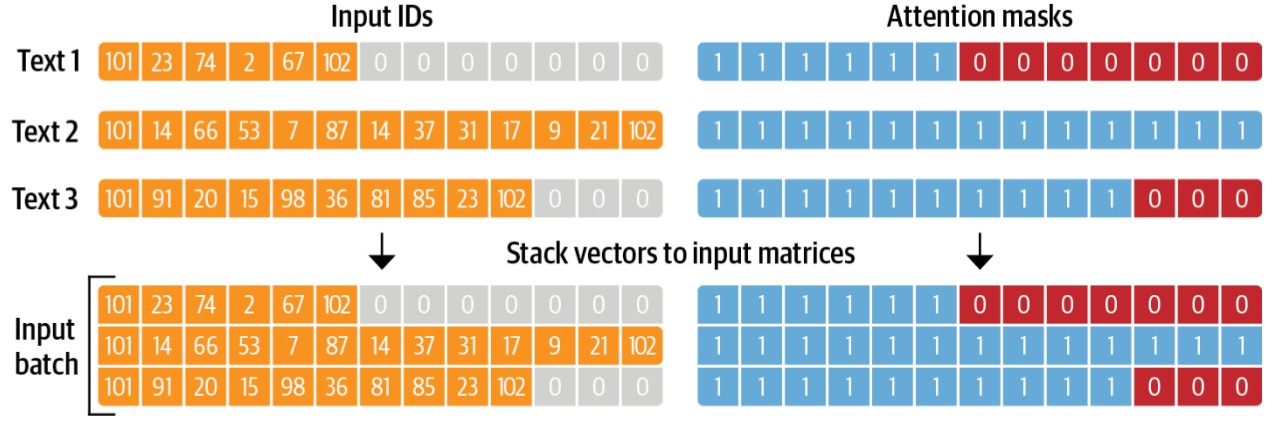
Padding 填充
一个batch内多个句子长度不同, 怎么办?
- 填充: 使张量变成矩形。
Padding 在短句中添加 Padding token 特殊单词, 确保所有句子长度相同。
如果有10个包含10个单词的句子和1个包含20个单词的句子,填充将确保所有句子都包含20个单词。
model = AutoModelForSequenceClassification.from_pretrained(checkpoint)

sequence1_ids = [[200, 200, 200]]
sequence2_ids = [[200, 200]]
batched_ids = [
    [200, 200, 200],
    [200, 200, tokenizer.pad_token_id],
]

print(model(torch.tensor(sequence1_ids)).logits)
print(model(torch.tensor(sequence2_ids)).logits)
print(model(torch.tensor(batched_ids)).logits)
# tensor([[ 1.5694, -1.3895]], grad_fn=<AddmmBackward>)
# tensor([[ 0.5803, -0.4125]], grad_fn=<AddmmBackward>)
# tensor([[ 1.5694, -1.3895],
#         [ 1.3373, -1.2163]], grad_fn=<AddmmBackward>)
问题
- 预测结果 logits 有问题:第二行应该与第二句 logits相同,但得到了完全不同的值
原因
- transformer 注意层计算时忽略了填充标记
不同填充策略
- left 左侧填充
- right 右侧填充
# Will pad the sequences up to the maximum sequence length
model_inputs = tokenizer(sequences, padding="longest") # 最长序列
# Will pad the sequences up to the model max length
# (512 for BERT or DistilBERT)
model_inputs = tokenizer(sequences, padding="max_length") # model 最大长度
# Will pad the sequences up to the specified max length
model_inputs = tokenizer(sequences, padding="max_length", max_length=8) # 自定义最大长度
Attention Mask 注意力掩码
Attention masks 与输入ID张量形状完全相同,用0和1填充:
- 1s表示应注意相应的标记
- 0s表示不应注意相应的标记, 即模型注意力层应忽略它们
batched_ids = [
    [200, 200, 200],
    [200, 200, tokenizer.pad_token_id],
]
# 注意力掩码
attention_mask = [
    [1, 1, 1],
    [1, 1, 0],
]

outputs = model(torch.tensor(batched_ids), attention_mask=torch.tensor(attention_mask))
print(outputs.logits)

# tensor([[ 1.5694, -1.3895],
#         [ 0.5803, -0.4125]], grad_fn=<AddmmBackward>)
长序列
Transformers模型序列长度有限。大多数模型处理多达 512 或 1024 个token 序列,当要求处理更长的序列时,会崩溃。
两种解决方案:
- (1) 使用更长序列长度的模型。
- (2) 截断序列。
模型有不同的支持序列长度,有些模型专门处理长序列。
- Longformer 是个例子
- 另一个是 LED .
否则,建议指定 max_sequence_length 参数:
sequence = sequence[:max_sequence_length]
截断策略
sequences = ["I've been waiting for a HuggingFace course my whole life.", "So have I!"]
# Will truncate the sequences that are longer than the model max length
# (512 for BERT or DistilBERT)
model_inputs = tokenizer(sequences, truncation=True)
# Will truncate the sequences that are longer than the specified max length
model_inputs = tokenizer(sequences, max_length=8, truncation=True)
特殊词符(token)
序列化时, 模型自动给句子加了特殊token
- 开头
[CLS], 结尾[SEP] - 注意: 有些模型
- 不添加特殊单词
- 添加不同单词;
- 只添加开头或结尾单词
使用模型训练时, 要清楚用了哪些特殊字符
sequence = "I've been waiting for a HuggingFace course my whole life."

model_inputs = tokenizer(sequence)
print(model_inputs["input_ids"])
# [101, 1045, 1005, 2310, 2042, 3403, 2005, 1037, 17662, 12172, 2607, 2026, 2878, 2166, 1012, 102]
tokens = tokenizer.tokenize(sequence)
ids = tokenizer.convert_tokens_to_ids(tokens)
print(ids)
# [1045, 1005, 2310, 2042, 3403, 2005, 1037, 17662, 12172, 2607, 2026, 2878, 2166, 1012]

print(tokenizer.decode(model_inputs["input_ids"]))
# "[CLS] i've been waiting for a huggingface course my whole life. [SEP]"
print(tokenizer.decode(ids))
# "i've been waiting for a huggingface course my whole life."
数据
数据集工具包 huggingface datasets
load_dataset 函数
datasets.load_dataset(
	path: str,
    name: Optional[str] = None,
    data_dir: Optional[str] = None,
    data_files: Optional[Union[str, Sequence[str], Mapping[str, Union[str, Sequence[str]]]]] = None,
    split: Optional[Union[str, Split]] = None,
    cache_dir: Optional[str] = None,
    features: Optional[Features] = None,
    download_config: Optional[DownloadConfig] = None,
    download_mode: Optional[DownloadMode] = None,
    ignore_verifications: bool = False,
    keep_in_memory: Optional[bool] = None,
    save_infos: bool = False,
    revision: Optional[Union[str, Version]] = None,
    use_auth_token: Optional[Union[bool, str]] = None,
    task: Optional[Union[str, TaskTemplate]] = None,
    streaming: bool = False,
    **config_kwargs
    )
函数说明
load_dataset函数从 Hugging Face Hub 或本地数据集文件中加载一个数据集。可以通过 datasets 或者datasets.list_datasets()获取所有可用数据集。- 参数
path表示数据集的名字/路径。- 数据集名字: 比如”imdb”、“glue”;
- 数据集生成脚本: 比如 “json”、“csv”、“parquet”、“text”;
- 数据集目录中的脚本(.py)文件,比如“glue/glue.py”
- 参数
name表示数据集中的子数据集- 当一个数据集包含多个数据集时,需要这个参数。比如”glue”数据集下就包含”sst2”、“cola”、”qqp”等多个子数据集,此时就需要指定name来表示加载哪一个子数据集。
- 参数
data_dir数据集所在的目录- 参数
data_files表示本地数据集文件。
- 参数
- 参数
split- 如果为 None,则返回 DataDict 对象,包含多个 DataSet 数据集对象;
- 如果给定,则返回单个 DataSet 对象。
- 参数
cache_dir表示缓存数据的目录- 默认为
~/.cache/huggingface/datasets
- 默认为
- 参数
keep_in_memory是否将数据集缓存在内存中,加载一次后,再次加载可以提高加载速度。 - 参数
revision加载数据集的脚本版本。
远程数据集
import datasets

dataset = datasets.load_dataset("imdb") # imdb 数据集
# 加载glue下的cola子数据集
dataset = datasets.load_dataset("glue", name="cola")
# csv脚本加载本地的test.tsv文件中的数据集
dataset = datasets.load_dataset("csv", data_dir="./test", data_files="test.tsv")
# 本地glue.py脚本文件加载远程cola数据集
dataset_1 = datasets.load_dataset("../dataset/glue/glue.py", name="cola")
# 与上一个等价
dataset_2 = datasets.load_dataset("../dataset/glue", name="cola")
from datasets import load_dataset

raw_datasets = load_dataset("glue", "mrpc")
# 数据格式
raw_train_dataset.features
# 访问数据
raw_datasets
raw_train_dataset = raw_datasets["train"]
raw_train_dataset[0]
输出
- DatasetDict对象,其中包含训练集、验证集和测试集。
- 每个集合都包含几个列(sentence1, sentence2, label, and idx) 以及一个代表行数的变量,即每个集合中的行的个数
- 数据集默认缓存到
~/.cache/huggingface/datasets. - 可通过设置
HF_HOME环境变量来自定义缓存文件夹
DatasetDict({
    train: Dataset({
        features: ['sentence1', 'sentence2', 'label', 'idx'],
        num_rows: 3668
    })
    validation: Dataset({
        features: ['sentence1', 'sentence2', 'label', 'idx'],
        num_rows: 408
    })
    test: Dataset({
        features: ['sentence1', 'sentence2', 'label', 'idx'],
        num_rows: 1725
    })
})
# ['sentence1', 'sentence2', 'label', 'idx']
{'sentence1': Value(dtype='string', id=None),
 'sentence2': Value(dtype='string', id=None),
 'label': ClassLabel(num_classes=2, names=['not_equivalent', 'equivalent'], names_file=None, id=None),
 'idx': Value(dtype='int32', id=None)}
# 取数
{'idx': 0,
 'label': 1,
 'sentence1': 'Amrozi accused his brother , whom he called " the witness " , of deliberately distorting his evidence .',
 'sentence2': 'Referring to him as only " the witness " , Amrozi accused his brother of deliberately distorting his evidence .'
}
本地数据集
【2024-4-22】错误
  File "/usr/local/lib/python3.9/dist-packages/datasets/load.py", line 1780, in dataset_module_factory
    raise ConnectionError(f"Couldn't reach '{path}' on the Hub ({type(e).__name__})")
ConnectionError: Couldn't reach 'wikitext' on the Hub (ConnectTimeout)
服务器访问不了外网,如何读取本地数据集?
- 首先,下载并存储数据
- 然后,把数据集上传到指定服务器地址,并进行本地加载
import datasets

local_path = '.' # 本地缓存目录
all_data = datasets.load_dataset('imdb')
# 子集
dataset = load_dataset("Salesforce/dialogstudio", "TweetSumm")
# 缓存到本地, 目录名 imdb, 再次执行会报错
# ValueError: Invalid pattern: '**' can only be an entire path component
all_data = datasets.load_dataset('imdb', cache_dir=local_path)
# 划分训练集、测试集
train_data, test_data = datasets.load_dataset('imdb', split =['train', 'test'], cache_dir=local_path)
# 通过csv脚本加载本地的test.tsv文件中的数据集
dataset = datasets.load_dataset("csv", data_dir="./test", data_files="test.tsv")
# 多种加载形式
dataset = datasets.load_dataset('csv', data_files='my_file.csv') # 单个文件
dataset = datasets.load_dataset('csv', data_files=['my_file_1.csv', 'my_file_2.csv', 'my_file_3.csv']) # 多文件, list 形式
dataset = datasets.load_dataset('csv', data_files={'train':['my_train_file_1.csv','my_train_file_2.csv'],'test': 'my_test_file.csv'}) # 多文件, dict 形式

# 手工保存到本地
all_data.save_to_disk('my_imdb')
all_data.to_csv('my_imdb')
all_data.to_json('my_imdb')
# 加载本地数据集
new_data = datasets.load_from_disk('my_imdb')
【2024-5-8】再次执行报错
ValueError: Invalid pattern: '**' can only be an entire path component
原因
- 本地有数据集同名目录,改名即可
注意:
- 保存数据集所用机器上 datasets版本和使用本地数据集的datasets的版本要一致才行,不然可能会出现数据集加载错误的情况。
dataset = load_dataset("json", data_dir='data', data_files="data/train_dataset.json", split="train")
内存数据集
内存加载数据
支持从内存中加载字典或者 DafaFrame(pandas)数据结构的数据,具体操作示例如下:
# 从字典导入数据
from datasets import Dataset

my_dict = {"a": [1, 2, 3]}
dataset = Dataset.from_dict(my_dict) # 从dataFrame导入数据

import pandas as pd
df = pd.DataFrame({"a": [1, 2, 3]})
dataset = Dataset.from_pandas(df)
自定义数据集
加载自定义数据, 只需要继承类(torch.util.data.Dataset),并且覆写 __len__ 和 __getitem__ 两个方法
- 不覆写会直接返回错误。
class MyDataset(Dataset):
    def __init__(self, ...):
        ...

    def __len__(self):
        ...
        return len # 返回数据集数据个数

    def __getitem__(self, index):
        ...
        return image, label # 返回第 index 个数据 + 标签
步骤:
- 继承
torch.util.data.Dataset __init__:改写__init__函数时,要添加对父类的初始化,一些参数初始化工作,定义一些路径或者变量__getitem__: 加载数据,用于读取每一条数据,有个参数idx,对应的索引,用来获取一些索引的数据,使dataset[i]返回数据集中第i个样本。__len__:实现 len(dataset), 返回整个数据集的大小
示例
# 加载数据集,自己重写DataSet类
class dataset(Dataset):
    # image_dir为数据目录,label_file,为标签文件
    def __init__(self, image_dir, label_file, transform=None):
        super(dataset, self).__init__()    # 添加对父类的初始化
        self.image_dir = image_dir         # 图像文件所在路径
        self.labels = read(label_file)     # 图像对应的标签文件, read label_file之后的结果
        self.transform = transform         # 数据转换操作
        self.images = os.listdir(self.image_dir )#目录里的所有img文件

    # 加载每一项数据
    def __getitem__(self, idx):
        image_index = self.images[index]    #根据索引index获取该图片
        img_path = os.path.join(self.image_dir, image_index) #获取索引为index的图片的路径名
        labels = self.labels[index]   # 对应标签

        image = Image.open(img_name)
        if self.transform:
            image = self.transform(image)
        # 返回一张照片,一个标签
        return image, labels

    # 数据集大小
    def __len__(self):
        return (len(self.images))

if __name__ == '__main__':
    data = AnimalData(img_dir_path, label_file, transform=None) # 初始化类,设置数据集所在路径以及变换
    dataloader = DataLoader(data, batch_size=128, shuffle=True) # 使用DataLoader加载数据
    for i_batch,batch_data in enumerate(dataloader):
        print(i_batch)#打印batch编号
        print(batch_data['image'].size())#打印该batch里面图片的大小
        print(batch_data['label'])#打印该batch里面图片的标签
数据处理
数据查看
加载完数据后, 看看有那些内容
- 整个数据集划分成了多个数据子集,包含train,valid以及test集。
- 每个arrow_dataset都有多少条数据
- 这些数据的feature是什么
| 数据格式 | 函数 |
|---|---|
| Arrow | save_to_disk() |
| CSV | to_csv() |
| JSON | to_json() |
简单两行代码导入数据,然后打印出来看一下;
from datasets import load_dataset

# datasets = load_dataset('cail2018')
datasets = load_dataset('imdb')
print(datasets)  # 查看数据的结构
datasets['train'] # type: datasets.arrow_dataset.Dataset
# DatasetDict({
#     train: Dataset({
#         features: ['text', 'label'],
#         num_rows: 25000
#     })
#     test: Dataset({
#         features: ['text', 'label'],
#         num_rows: 25000
#     })
#     unsupervised: Dataset({
#         features: ['text', 'label'],
#         num_rows: 50000
#     })
# })

datasets = load_dataset('cail2018',split='exercise_contest_test') # 如果知道数据结构,在load的时候就可以用split只load进来一部分数据;
# 从数据集里面取数据
datasets_sample = datasets[ "exercise_contest_train" ].shuffle(seed=42).select(range(1000))
# 这里就是从cail2018这个数据集里面的,exercise_contest_train这部分数据,随机抽取1000个数据
# 从这个里面切片取数如下所示,规律和np或者dataframe的数据结构形式是一样的。
print(datasets_sample[10:15] )
数据转换
from datasets import load_dataset
datasets = load_dataset('cail2018')
print(datasets)  # 查看数据的结构


def add_prefix(example):
    example["fact"] = "案件详情: " + example["fact"]
    return example
# shuffle 打乱
datasets_sample = datasets[ "exercise_contest_train" ].shuffle(seed= 42 ).select( range ( 1000 ))
# map 映射: 逐元素处理
datasets_sample = datasets_sample.map(add_prefix)
print(datasets_sample[:3] )
# filter 过滤
drug_dataset = drug_dataset.filter(lambda x: x["condition"] is not None)
# sort 排序
datasets_sample = datasets_sample.sort('punish_of_money') # 按照被罚金额排序,是从大到小的,这个排序似乎没法改,看了下参数没找到改成从小到大的。。。。
# set_format 格式转化: [None, 'numpy', 'torch', 'tensorflow', 'pandas', 'arrow'] None 默认
datasets_sample.set_format("pandas") # 转换为pandas的dataFrame结构,这处理起来还不是手拿把掐的


# 生成新列
from datasets import load_dataset , Dataset
dataset = Dataset.from_dict({"a": [0, 1, 2]})
dataset = dataset.map(lambda batch: {"b": batch["a"]*2})
# 这里给数据dataset产生一个新的列b,请注意处理的时候要注意,新的列长度必须和原来一致;
如何加载大数据
加载超大型的语料,占用内存是加载语料的几倍。比如gpt-2训练的40G语料,可能会让内存爆掉。
huggingface设计了两个机制来解决这个问题,第一个是将数据集视为“内存映射”文件,第二个是“流式传输”语料库。
- 内存映射:通过Apache Arrow内存格式和pyarrow库实现的,huggingface已经自己处理好了,网站上官方测试的情况大概是0.3gb/s。
- 流式传输:因为很多语料库非常的大(比如pile多达800多G),下载到本地硬盘还是有些吃不消呀,因此huggingface设置了流式传输,类似于视频网站的操作,本地有个缓冲区大小固定,然后不停的迭代新数据。假设缓冲区数据一共10000条,当你处理第一条的时候,他就加载第10001条数据。
示例代码:
- 只需要设置 streaming= True 即可,这个load上来的数据是一个可迭代对象,之后的处理与前面介绍的一样。
pubmed_dataset_streamed = load_dataset( "json" , data_files=data_files, split= "train" , streaming= True )
模型
Transformer 模型可以分为三类:
- GPT-like (
自回归Transformer模型) - BERT-like (
自编码Transformer模型) - BART/T5-like (
序列到序列的 Transformer模型)
模型信息
从 hf 下载的模型,常见文件
- 配置文件
config.json - 词典文件
vocab.json - 预训练模型文件
- 如果用 pytorch, 则保存
pytorch_model.bin - 如果用 tensorflow 2,则保存
tf_model.h5
- 如果用 pytorch, 则保存
额外的文件
- merges.txt、special_tokens_map.json、added_tokens.json、tokenizer_config.json、sentencepiece.bpe.model等
这几类是 tokenizer 需要使用的文件
以 GPT-2 模型为例
# 默认下载目录
ls ~/.cache/huggingface/hub/models--gpt2/*
# 3 个子目录: blobs, refs, snapshots
~/.cache/huggingface/hub/models--gpt2/blobs:
# 10c66461e4c109db5a2196bff4bb59be30396ed8
# 3dc481ecc3b2c47a06ab4e20dba9d7f4b447bdf3
# 248dfc3911869ec493c76e65bf2fcf7f615828b0254c12b473182f0f81d3a707  # 523M
~/.cache/huggingface/hub/models--gpt2/refs:
# main
~/.cache/huggingface/hub/models--gpt2/snapshots:
# 607a30d783dfa663caf39e06633721c8d4cfcd7e
# 子目录下有3个文件: config.json, generation_config.json, model.safetensors
格式转换
mkdir -p Helsinki-NLP/opus-mt-zh-en
cd Helsinki-NLP/opus-mt-zh-en/
cp ~/.cache/huggingface/hub/models--Helsinki-NLP--opus-mt-zh-en/blobs/0ab361451ecc57b6223303c7b52e216ff40dc7e6 source.spm
cp ~/.cache/huggingface/hub/models--Helsinki-NLP--opus-mt-zh-en/blobs/3be15dddf54535a2257b485f32c8f9226352d5c4 vocab.json
cp ~/.cache/huggingface/hub/models--Helsinki-NLP--opus-mt-zh-en/blobs/60000ab989b1eec84f7b0299368f9dd498cdab61 tokenizer_config.json
cp ~/.cache/huggingface/hub/models--Helsinki-NLP--opus-mt-zh-en/blobs/710dcdf966ec0aa5b3d991a35264c7cb174ccf14 config.json
cp ~/.cache/huggingface/hub/models--Helsinki-NLP--opus-mt-zh-en/blobs/878ae3c6ca6afea7971e3be0b18debdd0d41e3ea target.spm
cp ~/.cache/huggingface/hub/models--Helsinki-NLP--opus-mt-zh-en/blobs/a43af728d2ddefe1ed73656ce004be6391c02e0a generation_config.json
cp ~/.cache/huggingface/hub/models--Helsinki-NLP--opus-mt-zh-en/blobs/9d8ceb91d103ef89400c9d9d62328b4858743cf8924878aee3b8afc594242ce0 pytorch_model.bin
模型导入
导入方法
- 默认自动从远程下载模型
- 前提:能联网
- 默认保存路径:
~/.cache/huggingface/hub/
- 可以本地导入
from transformers import AutoTokenizer, AutoModelForCausalLM

model_name = "distilgpt2"
tokenizer = AutoTokenizer.from_pretrained(model_name)
model = AutoModelForCausalLM.from_pretrained(model_name)
【2024-5-8】transformers 中有哪些包可用?
- 见官方源码 transformers/init.py
如果传入的是目录, 则从中找 vocab.json、pytorch_model.bin、tf_model.h5、merges.txt、special_tokens_map.json、added_tokens.json、tokenizer_config.json、sentencepiece.bpe.model等进行加载。
远程导入
方法
- 使用repo id下载到缓存并加载
- 默认下载到
~/.cache/huggingface/hub/models–Helsinki-NLP–opus-mt-zh-en - 缓存目录:
blobs,refs,snapshots - 其中 snapshots 包含多个md5字符串的目录, 对应不同版本, 其中任意一个包含实际模型文件信息(config.json,generation_config.json, tokenizer_config.json, pytorch_model.bin等)
- 默认下载到
- 本地路径,避免访问 http://huggingface.co,从而迅速加载模型
from transformers import BertTokenizer, BertModel

# ① 使用repo id下载到缓存并加载
model_name = 'Helsinki-NLP/opus-mt-zh-en'
model_name = 'bert-base-chinese'
model_path = '/tmp/model'

# 每次执行时都下载远程模型
tokenizer = BertTokenizer.from_pretrained(model_name)
model = BertModel.from_pretrained(model_name)

tokenizer.save_pretrained(model_path)
model.save_pretrained(model_path)

# 每次执行时先检查本地是否存在,再远程下载
tokenizer = BertTokenizer.from_pretrained(model_name, cache_dir=model_path)
model = BertModel.from_pretrained(model_name, cache_dir=model_path)
# 只从本地加载,没有就报错
tokenizer = BertTokenizer.from_pretrained(model_name, local_files_only=True)
model = BertModel.from_pretrained(model_name, local_files_only=True)
本地导入
无法联网时,读取预训练模型会失败
解法
- 下载模型:huggingface 官网 Files and versions 下载几个文件
- 模型
配置文件config.json
- pytorch
模型文件pytorch_model.bin
- tokenizer
分词文件tokenizer.jsontokenizer_config.jsonvocab.txt
- 模型
- 本地导入
- 改成本地目录
- 额外读取 config 信息
AutoTokenizer
- 只会从传入路径找 tokenizer_config.json 文件
- 找到后,所有的加载内容都以 tokenizer_config.json 中内容为准,这里的“auto_map”告诉加载器要去哪里找对应的tokenizer类,前半段的路径标记的就是去哪里找
.py文件,使用--分割后面的就是指的对应的python文件中的Tokenizer类
from transformers import BertTokenizer, BertModel

# config 文件
config = BertConfig.from_json_file("bert-base-chinese/config.json")
# tokenizer = BertTokenizer.from_pretrained('bert-base-chinese')
# model = BertModel.from_pretrained('bert-base-chinese')
tokenizer = BertTokenizer.from_pretrained('bert-base-chinese/') # 此处为本地文件夹,包含 tokenizer_config.json 文件
model = BertModel.from_pretrained("bert-base-chinese/pytorch_model.bin", config=config)
【2024-5-14】本地模型加载实践
from datasets import load_dataset, load_from_disk
from transformers import AutoConfig, AutoTokenizer, DataCollatorWithPadding
from transformers import AutoModelForSequenceClassification

local_dir = '/mnt/bn/flow-algo-cn/wangqiwen'

# 数据集加载
# raw_datasets = load_dataset("glue", "mrpc") # 远程数据集
local_data = f'{local_dir}/data/my_imdb'
local_model = f'{local_dir}/model/bigbird'
print(f'本地数据目录: {local_data}\n本地模型目录:{local_model}')

raw_datasets = load_from_disk(local_data) # 本地数据集

# model_name = "bert-base-uncased"
model_name = 'bigbird-roberta-base'
model_path = f'{local_model}/{model_name}'
model_file = f"{model_path}/pytorch_model.bin"

# 远程模型
# tokenizer = AutoTokenizer.from_pretrained(model_name, cache_dir=local_model)
# model = AutoModelForSequenceClassification.from_pretrained(model_name, cache_dir=local_model)

# 加载本地模型: 配置文件、分词器、模型文件
config = AutoConfig.from_pretrained(f"{local_model}/{model_name}/config.json") # 配置文件
tokenizer = AutoTokenizer.from_pretrained(model_path) # 分词器, tokenizer_config.json
model = AutoModelForSequenceClassification.from_pretrained(model_file, config=config) # 本地模型
模型下载
- 在huggingface模型库里选择需要的预训练模型并下载。
- 例如,点击
bert-base-uncased以后点Files and versions手动下载。 - 只要点击对应文件的下载(↓), 然而要通过from_pretrained方法加载,还需要把模型文件名改成pytorch_model.bin
- 例如,点击
- 这样下载的模型有损,后续无法使用,因此最好是通过git下载
这种方法麻烦
- Git lfs 方案要简洁得多 – 优雅但不灵活
- 问题:会下载仓库所有文件,大大延长模型下载时间
- HuggingFace Hub: 精准下载
官方访问受限?使用国内镜像
# ~/.bashrc 添加,否则 每次下载时都需要先输入该命令
export HF_ENDPOINT=https://hf-mirror.com
参考
(0) 自动下载
模型文件导入
- 默认保存路径:
~/.cache/huggingface/hub/
from transformers import AutoTokenizer, AutoModelForCausalLM

model_name = "distilgpt2"
tokenizer = AutoTokenizer.from_pretrained(model_name)
model = AutoModelForCausalLM.from_pretrained(model_name)

# ---- 示例 -----
import transformers

MODEL_PATH = "./transformr_files/bert-base-uncased/"
# a.通过词典导入分词器
tokenizer = transformers.BertTokenizer.from_pretrained(f"{MODEL_PATH}/bert-base-uncased-vocab.txt")
# b. 导入配置文件
model_config = transformers.BertConfig.from_pretrained(MODEL_PATH)
# 【2023-2-22】默认保存路径:~/.cache/huggingface/hub/
tokenizer = BertTokenizer.from_pretrained(model_name, cache_dir='./transformers/')	# cache_dir表示将预训练文件下载到本地指定文件夹下,而不是默认路径

# 修改配置
model_config.output_hidden_states = True
model_config.output_attentions = True
# 通过配置和路径导入模型
model = transformers.BertModel.from_pretrained(MODEL_PATH,config = model_config)
(1) HuggingFace Hub 精准下载
通过 huggingface hub 下载模型时,模型文件是blob编码
- 因为 huggingface_hub 默认下载以系统全局缓存形式保存。
- 只需要通过修改
snapshot_download(local_dir_use_symlinks=False)即可以得到正常的文件形式
hf_hub_download
#! pip install huggingface_hub

from huggingface_hub import hf_hub_download
import joblib

REPO_ID = "YOUR_REPO_ID"
FILENAME = "sklearn_model.joblib"

model = joblib.load(
    hf_hub_download(repo_id=REPO_ID, filename=FILENAME)
)

from huggingface_hub import hf_hub_download
# 下载单个文件
hf_hub_download(repo_id="lysandre/arxiv-nlp", filename="config.json")
hf_hub_download(repo_id="google/fleurs", filename="fleurs.py", repo_type="dataset")
# 下载特定版本
hf_hub_download(repo_id="lysandre/arxiv-nlp", filename="config.json", revision="v1.0")
hf_hub_download(repo_id="lysandre/arxiv-nlp", filename="config.json", revision="test-branch")
hf_hub_download(repo_id="lysandre/arxiv-nlp", filename="config.json", revision="refs/pr/3")
hf_hub_download(repo_id="lysandre/arxiv-nlp", filename="config.json", revision="877b84a8f93f2d619faa2a6e514a32beef88ab0a")
snapshot_download
snaphot_download方法提供了allow_regex和ignore_regex两个参数,前者是对指定的匹配项进行下载,后者是忽略指定的匹配项,下载其余部分。
# 下载整个代码库
from huggingface_hub import snapshot_download
#    snapshot_download() 默认下载最新的修订版本
snapshot_download(repo_id="lysandre/arxiv-nlp")
snapshot_download(repo_id="google/fleurs", repo_type="dataset")
snapshot_download(repo_id="lysandre/arxiv-nlp", revision="refs/pr/1") # 特定版本
snapshot_download(repo_id="lysandre/arxiv-nlp", allow_patterns="*.json") # 指定要下载的文件类型
snapshot_download(repo_id="lysandre/arxiv-nlp", ignore_patterns=["*.msgpack", "*.h5"]) # 忽略哪些文件
# 实例: 过滤某些文件
snapshot_download(repo_id="bert-base-chinese")
snapshot_download(repo_id="bert-base-chinese", ignore_regex=["*.h5", "*.ot", "*.msgpack"])
使用 huggingface_hub 工具创建、删除、更新和索引模型库
# python -m pip install huggingface_hub
from huggingface_hub import hf_hub_download
import joblib

REPO_ID = "YOUR_REPO_ID" # 同 model_name
FILENAME = "sklearn_model.joblib"

hf_hub_download(repo_id="bigscience/T0_3B", filename="config.json", cache_dir="./your/path/bigscience_t0")
# 或
model = joblib.load(
    hf_hub_download(repo_id=REPO_ID, filename=FILENAME)
)
# 使用
from transformers import AutoConfig
config = AutoConfig.from_pretrained("./your/path/bigscience_t0/config.json")
(2) huggingface-cli 单文件下载
【2026-3-13】错误信息
$ huggingface-cli login
bash: huggingface-cli: command not found
这种情况通常出现在未安装 CLI、安装版本过旧或 PATH 未配置的情况下。
解决
- 直接安装新版 CLI 工具。
- Hugging Face 已将 huggingface-cli 更名为
hf或hf-cli
推荐使用以下命令安装:
pip install -U "huggingface_hub[cli]"
# 或者
pip install hf-cli
安装完成后,以下命令验证:
hf --help
hf auth login # 登录
# 输入在 Hugging Face 账户设置中生成的 Access Token 即可完成认证。

# 正常使用 CLI,例如下载模型:
hf download gpt2 config.json
huggingface-cli download --resume-download Qwen/Qwen2.5-VL-7B-Instruct --local-dir ./model # 模型都下载在当前终端的地址下
# [2026-3-27] 实践通过
hf download  Qwen/Qwen3.5-0.8B --local-dir ./model
huggingface-cli 命令直接从Hub下载文件。
- 内部使用
hf_hub_download()和snapshot_download()助手,并将返回路径打印到终端 - 文件将被下载到由
HF_HOME环境变量定义的缓存目录中(如果未指定,则为~/.cache/huggingface/hub)
# 查看可用参数
huggingface-cli download --help
# 下载单个文件
huggingface-cli download gpt2 config.json
#~/.cache/huggingface/hub/models--gpt2/snapshots/11c5a3d5811f50298f278a704980280950aedb10/config.json
huggingface-cli download google/gemma-7b-it-pytorch
# [2024-5-6] merlin 上执行失,败403, mac 本地成功
huggingface-cli download google/bigbird-roberta-large --local-dir=. --quiet
# 指定身份
huggingface-cli download gpt2 config.json --token=hf_****
#/home/wauplin/.cache/huggingface/hub/models--gpt2/snapshots/11c5a3d5811f50298f278a704980280950aedb10/config.json
# 同事下载多个文件,并进度条显示
huggingface-cli download gpt2 config.json model.safetensors
# 进度条静音
huggingface-cli download gpt2 config.json model.safetensors --quiet
# 指定目录
huggingface-cli download gpt2 config.json --cache-dir=./cache
# 下载到本地文件夹,而不带缓存目录结构,则可用 --local-dir
huggingface-cli download gpt2 config.json --local-dir=./models/gpt2
# 指定不同类型的仓库或版本来下载,并使用glob模式包含/排除要下载的文件
huggingface-cli download bigcode/the-stack --repo-type=dataset --revision=v1.2 --include="data/python/*" --exclude="*.json" --exclude="*.zip"
(3) git lfs 优雅但不灵活
# mac下
brew install git-lfs
apt get install git-lfs # ubuntu
git lfs install
git clone https://huggingface.co/bert-base-chinese
# 或
git lfs clone https://huggingface.co/stabilityai/sd-vae-ft-mse
# git clone https://huggingface.co/lmsys/vicuna-13b-delta-v0
# git clone git@hf.co:bigscience/bloom
# git clone https://huggingface.co/LinkSoul/Chinese-Llama-2-7b
GIT_LFS_SKIP_SMUDGE=1 # 只下载 pointer 文件,不下大文件
# 在当前目录新建一个 models 文件夹用来存放大模型
# 只下载特定文件
git lfs clone --include="*.bin" [HF_REPO]
(4) hf_transfer
hf_transfer是一个基于Rust开发的库,用于加速与Hub的文件传输
- 安装该包
pip install hf_transfer - 并将
HF_HUB_ENABLE_HF_TRANSFER=1设置为环境变量
模型不同点
关于transformers库中不同模型的Tokenizer
不同PLM原始论文和transformers库中数据的组织格式。其实,像Roberta,XLM等模型的中< s>, < /s>是可以等价于Bert中的[CLS], [SEP]的,只不过不同作者的习惯不同。
# Bert
单句:[CLS] A [SEP]
句对:[CLS] A [SEP] A [SEP]
# Roberta
单句:<s> A </s>
句对:<s> A </s> </s> B </s>
# Albert
单句:[CLS] A [SEP]
句对:[CLS] A [SEP] B [SEP]
# XLNet
单句:[A] <sep> <cls>
句对:A <sep> B <sep> <cls>
# XLM
单句:<s> A </s>
句对:<s> A </s> B </s>
# XLM-Roberta
单句:<s> A </s>
句对:<s> A </s> </s> B </s>
# Bart
单句:<s> A </s>
句对:<s> A </s> </s> B </s>
transformers库中RobertaTokenizer和BertTokenizer的不同
- transformers库中
RobertaTokenizer需要同时读取vocab_file和merges_file两个文件,不同于BertTokenizer只需要读取vocab_file一个词文件。主要原因是两种模型采用的编码不同: - Bert采用的是字符级别的BPE编码,直接生成词表文件,官方词表中包含3w左右的单词,每个单词在词表中的位置即对应Embedding中的索引,Bert预留了100个[unused]位置,便于使用者将自己数据中重要的token手动添加到词表中。
- Roberta采用的是byte级别的BPE编码,官方词表包含5w多的byte级别的token。merges.txt中存储了所有的token,而vocab.json则是一个byte到索引的映射,通常频率越高的byte索引越小。所以转换的过程是,先将输入的所有tokens转化为merges.txt中对应的byte,再通过vocab.json中的字典进行byte到索引的转化。
由于中文的特殊性不太适合采用byte级别的编码,所以大部分开源的中文Roberta预训练模型仍然采用的是单字词表,所以直接使用BertTokenizer读取即可, 不需要使用RobertaTokenizer。
模型保存
tokenizer.save_pretrained(save_directory) # 保存词表
model.save_pretrained(save_directory) # 保存模型
保存后的结果
- config.json 模型结构信息
- pytorch_model.bin 模型所有权重
Safetensors
Safetensors 是一种用于在移动设备上运行模型的文件格式。 安全性、快速加载和兼容性等优点。
- 将模型转换为Safetensors文件格式,可在移动设备上高效地加载和运行模型,同时保护模型的实现和逻辑
Hugging Face 开发 Safetensors的新序列化格式
- 简化和精简大型复杂张量的存储和加载。
张量是深度学习中使用的主要数据结构,其大小会给效率带来挑战。
- Safetensors结合使用高效的序列化和压缩算法来减少大型张量的大小,使其比pickle等其他序列化格式更快、更高效。
- 与传统PyTorch序列化格式
pytorch_model.bin和model.safetensors相比,Safetensors在CPU上的速度快76.6倍,在GPU上的速度快2倍。
Safetensors API 适用于: Pytorch、Tensorflow、PaddlePaddle、Flax和Numpy
安装
pip install safetensors
创建模型
from torch import nn

class Model(nn.Module):
    def __init__(self):
        super().__init__()
        self.a = nn.Linear(100, 100)
        self.b = self.a

    def forward(self, x):
        return self.b(self.a(x))


model = Model()
print(model.state_dict())
模型导入导出
from safetensors.torch import load_model, save_model

save_model(model, "model.safetensors")

load_model(model, "model.safetensors")
print(model.state_dict())
# OrderedDict([('a.weight', tensor([[-0.0913, 0.0470, -0.0209, ..., -0.0540, -0.0575, -0.0679], [ 0.0268, 0.0765, 0.0952, ..., -0.0616, 0.0146, -0.0343], [ 0.0216, 0.0444, -0.0347, ..., -0.0546, 0.0036, -0.0454], ...,
张量导入、导出
import torch
from safetensors.torch import save_file, load_file

tensors = {
   "weight1": torch.zeros((1024, 1024)),
   "weight2": torch.zeros((1024, 1024))
}
save_file(tensors, "new_model.safetensors")
load_file("new_model.safetensors")
GPU
【2023-2-22】Efficient Training on Multiple GPUs
The following is the brief description of the main concepts that will be described later in depth in this document.
- DataParallel (
DP) - the same setup is replicated multiple times, and each being fed a slice of the data. The processing is done in parallel and all setups are synchronized at the end of each training step. - TensorParallel (
TP) - each tensor is split up into multiple chunks, so instead of having the whole tensor reside on a single gpu, each shard of the tensor resides on its designated gpu. During processing each shard gets processed separately and in parallel on different GPUs and the results are synced at the end of the step. This is what one may call horizontal parallelism, as the splitting happens on horizontal level. - PipelineParallel (
PP) - the model is split up vertically (layer-level) across multiple GPUs, so that only one or several layers of the model are places on a single gpu. Each gpu processes in parallel different stages of the pipeline and working on a small chunk of the batch. - Zero Redundancy Optimizer (
ZeRO) - Also performs sharding of the tensors somewhat similar to TP, except the whole tensor gets reconstructed in time for a forward or backward computation, therefore the model doesn’t need to be modified. It also supports various offloading techniques to compensate for limited GPU memory. - Sharded
DDP- is another name for the foundational ZeRO concept as used by various other implementations of ZeRO.
Before diving deeper into the specifics of each concept we first have a look at the rough decision process when training large models on a large infrastructure.
推理加速
【2022-1-21】让 Transformer 的推理速度提高 4.5 倍,这个小 trick 还能给你省十几万
- NLP明星公司Hugging Face发布了一个叫做Infinity的产品,可以以1ms延时完成Transformer的推理,性能相当高了。但有点贵——1年至少要十几万块 (2万美元)
- 有没有别的办法?Transformer-deploy:开源的、“不费吹灰之力”就可以达到Infinity一些公共基准的那种。并且现在,通过在该方法上施加一个小trick(GPU量化(quantization)),将Transformer的推理速度提高4.5倍!
- 用一行命令优化和部署Hugging Face上的Transformer模型,并支持大多数基于Transformer编码器的模型,比如Bert、Roberta、miniLM、Camembert、Albert、XLM-R、Distilbert等。
- Transformer-deploy推理服务器用的是Nvidia Triton。推理引擎为Microsoft ONNX Runtime(用于CPU和GPU推理)和Nvidia TensorRT(仅限 GPU)。如果想在GPU上获得一流的性能,Nvidia Triton+Nvidia TensorRT这样的组合无疑是最佳选择。虽然TensorRT用起来有点难,但它确实能比用Pytorch快5~10倍。
- 在实际性能测试中,Transformer-deploy在batch size为1、token分别为16和128的输入序列中的推理速度,都比付费的Hugging Face Infinity要快:Transformer-deploy在token为16时要1.52ms,Infinity则需要1.7ms;token为128时需要1.99ms,Infinity则需要2.5ms。
generate
文本生成方法 generate
Each framework has a generate method for text generation implemented in their respective GenerationMixin class:
- PyTorch
generate() is implemented inGenerationMixin. - TensorFlow
generate() is implemented inTFGenerationMixin. - Flax/JAX
generate() is implemented inFlaxGenerationMixin.
Regardless of your framework of choice, you can parameterize the generate method with a GenerationConfig class instance. Please refer to this class for the complete list of generation parameters, which control the behavior of the generation method.
输入格式
Special tokens that can be used at generation time
pad_token_id(int, optional) — 填充字符 The id of the padding token.bos_token_id(int, optional) — 开始字符 The id of the beginning-of-sequence token.eos_token_id(Union[int, List[int]], optional) — 结束字符 The id of the end-of-sequence token. Optionally, use a list to set multiple end-of-sequence tokens.
Generation parameters exclusive to encoder-decoder models 编码-解码模型独有参数
encoder_no_repeat_ngram_size(int, optional, defaults to 0) — If set to int > 0, all ngrams of that size that occur in the encoder_input_ids cannot occur in thedecoder_input_ids.decoder_start_token_id(int, optional) — If an encoder-decoder model starts decoding with a different token than bos, the id of that token.
输出参数
Parameters that define the output variables of generate
num_return_sequences(int, optional, defaults to 1) — The number of independently computed returned sequences for each element in the batch. 返回句子数目output_attentions(bool, optional, defaults to False) — Whether or not to return the attentions tensors of all attention layers. See attentions under returned tensors for more details. 所有层的注意力值output_hidden_states(bool, optional, defaults to False) — Whether or not to return the hidden states of all layers. See hidden_states under returned tensors for more details. 所有曾的隐层状态output_scores(bool, optional, defaults to False) — Whether or not to return the prediction scores. See scores under returned tensors for more details. 预测分值return_dict_in_generate(bool, optional, defaults to False) — Whether or not to return a ModelOutput instead of a plain tuple.
解码策略
generate 解码参数
do_sample: 是否采样, 默认 False(对应贪心解码)num_beams: 束宽,int, 默认 1(不用beam search),集束搜索参数,num_beam_groups: int, 默认 1, 一组束宽,通过不同beam取值获取更好的多样性penalty_alpha: float, 惩罚因子,用于contrastive search decoding,平衡模型置信度与退化惩罚use_cache: 默认True, 是否使用上一个K/V注意力,用于解码提速
方法使用: can be used for text-decoder, text-to-text, speech-to-text, and vision-to-text models.
greedy decoding贪心解码: greedy search, 触发条件:num_beams=1anddo_sample=Falsecontrastive search对比搜索: contrastive_search, 触发条件:penalty_alpha>0andtop_k>1`multinomial sampling多项式采样: sample, 触发条件:num_beams=1anddo_sample=Truebeam-search decoding集束解码: beam search, 触发条件:num_beams>1anddo_sample=Falsebeam-search multinomial sampling集束多项式采样: beam sample, 触发条件:num_beams>1anddo_sample=Truediverse beam-search decodingDBS解码:DBSgroup_beam_search, 触发条件:num_beams>1andnum_beam_groups>1- DBS论文实现,将束宽均分成几组,小组内执行常规bs, 解码时考虑与前面序列的差异性,效果比diverseRL好,详见
constrained beam-search decoding对比集束解码: constrained_beam_search, 触发条件:constraints!=Noneorforce_words_ids!=None
理论上,解码策略有几种
贪心搜索:greedy search集束搜索:beam search全局搜索:又称暴力搜索, brute search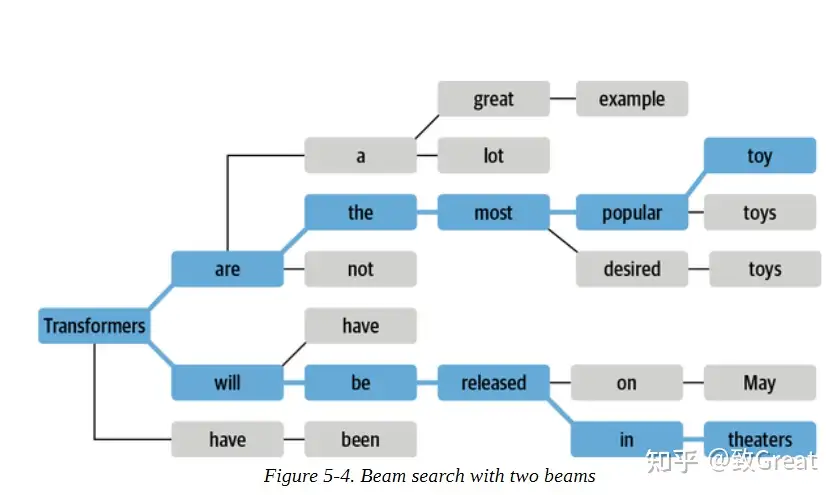
结合采样方法,可以衍生出多种解码策略
- generation.GenerationMixin
| generate类型 | 解码策略 | 参数do_sample |
参数num_beams |
其它参数 | 触发条件 |
|---|---|---|---|---|---|
greedy decoding |
greedy_search 贪心解码 |
False | 1 | - | num_beams=1 and do_sample=False |
contrastive search |
contrastive_search | - | - | - | penalty_alpha>0 and top_k>1 |
multinomial sampling |
sample 多样式采样 |
true | 1 | - | num_beams=1 and do_sample=True |
beam-search decoding |
beam_search 集束解码 |
False | >1 | - | num_beams>1 and do_sample=False |
beam-search multinomial sampling |
beam_sample 集束解码+多样式采样 |
True | >1 | - | num_beams>1 and do_sample=True |
diverse beam-search decoding |
group_beam_search 多样性集束解码 |
- | >1 | - | num_beams>1 and num_beam_groups>1 |
constrained beam-search decoding |
constrained_beam_search 受限集束解码 |
受限beam search | - | - | constraints!=None or force_words_ids!=None |
参数:
- text_generation函数说明
- generation源码
哪种解码方法最好?
没有一个普遍 “最佳”的解码方法。哪种方法最好取决于生成任务的性质。
- 如果想执行精确的任务,如进行算术运算或提供一个特定问题的答案,那么降低温度或使用确定性方法,如
贪婪搜索与束搜索相结合,以保证得到最可能的答案。 - 如果想生成更长的文本,甚至有点创造性,那么改用抽样方法,并提高温度,或者使用top-k和核抽样的混合方法。
作者:致Great
Demo发布(space)
【2022-10-8】Spaces :Discover amazing ML apps made by the community! 展示各种DEMO
- Hugging Face Spaces will host the interface on its servers and provide you with a link you can share.
- 更多用法,参考另一篇日志:Python下的模型快速部署
transformers BERT 源码
参考:
- BERT Tokenization分词模型(BertTokenizer)(请看上篇)
- BERT Model本体模型(BertModel)(请看上篇)
- 2.1 BertEmbeddings
- 2.2 BertEncoder
- 2.2.1 BertLayer
- 2.2.1.1 BertAttention
- 2.2.1.1 BertSelfAttention
- 2.2.1.2 BertSelfOutput
- 2.2.1.2 BertIntermediate
- 2.2.1.3 BertOutput
- 2.2.1.1 BertAttention
- 2.2.2 BertPooler
- BERT-based Models应用模型
- 3.1 BertForPreTraining
- 3.2 BertForSequenceClassification
- 3.3 BertForMultiChoice
- 3.4 BertForTokenClassification
- 3.5 BertForQuestionAnswering
- BERT训练与优化
- 4.1 Pre-Training
- 4.2 Fine-Tuning
- 4.2.1 AdamW
- 4.2.2 Warmup
BERT 快速调用
5行代码
from transformers import BertTokenizer, BertModel

tokenizer = BertTokenizer.from_pretrained("bert-base-uncased")
model = BertModel.from_pretrained("bert-base-uncased")

inputs = tokenizer("Hello world!")
outputs = model(**inputs)
Tokenization(BertTokenizer)
和BERT有关的Tokenizer主要写在/models/bert/tokenization_bert.py和/models/bert/tokenization_bert_fast.py 中。这两份代码分别对应基本的BertTokenizer,以及不进行token到index映射的BertTokenizerFast,这里主要讲解第一个。
BertTokenizer 是基于BasicTokenizer和WordPieceTokenizer 的分词器:
BasicTokenizer负责处理的第一步——按标点、空格等分割句子,并处理是否统一小写,以及清理非法字符。继承自 class BertTokenizer(PreTrainedTokenizer):- 对于中文字符,通过预处理(加空格)来按字分割;
- 同时可以通过never_split指定对某些词不进行分割;
- 这一步是可选的(默认执行)。
WordPieceTokenizer在词的基础上,进一步将词分解为子词(subword) 。- subword介于char和word之间,既在一定程度保留了词的含义,又能够照顾到英文中单复数、时态导致的词表爆炸和未登录词的OOV(Out-Of-Vocabulary)问题,将词根与时态词缀等分割出来,从而减小词表,也降低了训练难度;
- 例如,tokenizer这个词就可以拆解为“token”和“##izer”两部分,注意后面一个词的“##”表示接在前一个词后面。
BertTokenizer 有以下常用方法:
from_pretrained:从包含词表文件(vocab.txt)的目录中初始化一个分词器;tokenize:将文本(词或者句子)分解为子词列表;convert_tokens_to_ids:将子词列表转化为子词对应下标的列表;convert_ids_to_tokens:与上一个相反;convert_tokens_to_string:将subword列表按“##”拼接回词或者句子;encode:- 对于单个句子输入,分解词并加入特殊词形成“[CLS], x, [SEP]”的结构并转换为词表对应下标的列表;
- 对于两个句子输入(多个句子只取前两个),分解词并加入特殊词形成“[CLS], x1, [SEP], x2, [SEP]”的结构并转换为下标列表;
decode:可以将encode方法的输出变为完整句子。
构建transformer分词器时, 通常生成两个文件,一个 merges.txt 和 vocab.json 文件。transformers分词方法
- merges.txt用于把文本转换为单词
- 通过vocab.json文件处理这些单词,该文件只是一个从单词到单词ID的映射文件:
模型在使用之前需要进行分词和编码,每个模型都会自带分词器(tokenizer),熟悉分词器的使用将会提高模型构建的效率。
- string 原始字符串: :hello world!”
- tokens 单词串: [ “hello”, “world”, “!”]
- token ids 串: [ 7592, 2088, 999]

from transformers import BertTokenizer
tokenizer = BertTokenizer.from_pretrained('bert-base-uncased')

text = 'hello world!'
# 字符串转换为单词列表
token_ids = tokenizer(text)
# 单词列表转换为单词ID列表
token_ids = tokenizer.convert_tokens_to_ids(tokenizer.tokenize(text))
# 一步到位:字符串 → id列表
# 如: [101, 7592, 2088, 999, 102]
token_ids = tokenizer.encode(text)
tokens = tokenizer.encode(text, max_length=512, padding='max_length', return_tensors='pt') # 使用更多参数
# encode仅输出单词ID张量,encode_plus输出包含单词ID张量和附加张量的字典。
# {'input_ids': [101, 7592, 2088, 999, 102], 'token_type_ids': [0, 0, 0, 0, 0], 'attention_mask': [1, 1, 1, 1, 1]}
token_ids = tokenizer.encode_plus(text)
# 批量转化
# {'input_ids': [[101, 7592, 2088, 999, 102], [101, 7592, 7733, 999, 102]], 'token_type_ids': [[0, 0, 0, 0, 0], [0, 0, 0, 0, 0]], 'attention_mask': [[1, 1, 1, 1, 1], [1, 1, 1, 1, 1]]}
token_ids = tokenizer.batch_encode_plus([text])
变换过程
【2023-3-21】string、tokens、ids 三者转换
string→tokenstokenize(text: str, **kwargs)tokens→stringconvert_tokens_to_string(tokens: List[token])tokens→idsconvert_tokens_to_ids(tokens: List[token])ids→tokensconvert_ids_to_tokens(ids: int or List[int], skip_special_tokens=False)string→idsencode(text, text_pair=None, add_special_tokens=True, padding=False, truncation=False, max_length=None, return_tensors=None)ids→stringdecode(token_ids: List[int], skip_special_tokens=False, clean_up_tokenization_spaces=True)
tokenizer用法:encode、encode_plus、batch_encode_plus等等
- encode_plus:
- encode_plus(text, text_pair=None, add_special_tokens=True, padding=False, truncation=False, max_length=None, stride=0, is_pretokenized=False, pad_to_multiple_of=None, return_tensors=None, return_token_type_ids=None, return_attention_mask=None, return_overflowing_tokens=False, return_special_tokens_mask=False, return_offsets_mapping=False, return_length=False)
- batch_encode_plus: 输入为 encode 输入的 batch,其它参数相同。注意,plus 是返回一个字典。
- batch_decode: 输入是batch.
#这里以bert模型为例,使用上述提到的函数

from transformers import BertTokenizer
tokenizer = BertTokenizer.from_pretrained('bert-base-uncased')
text = "It's a nice day today!"

#tokenize,#仅用于分词
seg_words = tokenizer.tokenize(text)
print("tokenize分词结果:\n",seg_words)

#convert_tokens_to_ids,将token转化成id,在分词之后。
#convert_ids_to_tokens,将id转化成token,通常用于模型预测出结果,查看时使用。
seg_word_id = tokenizer.convert_tokens_to_ids(seg_words)
print("tokenize Id:\n",seg_word_id)

#encode,进行分词和token转换,encode=tokenize+convert_tokens_to_ids
encode_text = tokenizer.encode(text)
print("encode结果:\n",encode_text)

#encode_plus,在encode的基础之上生成input_ids、token_type_ids、attention_mask
encode_plus_text = tokenizer.encode_plus(text)
print("encode_plus结果:\n",encode_plus_text)

#batch_encode_plus,在encode_plus的基础之上,能够批量梳理文本。
batch_encode_plus_text = tokenizer.batch_encode_plus([text,text])
print("batch_encode_plus结果:\n",batch_encode_plus_text)
变换图解
Model(BertModel)
和BERT模型有关的代码主要写在/models/bert/modeling_bert.py中,这份代码有1k多行,包含BERT模型的基本结构和基于它的微调模型等。继承自class BertModel(BertPreTrainedModel)
BertModel主要为 transformer encoder 结构,包含三个部分:
embeddings,即BertEmbeddings类的实体,对应词嵌入;encoder,即BertEncoder类的实体;pooler, 即BertPooler类的实体,这一部分是可选的。
补充:
- BertModel也可以配置为Decoder,不过下文中不包含对这一部分的讨论。
BertModel的前向传播过程中各个参数的含义以及返回值:
def forward(
    self,
    input_ids=None,
    attention_mask=None,
    token_type_ids=None,
    position_ids=None,
    head_mask=None,
    inputs_embeds=None,
    encoder_hidden_states=None,
    encoder_attention_mask=None,
    past_key_values=None,
    use_cache=None,
    output_attentions=None,
    output_hidden_states=None,
    return_dict=None,
): ...
说明:
input_ids:经过 tokenizer 分词后的subword对应的下标列表;attention_mask:在self-attention过程中,这一块mask用于标记subword所处句子和padding的区别,将padding部分填充为0;token_type_ids: 标记subword当前所处句子(第一句/第二句/padding);position_ids: 标记当前词所在句子的位置下标;head_mask: 用于将某些层的某些注意力计算无效化;inputs_embeds: 如果提供了,那就不需要input_ids,跨过embedding lookup过程直接作为Embedding进入Encoder计算;encoder_hidden_states: 这一部分在BertModel配置为decoder时起作用,将执行cross-attention而不是self-attention;encoder_attention_mask: 同上,在cross-attention中用于标记encoder端输入的padding;past_key_values:这个参数貌似是把预先计算好的K-V乘积传入,以降低cross-attention的开销(因为原本这部分是重复计算);use_cache: 将保存上一个参数并传回,加速decoding;output_attentions:是否返回中间每层的attention输出;output_hidden_states:是否返回中间每层的输出;return_dict:是否按键值对的形式(ModelOutput类,也可以当作tuple用)返回输出,默认为真。
注意
- 这里的head_mask对注意力计算的无效化,和下文提到的注意力头剪枝不同,而仅仅把某些注意力的计算结果给乘以这一系数。
返回值不但包含了encoder和pooler的输出,也包含了其他指定输出的部分(hidden_states和attention等,这一部分在encoder_outputs[1:])方便取用
BertModel还有以下的方法,方便BERT玩家进行各种骚操作:
get_input_embeddings:提取embedding中的word_embeddings即词向量部分;set_input_embeddings:为embedding中的word_embeddings赋值;_prune_heads:提供了将注意力头剪枝的函数,输入为 {layer_num: list of heads to prune in this layer} 的字典,可以将指定层的某些注意力头剪枝。
补充:
- 剪枝是一个复杂的操作,需要将保留的注意力头部分的Wq、Kq、Vq和拼接后全连接部分的权重拷贝到一个新的较小的权重矩阵(注意先禁止grad再拷贝),并实时记录被剪掉的头以防下标出错。具体参考BertAttention部分的prune_heads方法。
BertEmbeddings
包含三个部分求和得到:
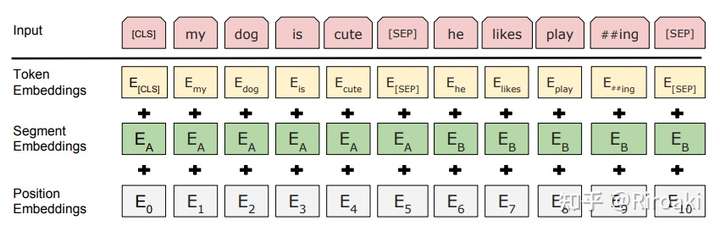
word_embeddings,上文中次词subword对应的嵌入。token_type_embeddings,用于表示当前词所在的句子,辅助区别句子与padding、句子对间的差异。position_embeddings,句子中每个词的位置嵌入,用于区别词的顺序。和transformer论文中的设计不同,这一块是训练出来的,而不是通过Sinusoidal函数计算得到的固定嵌入。一般认为这种实现不利于拓展性(难以直接迁移到更长的句子中)。
三个embedding不带权重相加,并通过一层 LayerNorm+dropout 后输出,其大小为 $(batch_size, sequence_length, hidden_size)$。
补充:
- 为什么要用LayerNorm+Dropout呢?为什么要用LayerNorm而不是BatchNorm?可以参考一个不错的回答
BertEncoder
包含多层BertLayer,这一块本身没有特别需要说明的地方,不过有一个细节值得参考:
- 利用gradient checkpointing技术以降低训练时的显存占用。
- 补充:gradient checkpointing即梯度检查点,通过减少保存的计算图节点压缩模型占用空间,但是在计算梯度的时候需要重新计算没有存储的值,参考论文《Training Deep Nets with Sublinear Memory Cost》,过程如下示意图
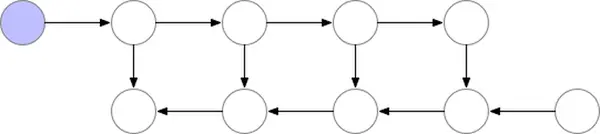
在BertEncoder中,gradient checkpoint是通过torch.utils.checkpoint.checkpoint实现的,使用起来比较方便,可以参考文档
BertLayer
这一层包装了BertAttention和BertIntermediate+BertOutput(即Attention后的FFN部分),以及这里直接忽略的cross-attention部分(将BERT作为Decoder时涉及的部分)。
理论上,这里顺序调用三个子模块就可以,没有什么值得说明的地方。
细节:
- apply_chunking_to_forward和feed_forward_chunk了吗(为什么要整这么复杂,直接调用它不香吗?
- 节约显存的技术——包装了一个切分小batch或者低维数操作的功能:这里参数chunk_size其实就是切分的batch大小,而chunk_dim就是一次计算维数的大小,最后拼接起来返回。
- 不过,在默认操作中不会特意设置这两个值(在源代码中默认为0和1),所以会直接等效于正常的forward过程。
BertAttention
本以为attention的实现就在这里,没想到还要再下一层……其中,self成员就是多头注意力的实现,而output成员实现attention后的全连接+dropout+residual+LayerNorm一系列操作。出现了上文提到的剪枝操作,即prune_heads方法
class BertAttention(nn.Module)概括如下:
- find_pruneable_heads_and_indices是定位需要剪掉的head,以及需要保留的维度下标index;
- prune_linear_layer则负责将Wk/Wq/Wv权重矩阵(连同bias)中按照index保留没有被剪枝的维度后转移到新的矩阵。
BertSelfAttention
预警:这一块可以说是模型的核心区域,也是唯一涉及到公式的地方,所以将贴出大量代码。
class BertSelfAttention(nn.Module)
class BertSelfAttention(nn.Module):
    def __init__(self, config):
        super().__init__()
        if config.hidden_size % config.num_attention_heads != 0 and not hasattr(config, "embedding_size"):
            raise ValueError(
                "The hidden size (%d) is not a multiple of the number of attention "
                "heads (%d)" % (config.hidden_size, config.num_attention_heads)
            )

        self.num_attention_heads = config.num_attention_heads
        self.attention_head_size = int(config.hidden_size / config.num_attention_heads)
        self.all_head_size = self.num_attention_heads * self.attention_head_size

        self.query = nn.Linear(config.hidden_size, self.all_head_size)
        self.key = nn.Linear(config.hidden_size, self.all_head_size)
        self.value = nn.Linear(config.hidden_size, self.all_head_size)

        self.dropout = nn.Dropout(config.attention_probs_dropout_prob)
        self.position_embedding_type = getattr(config, "position_embedding_type", "absolute")
        if self.position_embedding_type == "relative_key" or self.position_embedding_type == "relative_key_query":
            self.max_position_embeddings = config.max_position_embeddings
            self.distance_embedding = nn.Embedding(2 * config.max_position_embeddings - 1, self.attention_head_size)

        self.is_decoder = config.is_decoder
- 除掉熟悉的query、key、value三个权重和一个dropout,这里还有一个谜一样的position_embedding_type,以及decoder标记(当然,我不打算介绍cross-attenton部分);
- 注意,hidden_size和all_head_size在一开始是一样的。至于为什么要看起来多此一举地设置这一个变量——显然是因为上面那个剪枝函数,剪掉几个attention head以后all_head_size自然就小了;
- hidden_size必须是num_attention_heads的整数倍,以bert-base为例,每个attention包含12个head,hidden_size是768,所以每个head大小即attention_head_size=768/12=64;
- position_embedding_type是什么?
multi-head self-attention的基本公式

注意力头,众所周知是并行计算的,所以上面的query、key、value三个权重是唯一的——这并不是所有heads共享了权重,而是“拼接”起来了。
补充:原论文中多头的理由为Multi-head attention allows the model to jointly attend to information from different representation subspaces at different positions. With a single attention head, averaging inhibits this.而另一个比较靠谱的分析
forward方法
def transpose_for_scores(self, x):
        new_x_shape = x.size()[:-1] + (self.num_attention_heads, self.attention_head_size)
        x = x.view(*new_x_shape)
        return x.permute(0, 2, 1, 3)

    def forward(
        self,
        hidden_states,
        attention_mask=None,
        head_mask=None,
        encoder_hidden_states=None,
        encoder_attention_mask=None,
        past_key_value=None,
        output_attentions=False,
    ):
        mixed_query_layer = self.query(hidden_states)

        # 省略一部分cross-attention的计算
        key_layer = self.transpose_for_scores(self.key(hidden_states))
        value_layer = self.transpose_for_scores(self.value(hidden_states))
        query_layer = self.transpose_for_scores(mixed_query_layer)

        # Take the dot product between "query" and "key" to get the raw attention scores.
        attention_scores = torch.matmul(query_layer, key_layer.transpose(-1, -2))
        # ...
- transpose_for_scores用来把hidden_size拆成多个头输出的形状,并且将中间两维转置以进行矩阵相乘;
- 这里key_layer/value_layer/query_layer的形状为:(batch_size, num_attention_heads, sequence_length, attention_head_size);
- 这里attention_scores的形状为:(batch_size, num_attention_heads, sequence_length, sequence_length),符合多个头单独计算获得的attention map形状。
- 到这里实现了K与Q相乘,获得raw attention scores的部分,按公式接下来应该是按dk进行scaling并做softmax的操作。奇怪的positional_embedding,以及一堆爱因斯坦求和
。。。
get_extended_attention_mask这个函数是在什么时候被调用的呢?和BertModel有什么关系呢?
- BertModel的继承细节了:BertModel继承自BertPreTrainedModel ,后者继承自PreTrainedModel,而PreTrainedModel继承自[nn.Module, ModuleUtilsMixin, GenerationMixin] 三个基类。——好复杂的封装!
- 这也就是说, BertModel必然在中间的某个步骤对原始的attention_mask调用了get_extended_attention_mask ,导致attention_mask从原始的[1, 0]变为[0, -1e4]的取值。BertModel的前向传播过程中找到了这一调用(第944行)
- 问题解决了:这一方法不但实现了改变mask的值,还将其广播(broadcast)为可以直接与attention map相加的形状。
细节有:
- 按照每个头的维度进行缩放,对于bert-base就是64的平方根即8;
- attention_probs不但做了softmax,还用了一次dropout,这是担心attention矩阵太稠密吗……这里也提到很不寻常,但是原始Transformer论文就是这么做的;
- head_mask就是之前提到的对多头计算的mask,如果不设置默认是全1,在这里就不会起作用;
- context_layer即attention矩阵与value矩阵的乘积,原始的大小为:(batch_size, num_attention_heads, sequence_length, attention_head_size) ;
- context_layer进行转置和view操作以后,形状就恢复了(batch_size, sequence_length, hidden_size)。
BertSelfOutput
这一块操作略多但不复杂
class BertSelfOutput(nn.Module):
    def __init__(self, config):
        super().__init__()
        self.dense = nn.Linear(config.hidden_size, config.hidden_size)
        self.LayerNorm = nn.LayerNorm(config.hidden_size, eps=config.layer_norm_eps)
        self.dropout = nn.Dropout(config.hidden_dropout_prob)

    def forward(self, hidden_states, input_tensor):
        hidden_states = self.dense(hidden_states)
        hidden_states = self.dropout(hidden_states)
        hidden_states = self.LayerNorm(hidden_states + input_tensor)
        return hidden_states
补充:这里又出现了LayerNorm和Dropout的组合,只不过这里是先Dropout,进行残差连接后再进行LayerNorm。至于为什么要做残差连接,最直接的目的就是降低网络层数过深带来的训练难度,对原始输入更加敏感
BertIntermediate
看完了BertAttention,在Attention后面还有一个全连接+激活的操作
class BertIntermediate(nn.Module):
    def __init__(self, config):
        super().__init__()
        self.dense = nn.Linear(config.hidden_size, config.intermediate_size)
        if isinstance(config.hidden_act, str):
            self.intermediate_act_fn = ACT2FN[config.hidden_act]
        else:
            self.intermediate_act_fn = config.hidden_act

    def forward(self, hidden_states):
        hidden_states = self.dense(hidden_states)
        hidden_states = self.intermediate_act_fn(hidden_states)
        return hidden_states
- 全连接做了一个扩展,以bert-base为例,扩展维度为3072,是原始维度768的4倍之多;
- 补充:为什么要过一个FFN?不知道……谷歌最近的论文貌似说明只有attention的模型什么用都没有
- 激活函数默认实现为gelu(Gaussian Error Linerar Units(GELUS):
;当然,它是无法直接计算的,可以用一个包含tanh的表达式进行近似(略)。
为什么在transformer中要用这个激活函数
- 补充:看了一些研究,应该是说GeLU比ReLU这些表现都好,以至于后续的语言模型都沿用了这一激活函数。
BertOutput
在这里又是一个全连接+dropout+LayerNorm,还有一个残差连接residual connect
class BertOutput(nn.Module):
    def __init__(self, config):
        super().__init__()
        self.dense = nn.Linear(config.intermediate_size, config.hidden_size)
        self.LayerNorm = nn.LayerNorm(config.hidden_size, eps=config.layer_norm_eps)
        self.dropout = nn.Dropout(config.hidden_dropout_prob)

    def forward(self, hidden_states, input_tensor):
        hidden_states = self.dense(hidden_states)
        hidden_states = self.dropout(hidden_states)
        hidden_states = self.LayerNorm(hidden_states + input_tensor)
        return hidden_states
这里的操作和BertSelfOutput不能说没有关系,只能说一模一样……非常容易混淆的两个组件。
BertPooler
这一层只是简单地取出了句子的第一个token,即[CLS]对应的向量,然后过一个全连接层和一个激活函数后输出
class BertPooler(nn.Module):
    def __init__(self, config):
        super().__init__()
        self.dense = nn.Linear(config.hidden_size, config.hidden_size)
        self.activation = nn.Tanh()

    def forward(self, hidden_states):
        # We "pool" the model by simply taking the hidden state corresponding
        # to the first token.
        first_token_tensor = hidden_states[:, 0]
        pooled_output = self.dense(first_token_tensor)
        pooled_output = self.activation(pooled_output)
        return pooled_output
小结
- 在HuggingFace实现的Bert模型中,使用了多种节约显存的技术:
- gradient checkpoint,不保留前向传播节点,只在用时计算;
- apply_chunking_to_forward,按多个小批量和低维度计算FFN部分;
- BertModel包含复杂的封装和较多的组件。以bert-base为例,主要组件如下:
- 总计Dropout出现了1+(1+1+1)x12=37次;
- 总计LayerNorm出现了1+(1+1)x12=25次;
- 总计dense全连接层出现了(1+1+1)x12+1=37次,并不是每个dense都配了激活函数
- BertModel有极大的参数量。以bert-base为例,其参数量为109M,具体计算过程可以参考
BERT-based Models
基于BERT的模型都写在/models/bert/modeling_bert.py里面,包括BERT预训练模型和BERT分类模型,UML图如下:

BERT模型一图流(建议保存后放大查看)
首先,以下所有的模型都是基于BertPreTrainedModel这一抽象基类的,而后者则基于一个更大的基类PreTrainedModel。这里我们关注BertPreTrainedModel的功能:
- 用于初始化模型权重,同时维护继承自PreTrainedModel的一些标记身份或者加载模型时的类变量。
BertForPreTraining
众所周知,BERT预训练任务包括两个:
- Masked Language Model(MLM):在句子中随机用[MASK]替换一部分单词,然后将句子传入 BERT 中编码每一个单词的信息,最终用[MASK]的编码信息预测该位置的正确单词,这一任务旨在训练模型根据上下文理解单词的意思;
- Next Sentence Prediction(NSP):将句子对A和B输入BERT,使用[CLS]的编码信息进行预测B是否A的下一句,这一任务旨在训练模型理解预测句子间的关系。
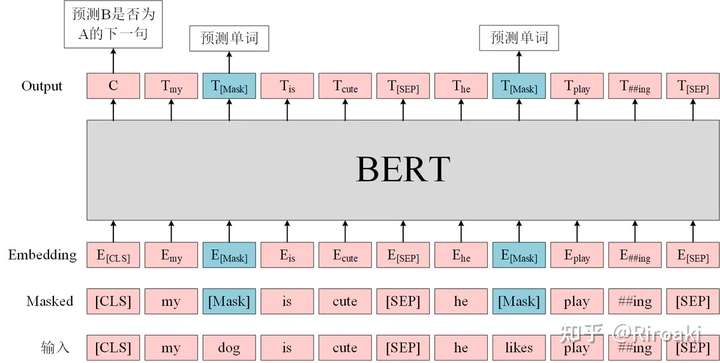
对应到代码中,这一融合两个任务的模型就是BertForPreTraining。略
这份代码里面也包含了对于只想对单个目标进行预训练的BERT模型(具体细节不作展开):
- BertForMaskedLM:只进行MLM任务的预训练;
- 基于BertOnlyMLMHead,而后者也是对BertLMPredictionHead的另一层封装;
- BertLMHeadModel:这个和上一个的区别在于,这一模型是作为decoder运行的版本;
- 同样基于BertOnlyMLMHead;
- BertForNextSentencePrediction:只进行NSP任务的预训练。
- 基于BertOnlyNSPHead,内容就是一个线性层……
各种Fine-tune模型,基本都是分类任务:
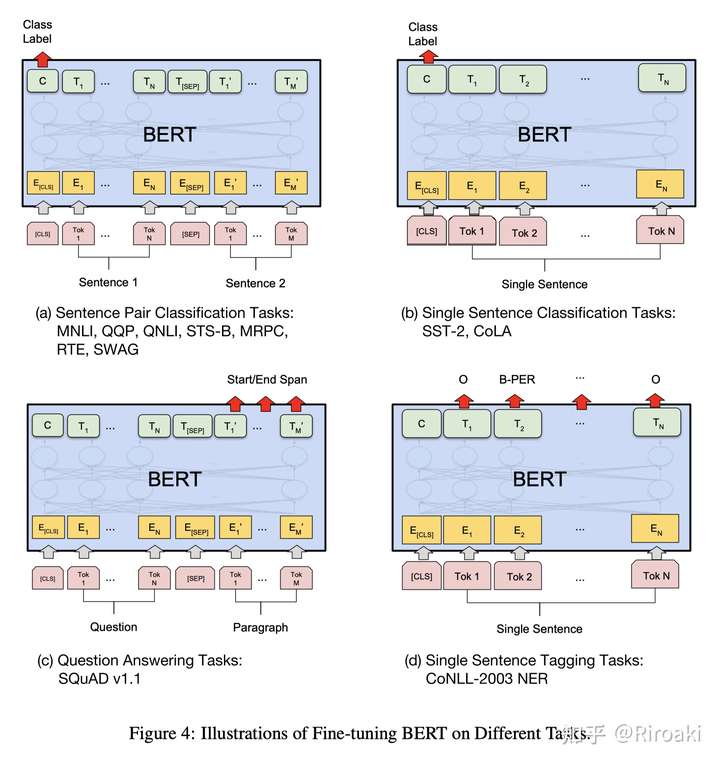
BertForSequenceClassification
这一模型用于句子分类(也可以是回归)任务,比如GLUE benchmark的各个任务。
- 句子分类的输入为句子(对),输出为单个分类标签。 结构上很简单,就是BertModel(有pooling)过一个dropout后接一个线性层输出分类
在前向传播时,和上面预训练模型一样需要传入labels输入。
- 如果初始化的num_labels=1,那么就默认为回归任务,使用MSELoss;
- 否则认为是分类任务。
BertForMultipleChoice
这一模型用于多项选择,如RocStories/SWAG任务。
- 多项选择任务的输入为一组分次输入的句子,输出为选择某一句子的单个标签。 结构上与句子分类相似,只不过线性层输出维度为1,即每次需要将每个样本的多个句子的输出拼接起来作为每个样本的预测分数。
- 实际上,具体操作时是把每个batch的多个句子一同放入的,所以一次处理的输入为[batch_size, num_choices]数量的句子,因此相同batch大小时,比句子分类等任务需要更多的显存,在训练时需要小心。
BertForTokenClassification
这一模型用于序列标注(词分类),如NER任务。
- 序列标注任务的输入为单个句子文本,输出为每个token对应的类别标签。 由于需要用到每个token对应的输出而不只是某几个,所以这里的BertModel不用加入pooling层;
- 同时,这里将_keys_to_ignore_on_load_unexpected这一个类参数设置为[r”pooler”],也就是在加载模型时对于出现不需要的权重不发生报错。
BertForQuestionAnswering
这一模型用于解决问答任务,例如SQuAD任务。
- 问答任务的输入为问题+(对于BERT只能是一个)回答组成的句子对,输出为起始位置和结束位置用于标出回答中的具体文本。 这里需要两个输出,即对起始位置的预测和对结束位置的预测,两个输出的长度都和句子长度一样,从其中挑出最大的预测值对应的下标作为预测的位置。
- 对超出句子长度的非法label,会将其压缩(torch.clamp_)到合理范围。
作为一个迟到的补充,这里稍微介绍一下ModelOutput这个类。它作为上述各个模型输出包装的基类,同时支持字典式的存取和下标顺序的访问,继承自python原生的OrderedDict 类。
BERT训练和优化
Pre-Training
预训练阶段,除了众所周知的15%、80%mask比例,有一个值得注意的地方就是参数共享。
不止BERT,所有huggingface实现的PLM的word embedding和masked language model的预测权重在初始化过程中都是共享的:
Fine-Tuning
微调也就是下游任务阶段,也有两个值得注意的地方。
AdamW
首先介绍一下BERT的优化器:AdamW(AdamWeightDecayOptimizer)。
这一优化器来自ICLR 2017的Best Paper:《Fixing Weight Decay Regularization in Adam》中提出的一种用于修复Adam的权重衰减错误的新方法。论文指出,L2正则化和权重衰减在大部分情况下并不等价,只在SGD优化的情况下是等价的;而大多数框架中对于Adam+L2正则使用的是权重衰减的方式,两者不能混为一谈。
Warmup
BERT的训练中另一个特点在于Warmup,其含义为:
- 在训练初期使用较小的学习率(从0开始),在一定步数(比如1000步)内逐渐提高到正常大小(比如上面的2e-5),避免模型过早进入局部最优而过拟合;
- 在训练后期再慢慢将学习率降低到0,避免后期训练还出现较大的参数变化。 在Huggingface的实现中,可以使用多种warmup策略
- CONSTANT:保持固定学习率不变;
- CONSTANT_WITH_WARMUP:在每一个step中线性调整学习率;
- LINEAR:上文提到的两段式调整;
- COSINE:和两段式调整类似,只不过采用的是三角函数式的曲线调整;
- COSINE_WITH_RESTARTS:训练中将上面COSINE的调整重复n次;
- POLYNOMIAL:按指数曲线进行两段式调整。
入门代码
import torch
from transformers import BertModel, BertTokenizer

# 调用bert-base模型,同时模型的词典经过小写处理
model_name = 'bert-base-uncased'
model_name = 'bert-base-chinese' # 中文模型
# ----------- 分词器 ------------
# 读取模型对应的tokenizer
tokenizer = BertTokenizer.from_pretrained(model_name)
# 【2023-2-22】默认保存路径:~/.cache/huggingface/hub/
tokenizer = BertTokenizer.from_pretrained(model_name, cache_dir='./transformers/')	# cache_dir表示将预训练文件下载到本地指定文件夹下,而不是默认路径
# 获取词表
vocab = tokenizer.get_vocab()
print("vocab: ", len(vocab))

# ----------- 模型 ------------
# 载入模型
model = BertModel.from_pretrained(model_name)
# 本地保存
model = BertModel.from_pretrained(model_name, cache_dir='./transformers/')
# 输出隐含层
model = BertModel.from_pretrained('./model', output_hidden_states = True,)

# 获取词向量矩阵
word_embedding = model.get_input_embeddings()
embed_weights = word_embedding.weight
print("embed_weights: ", embed_weights.shape, type(embed_weights))
# embed_weights: torch.Size([30522, 768]
# ----------- 测试 ------------
# (1)单行文本
input_text = "Here is some text to encode"
# 通过tokenizer把文本变成 token_id
input_ids = tokenizer.encode(input_text, add_special_tokens=True)
# input_ids: [101, 2182, 2003, 2070, 3793, 2000, 4372, 16044, 102]
input_ids = torch.tensor([input_ids]) # 矩阵转化为张量, 输入模型
# 中文测试
input_ids = torch.tensor(tokenizer.encode("遇见被老师提问问题", add_special_tokens=True)).unsqueeze(0)	# 增加一个维度因为输入到Bert模型中要求二维(Batch_size, seq_len)
print("input_ids: ", input_ids)
output = model(input_ids=input_ids)
last_hidden_states_0 = output[0]
print("last_hidden_states_0.shape: ", last_hidden_states_0.shape)
last_hidden_states_1 = output[1]
print("last_hidden_states_1.shape: ", ast_hidden_states_1.shape)
# input_ids:  tensor([[ 101, 6878, 6224, 6158, 5439, 2360, 2990, 7309, 7309, 7579,  102]])
# last_hidden_states_0.shape: torch.Size([1, 11, 768]
# last_hidden_states_1.shape: torch.Size([1, 768]

# (2)pair文本对
text_a = "EU rejects German call to boycott British lamb ."
text_b = "This tokenizer inherits from :class: transformers.PreTrainedTokenizer"

tokens_encode = tokenizer.encode_plus(text=text, text_pair=text_b, max_length=20, truncation_strategy="longest_first", truncation=True)
print("tokens_encode: ", tokens_encode)
# tokens_encode:  {'input_ids': [2, 2898, 12170, 18, 548, 645, 20, 16617, 388, 8624, 3, 48, 20, 2853, 11907, 17569, 18, 37, 13, 3], 'token_type_ids': [0, 0, 0, 0, 0, 0, 0, 0, 0, 0, 0, 1, 1, 1, 1, 1, 1, 1, 1, 1], 'attention_mask': [1, 1, 1, 1, 1, 1, 1, 1, 1, 1, 1, 1, 1, 1, 1, 1, 1, 1, 1, 1]}
# 输出以列表的形式保存
# - input_ids的内容与encode()方法返回的结果相同,为token转化为id之后的表示。
# - token_type_ids的内容表示用来区别两个文本,为0表示第一个文本,为1表示第二个文本。
# - attention_mask表示文本padding的部分(这里没有,所有全为1)。
# 每个部分分别对应于BertModel的输入参数,使用时取出对应键值的内容输入到相应参数即可
# forward(input_ids=None, attention_mask=None, token_type_ids=None, position_ids=None, head_mask=None, inputs_embeds=None, output_attentions=None, output_hidden_states=None, return_dict=None)[SOURCE]


# 获得BERT模型最后一个隐层结果
with torch.no_grad():
    last_hidden_states = model(input_ids)[0]  # Models outputs are now tuples

""" tensor([[[-0.0549,  0.1053, -0.1065,  ..., -0.3550,  0.0686,  0.6506],
         [-0.5759, -0.3650, -0.1383,  ..., -0.6782,  0.2092, -0.1639],
         [-0.1641, -0.5597,  0.0150,  ..., -0.1603, -0.1346,  0.6216],
         ...,
         [ 0.2448,  0.1254,  0.1587,  ..., -0.2749, -0.1163,  0.8809],
         [ 0.0481,  0.4950, -0.2827,  ..., -0.6097, -0.1212,  0.2527],
         [ 0.9046,  0.2137, -0.5897,  ...,  0.3040, -0.6172, -0.1950]]])
	shape: (1, 9, 768)
"""
# ----------- 配置文件 ------------
from transformers import BertConfig
# 获取bert模型结构参数
bert_config = BertConfig.from_pretrained('bert-base-uncased')
print(bert_config.get_config_dict('bert-base-uncased'))
# ({'architectures': ['BertForMaskedLM'], 'attention_probs_dropout_prob': 0.1, 'hidden_act': 'gelu', 'hidden_dropout_prob': 0.1, 'hidden_size': 768, 'initializer_range': 0.02, 'intermediate_size': 3072, 'layer_norm_eps': 1e-12, 'max_position_embeddings': 512, 'model_type': 'bert', 'num_attention_heads': 12, 'num_hidden_layers': 12, 'pad_token_id': 0, 'type_vocab_size': 2, 'vocab_size': 30522}, {})
# ----------- albert模型 ------------
from transformers import AlbertTokenizer, AlbertModel
# albert模型
tokenizer = AlbertTokenizer.from_pretrained("albert-base-v2", cache_dir="./transformers/")
model = AlbertModel.from_pretrained("albert-base-v2", cache_dir="transformers/")
# 多种模型,如XLNet、DistilBBET、RoBERTa等模型都可以以同样的方式进行导

# ----------- 学习率设置 ------------
from transformers import AdaW, get_linear_schedule_with_warmup

warmup_steps = int(args.warmup_proportion * num_train_optimization_steps)	# 定义warmup方式的步长
    optimizer = AdamW(optimizer_grouped_parameters, lr=args.learning_rate, eps=args.adam_epsilon)	# 定义优化器
    scheduler = get_linear_schedule_with_warmup(optimizer, num_warmup_steps=warmup_steps, num_training_steps=num_train_optimization_steps)		# 更新学习率的方式

# ----------- tf模型训练 ------------
def data_incoming(path):
    x = []
    y = []
    with open(path, 'r') as f:
        for line in f.readlines():
            line = line.strip('\n')
            line = line.split('\t')
            x.append(line[0])
            y.append(line[1])
    df_row = pd.DataFrame([x, y], index=['text', 'label'])
    df_row = df_row.T
    df_label = pd.DataFrame({"label": ['YOUR_LABEL'], 'y': list(range(10))})
    output = pd.merge(df_row, df_label, on='label', how='left')
    return output

def convert_example_to_feature(review):
    return tokenizer.encode_plus(review,
                                 max_length=256,
                                 pad_tp_max_length=True,
                                 return_attention_mask=True,
                                 truncation=True
                                 )

def map_example_to_dict(input_ids, attention_mask, token_type_ids, label):
    return {
               "input_ids": input_ids,
               "token_type_ids": token_type_ids,
               "attention_mask": attention_mask,
           }, label

def encode_example(ds, limit=-1):
    input_ids_list = []
    token_type_ids_list = []
    attention_maks_list = []
    label_list = []
    if limit > 0:
        ds.take(limit)
    for index, row in ds.iterrows():
        review = row["text"]
        label = row['y']
        bert_input = convert_example_to_feature(review)
        input_ids_list.append(bert_input["input_ids"])
        token_type_ids_list.append(bert_input['token_type_ids'])
        attention_maks_list.append(bert_input['attention_maks'])
        label_list.append([label])
    return tf.data.Dataset.from_tensor_slices(
        (input_ids_list, token_type_ids_list, attention_maks_list, label_list)).map(map_example_to_dict)

train = data_incoming(data_path + 'train.tsv')
test = data_incoming(data_path + 'test.tsv')
train = encode_example(train).shuffle(100000).batch(100)
test = encode_example(test).batch(100)
model = TFBertForSequenceClassification(model_path, num_labels=num_labels)
optimizer = tf.keras.optimizers.Adam(1e-5)
model.compile(optimizer=optimizer, loss=tf.keras.losses.SparseCategoricalCrossentropy(from_logits=True))
model.fit(train, epochs=epoch, verbose=1, validation_data=test)
包括import在内的不到十行代码,我们就实现了读取一个预训练过的BERT模型,来encode我们指定的一个文本,对文本的每一个token生成768维的向量。如果是二分类任务,我们接下来就可以把第一个token也就是[CLS]的768维向量,接一个linear层,预测出分类的logits,或者根据标签进行训练。
BERT configuration
Transformers的源码:路径 src/transformers 下有很多的python代码文件。以 configuration 开头的都是各个模型的配置代码,比如 configuration_bert.py,主要是一个继承自 PretrainedConfig 的类 BertConfig的定义,以及不同BERT模型的config文件的下载路径,下方显示前三个。
- bert-base-uncased的模型的配置,其中包括dropout, hidden_size, num_hidden_layers, vocab_size 等等。
- 比如bert-base-uncased的配置它是12层的,词典大小30522等等,甚至可以在config里利用output_hidden_states配置是否输出所有hidden_state。
BERT_PRETRAINED_CONFIG_ARCHIVE_MAP = {
    "bert-base-uncased": "https://s3.amazonaws.com/models.huggingface.co/bert/bert-base-uncased-config.json",
    "bert-large-uncased": "https://s3.amazonaws.com/models.huggingface.co/bert/bert-large-uncased-config.json",
    "bert-base-cased": "https://s3.amazonaws.com/models.huggingface.co/bert/bert-base-cased-config.json",
}
BERT tokenization
以tokenization开头的都是跟vocab有关的代码,比如在 tokenization_bert.py 中有函数如whitespace_tokenize,还有不同的tokenizer的类。同时也有各个模型对应的vocab.txt。从第一个链接进去就是bert-base-uncased的词典,这里面有30522个词,对应着config里面的vocab_size。
- 其中,第0个token是[pad],第101个token是[CLS],第102个token是[SEP],所以之前encode得到的 [101, 2182, 2003, 2070, 3793, 2000, 4372, 16044, 102] ,其实tokenize后convert前的token就是 [ ‘[ CLS]’, ‘here’, ‘is’, ‘some’, ‘text’, ‘to’, ‘en’, ‘##code’, ‘[ SEP]’ ],经过之前BERT论文的介绍,大家应该都比较熟悉了。
- BERT的vocab预留了不少unused token,如果我们会在文本中使用特殊字符,在vocab中没有,这时候就可以通过替换vacab中的unused token,实现对新的token的embedding进行训练。
PRETRAINED_VOCAB_FILES_MAP = {
    "vocab_file": {
        "bert-base-uncased": "https://s3.amazonaws.com/models.huggingface.co/bert/bert-base-uncased-vocab.txt",
        "bert-large-uncased": "https://s3.amazonaws.com/models.huggingface.co/bert/bert-large-uncased-vocab.txt",
        "bert-base-cased": "https://s3.amazonaws.com/models.huggingface.co/bert/bert-base-cased-vocab.txt",
    }
}
BERT modeling
以modeling开头的就是最关心的模型代码,比如 modeling_bert.py。文件中有许多不同的预训练模型以供下载,可以按需获取。
代码中可以重点看BertModel类,它就是BERT模型的基本代码, 类定义中,由embedding,encoder,pooler组成,forward时顺序经过三个模块,输出output。
class BertModel(BertPreTrainedModel):
    def __init__(self, config):
        super().__init__(config)
        self.config = config

        self.embeddings = BertEmbeddings(config)
        self.encoder = BertEncoder(config)
        self.pooler = BertPooler(config)

        self.init_weights()

 def forward(
        self, input_ids=None, attention_mask=None, token_type_ids=None,
        position_ids=None, head_mask=None, inputs_embeds=None,
        encoder_hidden_states=None, encoder_attention_mask=None,
    ):
    """ 省略部分代码 """

        embedding_output = self.embeddings(
            input_ids=input_ids, position_ids=position_ids, token_type_ids=token_type_ids, inputs_embeds=inputs_embeds
        )
        encoder_outputs = self.encoder(
            embedding_output,
            attention_mask=extended_attention_mask,
            head_mask=head_mask,
            encoder_hidden_states=encoder_hidden_states,
            encoder_attention_mask=encoder_extended_attention_mask,
        )
        sequence_output = encoder_outputs[0]
        pooled_output = self.pooler(sequence_output)

        outputs = (sequence_output, pooled_output,) + encoder_outputs[
            1:
        ]  # add hidden_states and attentions if they are here
        return outputs  # sequence_output, pooled_output, (hidden_states), (attentions)
BertEmbeddings这个类中可以清楚的看到,embedding由三种embedding相加得到,经过layernorm 和 dropout后输出。
def __init__(self, config):
        super().__init__()
        self.word_embeddings = nn.Embedding(config.vocab_size, config.hidden_size, padding_idx=0)
        self.position_embeddings = nn.Embedding(config.max_position_embeddings, config.hidden_size)
        self.token_type_embeddings = nn.Embedding(config.type_vocab_size, config.hidden_size)
        # self.LayerNorm is not snake-cased to stick with TensorFlow model variable name and be able to load
        # any TensorFlow checkpoint file
        self.LayerNorm = BertLayerNorm(config.hidden_size, eps=config.layer_norm_eps)
        self.dropout = nn.Dropout(config.hidden_dropout_prob)

def forward(self, input_ids=None, token_type_ids=None, position_ids=None, inputs_embeds=None):
        """ 省略 embedding生成过程 """
        embeddings = inputs_embeds + position_embeddings + token_type_embeddings
        embeddings = self.LayerNorm(embeddings)
        embeddings = self.dropout(embeddings)
        return embeddings
BertEncoder主要将embedding的输出,逐个经过每一层Bertlayer的处理,得到各层hidden_state,再根据config的参数,来决定最后是否所有的hidden_state都要输出,BertLayer的内容展开的话,篇幅过长,读者感兴趣可以自己一探究竟。
class BertEncoder(nn.Module):
    def __init__(self, config):
        super().__init__()
        self.output_attentions = config.output_attentions
        self.output_hidden_states = config.output_hidden_states
        self.layer = nn.ModuleList([BertLayer(config) for _ in range(config.num_hidden_layers)])

    def forward(
        self,
        hidden_states,
        attention_mask=None,
        head_mask=None,
        encoder_hidden_states=None,
        encoder_attention_mask=None,
    ):
        all_hidden_states = ()
        all_attentions = ()
        for i, layer_module in enumerate(self.layer):
            if self.output_hidden_states:
                all_hidden_states = all_hidden_states + (hidden_states,)

            layer_outputs = layer_module(
                hidden_states, attention_mask, head_mask[i], encoder_hidden_states, encoder_attention_mask
            )
            hidden_states = layer_outputs[0]

            if self.output_attentions:
                all_attentions = all_attentions + (layer_outputs[1],)
        # Add last layer
        if self.output_hidden_states:
            all_hidden_states = all_hidden_states + (hidden_states,)

        outputs = (hidden_states,)
        if self.output_hidden_states:
            outputs = outputs + (all_hidden_states,)
        if self.output_attentions:
            outputs = outputs + (all_attentions,)
        return outputs  # last-layer hidden state, (all hidden states), (all attentions)
Bertpooler 其实就是将BERT的[CLS]的hidden_state 取出,经过一层DNN和Tanh计算后输出。
class BertPooler(nn.Module):
    def __init__(self, config):
        super().__init__()
        self.dense = nn.Linear(config.hidden_size, config.hidden_size)
        self.activation = nn.Tanh()

    def forward(self, hidden_states):
        # We "pool" the model by simply taking the hidden state corresponding
        # to the first token.
        first_token_tensor = hidden_states[:, 0]
        pooled_output = self.dense(first_token_tensor)
        pooled_output = self.activation(pooled_output)
        return pooled_output
在这个文件中还有上述基础的BertModel的进一步的变化,比如BertForMaskedLM,BertForNextSentencePrediction这些是Bert加了预训练头的模型,还有BertForSequenceClassification, BertForQuestionAnswering 这些加上了特定任务头的模型。
模型信息
Transformers是TensorFlow 2.0和PyTorch的最新自然语言处理库
每个模型架构的详细示例(Bert、GPT、GPT-2、Transformer-XL、XLNet和XLM)可以在完整文档中找到
import torch
from transformers import *

# transformer有一个统一的API
# 有10个Transformer结构和30个预训练权重模型。
#模型|分词|预训练权重
MODELS = [(BertModel,       BertTokenizer,       'bert-base-uncased'),
          (OpenAIGPTModel,  OpenAIGPTTokenizer,  'openai-gpt'),
          (GPT2Model,       GPT2Tokenizer,       'gpt2'),
          (CTRLModel,       CTRLTokenizer,       'ctrl'),
          (TransfoXLModel,  TransfoXLTokenizer,  'transfo-xl-wt103'),
          (XLNetModel,      XLNetTokenizer,      'xlnet-base-cased'),
          (XLMModel,        XLMTokenizer,        'xlm-mlm-enfr-1024'),
          (DistilBertModel, DistilBertTokenizer, 'distilbert-base-cased'),
          (RobertaModel,    RobertaTokenizer,    'roberta-base'),
          (XLMRobertaModel, XLMRobertaTokenizer, 'xlm-roberta-base'),
         ]

# 要使用TensorFlow 2.0版本的模型,只需在类名前面加上“TF”,例如。“TFRobertaModel”是TF2.0版本的PyTorch模型“RobertaModel”

# 让我们用每个模型将一些文本编码成隐藏状态序列:
for model_class, tokenizer_class, pretrained_weights in MODELS:
    # 加载pretrained模型/分词器
    tokenizer = tokenizer_class.from_pretrained(pretrained_weights)
    model = model_class.from_pretrained(pretrained_weights)

    # 编码文本
    input_ids = torch.tensor([tokenizer.encode("Here is some text to encode", add_special_tokens=True)])  # 添加特殊标记
    with torch.no_grad():
        last_hidden_states = model(input_ids)[0]  # 模型输出是元组

# 每个架构都提供了几个类,用于对下游任务进行调优,例如。
BERT_MODEL_CLASSES = [BertModel, BertForPreTraining, BertForMaskedLM, BertForNextSentencePrediction,
                      BertForSequenceClassification, BertForTokenClassification, BertForQuestionAnswering]

# 体系结构的所有类都可以从该体系结构的预训练权重开始
#注意,为微调添加的额外权重只在需要接受下游任务的训练时初始化

pretrained_weights = 'bert-base-uncased'
tokenizer = BertTokenizer.from_pretrained(pretrained_weights)
for model_class in BERT_MODEL_CLASSES:
    # 载入模型/分词器
    model = model_class.from_pretrained(pretrained_weights)

    # 模型可以在每一层返回隐藏状态和带有注意力机制的权值
    model = model_class.from_pretrained(pretrained_weights,
                                        output_hidden_states=True,
                                        output_attentions=True)
    input_ids = torch.tensor([tokenizer.encode("Let's see all hidden-states and attentions on this text")])
    all_hidden_states, all_attentions = model(input_ids)[-2:]

    #模型与Torchscript兼容
    model = model_class.from_pretrained(pretrained_weights, torchscript=True)
    traced_model = torch.jit.trace(model, (input_ids,))

    # 模型和分词的简单序列化
    model.save_pretrained('./directory/to/save/')  # 保存
    model = model_class.from_pretrained('./directory/to/save/')  # 重载
    tokenizer.save_pretrained('./directory/to/save/')  # 保存
    tokenizer = BertTokenizer.from_pretrained('./directory/to/save/')  # 重载
如何用12行代码训练TensorFlow 2.0模型,然后加载在PyTorch快速检验/测试。
import tensorflow as tf
import tensorflow_datasets
from transformers import *

# 从预训练模型/词汇表中加载数据集、分词器、模型
tokenizer = BertTokenizer.from_pretrained('bert-base-cased')
model = TFBertForSequenceClassification.from_pretrained('bert-base-cased')
data = tensorflow_datasets.load('glue/mrpc')

# 准备数据集作为tf.data.Dataset的实例
train_dataset = glue_convert_examples_to_features(data['train'], tokenizer, max_length=128, task='mrpc')
valid_dataset = glue_convert_examples_to_features(data['validation'], tokenizer, max_length=128, task='mrpc')
train_dataset = train_dataset.shuffle(100).batch(32).repeat(2)
valid_dataset = valid_dataset.batch(64)

# 准备训练:编写tf.keras模型与优化,损失和学习率调度
optimizer = tf.keras.optimizers.Adam(learning_rate=3e-5, epsilon=1e-08, clipnorm=1.0)
loss = tf.keras.losses.SparseCategoricalCrossentropy(from_logits=True)
metric = tf.keras.metrics.SparseCategoricalAccuracy('accuracy')
model.compile(optimizer=optimizer, loss=loss, metrics=[metric])

# 用tf.keras.Model.fit进行测试和评估
history = model.fit(train_dataset, epochs=2, steps_per_epoch=115,
                    validation_data=valid_dataset, validation_steps=7)

# 在PyTorch中加载TensorFlow模型进行检查
model.save_pretrained('./save/')
pytorch_model = BertForSequenceClassification.from_pretrained('./save/', from_tf=True)

#让我们看看我们的模型是否学会了这个任务
sentence_0 = "This research was consistent with his findings."
sentence_1 = "His findings were compatible with this research."
sentence_2 = "His findings were not compatible with this research."
inputs_1 = tokenizer.encode_plus(sentence_0, sentence_1, add_special_tokens=True, return_tensors='pt')
inputs_2 = tokenizer.encode_plus(sentence_0, sentence_2, add_special_tokens=True, return_tensors='pt')

pred_1 = pytorch_model(inputs_1['input_ids'], token_type_ids=inputs_1['token_type_ids'])[0].argmax().item()
pred_2 = pytorch_model(inputs_2['input_ids'], token_type_ids=inputs_2['token_type_ids'])[0].argmax().item()

print("sentence_1 is", "a paraphrase" if pred_1 else "not a paraphrase", "of sentence_0")
print("sentence_2 is", "a paraphrase" if pred_2 else "not a paraphrase", "of sentence_0")
 支付宝打赏
支付宝打赏  微信打赏
微信打赏