扩散模型 DDPM
扩散模型
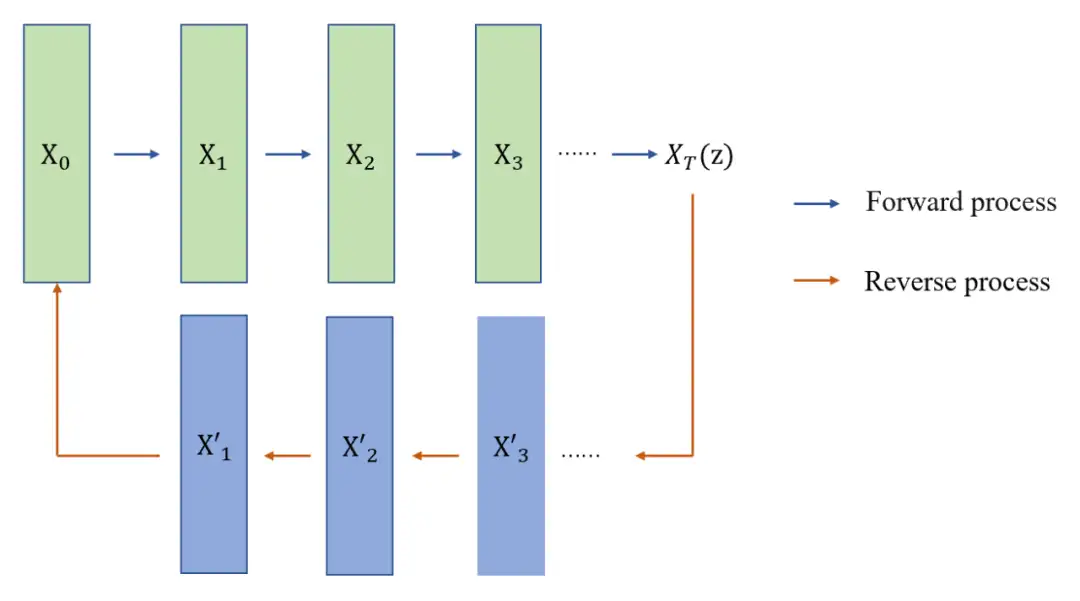
标准的扩散模型分为两个主要过程:正向过程(扩散)和反向过程(去噪、还原和生成目标)。
- 正向扩散阶段,逐渐引入噪声,直到图像变成完全随机的噪声。
- 再通过反向过程,使用一系列的
马尔科夫链进行去噪,得到最终清晰的图像数据。 
新出现的扩散模型(Denoising Diffusion Probabilistic Model,DDPM),整体原理上与 VAE 更加接近。
- X0 是输入样本,如一张原始图片,通过 T 步前向过程(Forward process)采样变换,最后生成了噪声图像 XT ,理解为隐变量 z。这个过程通过马尔科夫链实现。
随机过程中一个定理
- 符合马尔科夫链状态转移的模型,当状态转移到一定次数时,模型状态最终收敛于一个平稳分布。
- 等效于溶质在溶液中溶解的过程,随着溶解过程的进行,溶质(噪声)最终会整体分布到溶液(样本)中。类似 VAE 中的 encoder。而逆向过程(Reverse process)可以理解为 decoder。通过 T 步来还原到原始样本。
扩散模型核心创新:将数据生成过程建模为一个逐步去噪的逆扩散过程,使模型学习到数据分布的复杂结构,同时避免了 GANs 训练中常见的模式崩溃问题。
随着 Stable Diffusion、Sora 等代表性模型的推出,扩散模型已成为当前 AIGC 领域的主流技术之一
什么是扩散模型
扩散模型灵感来自非平衡热力学。通过定义了一个扩散步骤的马尔可夫链,以缓慢地将随机噪声添加到数据中,然后学习反转扩散过程以从噪声中构建所需的数据样本。
- 发布DALL·E的15个月后,OpenAI在今年春天带了续作DALL·E 2,以其更加惊艳的效果和丰富的可玩性迅速占领了各大AI社区的头条。近年来,随着生成对抗网络(GAN)、变分自编码器(VAE)、扩散模型(Diffusion models)的出现,深度学习已向世人展现其强大的图像生成能力;加上GPT-3、BERT等NLP模型的成功,人类正逐步打破文本和图像的信息界限。
- DALL·E 2中,只需输入简单的文本(prompt),它就可以生成多张1024*1024的高清图像。这些图像甚至可以将不合常理的语义表示,以超现实主义的形式创造出天马行空的视觉效果,例如图1中“写实风格的骑马的宇航员(An astronaut riding a horse in a photorealistic style)”。
【2022-8-31】苏剑林的生成扩散模型漫谈
- 生成模型中,VAE、GAN“如雷贯耳”,还有一些比较小众的选择,如flow模型、VQ-VAE等,颇有人气,尤其是VQ-VAE及其变体VQ-GAN,近期已经逐渐发展到“图像的Tokenizer”的地位,用来直接调用NLP的各种预训练方法。
- 除此之外,还有一个本来更小众的选择——
扩散模型(Diffusion Models)——正在生成模型领域“异军突起”,当前最先进的两个文本生成图像—— OpenAI 的DALL·E 2和 Google的Imagen,都是基于扩散模型来完成的。
生成扩散模型的大火,始于2020年所提出的DDPM(Denoising Diffusion Probabilistic Model),虽然也用了“扩散模型”这个名字,但事实上除了采样过程的形式有一定的相似之外,DDPM与传统基于朗之万方程采样的扩散模型完全不一样,一个新的起点、新的篇章。
【2024-2-13】深入理解3D扩散模型
扩散过程具有向图像添加噪声的正向过程和从图像中去除噪声的反向过程。
噪声图像= a ⋅噪声较小的图像+ b ⋅噪声噪声较小的图像= (噪声图像- b⋅噪声)/a- ab是常数, 所有
图像=(噪声图像- b’·噪声)/a’
主要步骤
- 从纯噪声开始作为噪声图像
- 使用模型预测噪声,将图像推向噪声较少的图像
- 进行上述计算以获得噪声较少的图像
教程
视频
【2025-7-31】AI如何从“噪声”中创造现实:揭秘扩散模型背后的原理
【2025-10-30】近500页史上最全扩散模型修炼宝典,宋飏等人一书覆盖三大主流视角
Sony AI、OpenAI 和斯坦福大学,专著《The Principles of Diffusion Models》,系统梳理了扩散模型的发展脉络与核心思想,并深入解析了这些模型如何工作、为何有效、以及未来将走向何方。不仅回顾了理论起点,也以统一的数学框架串联了变分、得分与流等多种视角。
- arxiv 地址:The Principles of Diffusion Models
SD 可视化
什么是扩散模型?
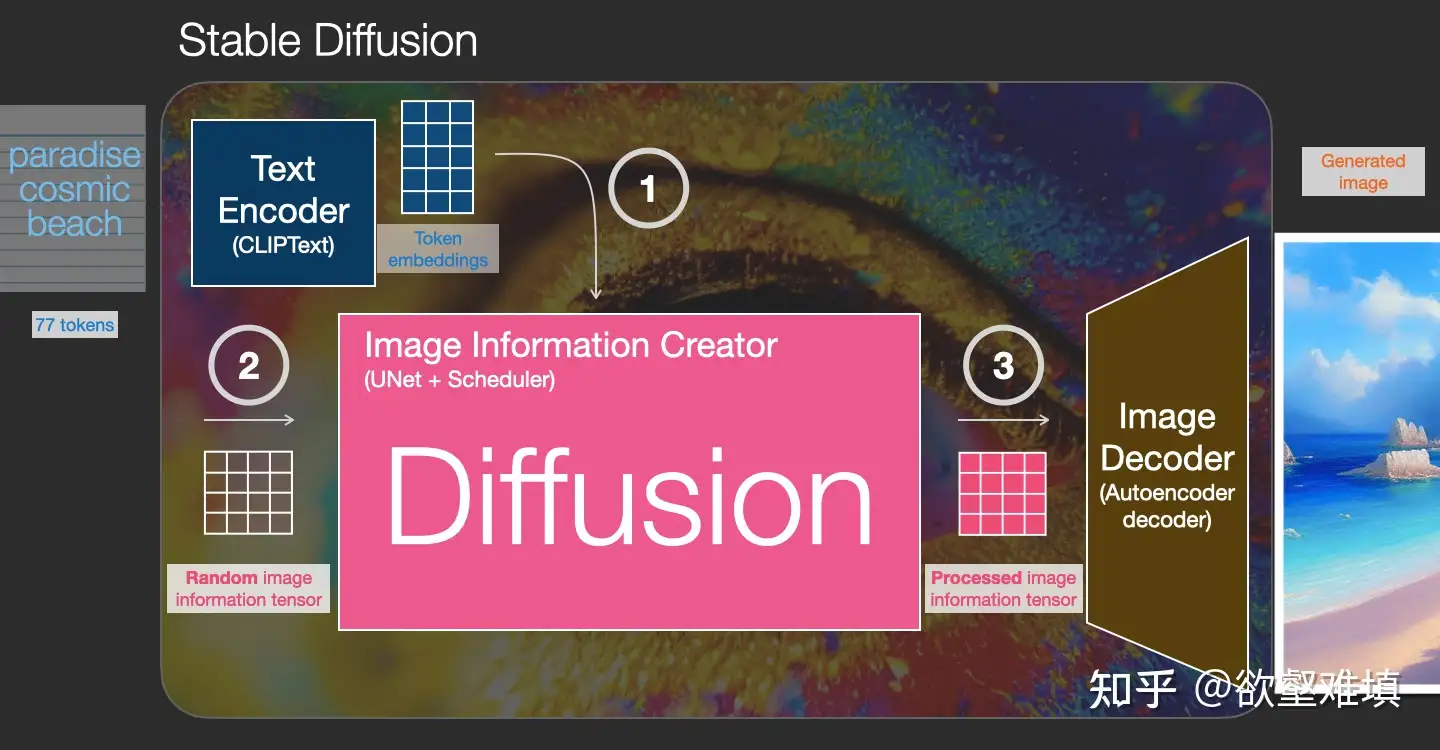
扩散是发生在粉红色图像信息生成器组件内部的过程。 该组件的输入为用于表示输入文本信息的 token 嵌入,和一个起始的随机噪声图像信息张量,生成一个信息张量,图像解码器使用该信息张量绘制最终图像。
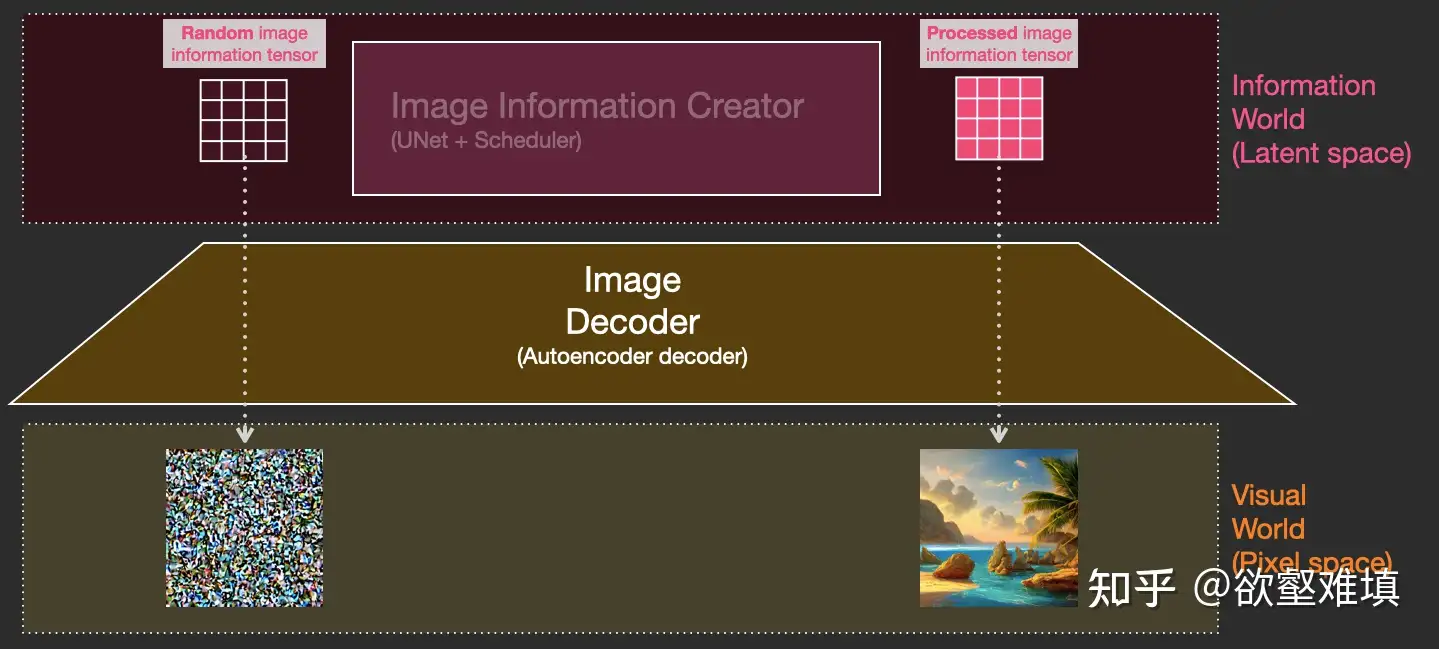
- 这个过程以多步形式进行。每步添加更多的相关信息。为了直观地理解整个过程,将随机潜层张量(latent)传递给视觉解码器,看它是否转换为随机视觉噪声。
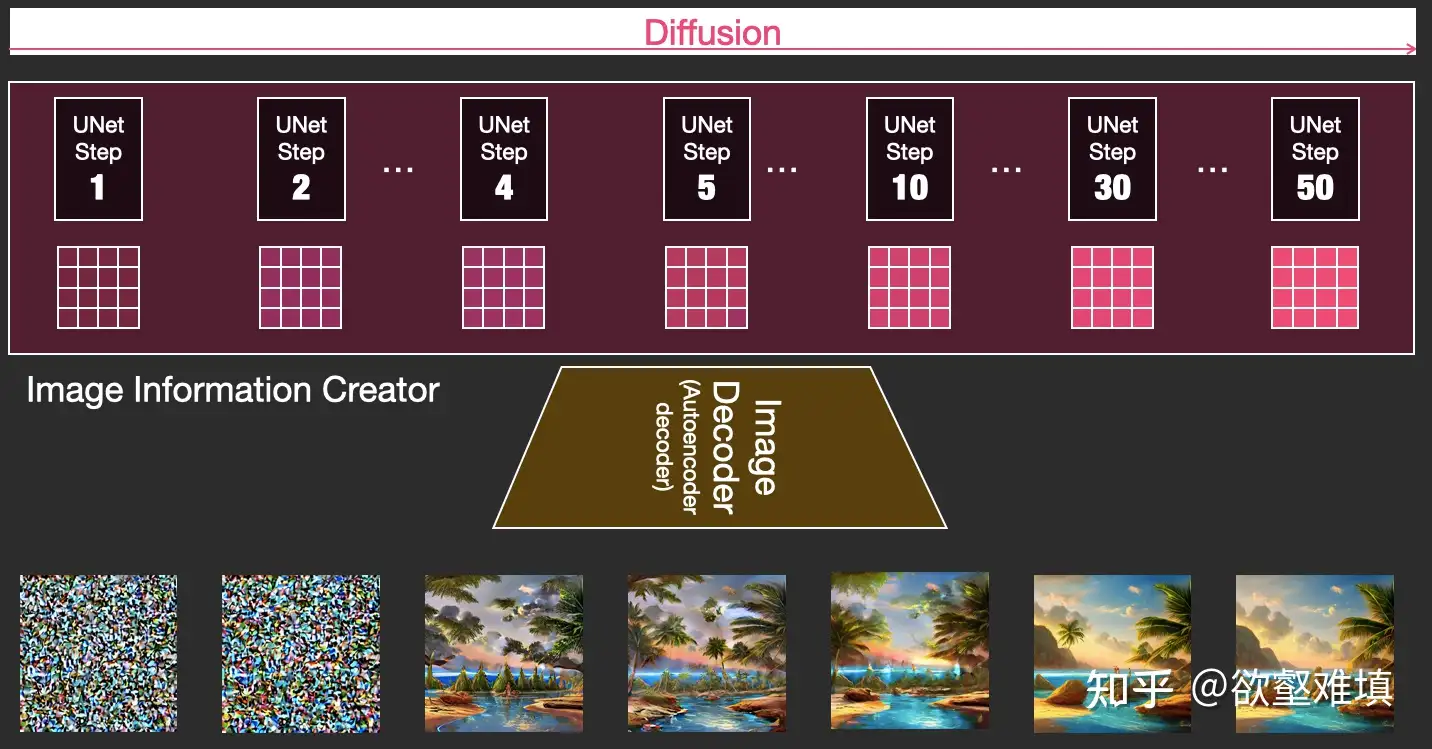
- 扩散过程有多步,每步操作一个输入潜层张量,并生成一个新的潜层张量。新的张量更好地集成了输入文本和视觉信息,其中视觉信息来自模型训练集中的图像。

详见原文:illustrated-stable-diffusion
站点 poloclub 提供多种模型原理可视化,包含扩散模型
- Demo Learn how Stable Diffusion transfo
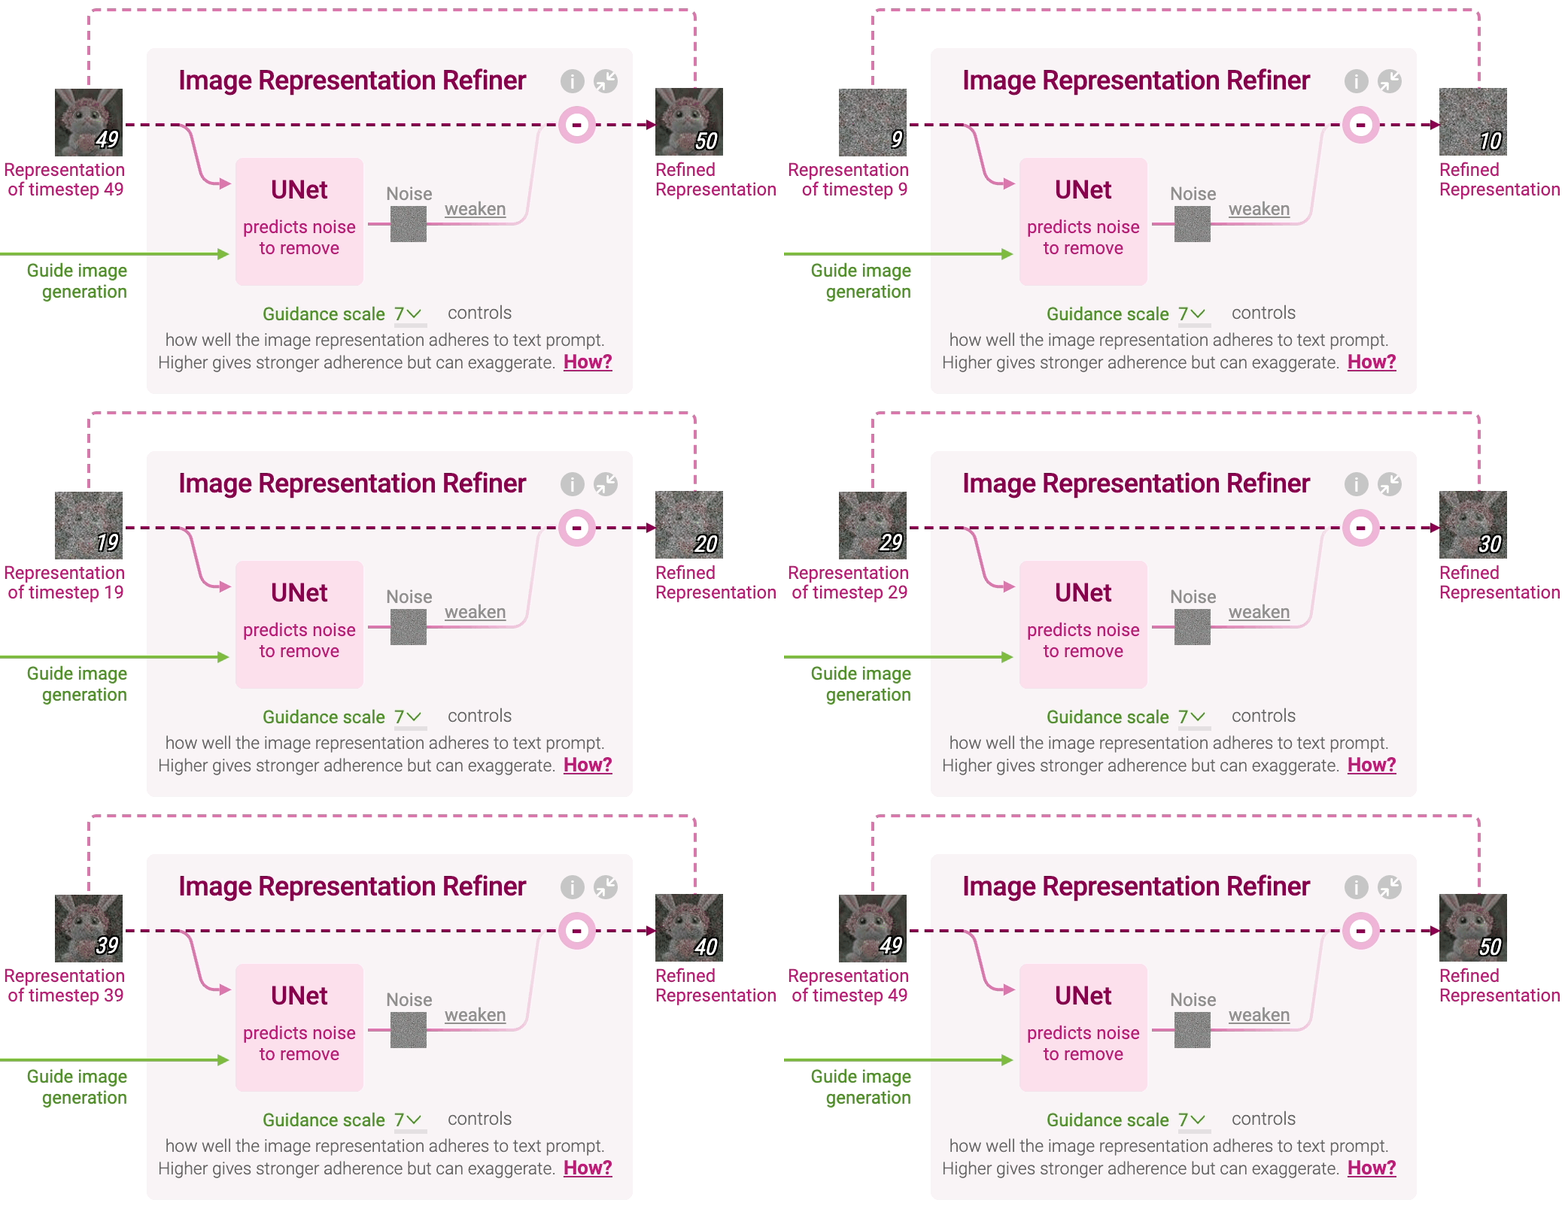
扩散模型概览
【2023-4-5】扩散模型(Diffusion Model)首篇综述
- Diffusion Models: A Comprehensive Survey of Methods and Applications
- 加州大学&Google Research的Ming-Hsuan Yang、斯坦福大学(OpenAI)的Yang Song(Score SDE一作)、北京大学崔斌实验室以及CMU、UCLA、蒙特利尔Mila研究院等众研究团队,首次对现有的扩散生成模型(diffusion model)进行了全面的总结分析,从diffusion model算法细化分类、和其他五大生成模型的关联以及在七大领域中的应用等方面展开,最后提出了diffusion model的现有limitation和未来的发展方向。
扩散模型(diffusion models)是深度生成模型中新的SOTA。其他的五种生成模型 GAN,VAE,Autoregressive model, Normalizing flow, Energy-based model。
- 扩散模型在图片生成任务中超越了原SOTA:GAN,并且在诸多应用领域都有出色的表现,如计算机视觉,NLP、波形信号处理、多模态建模、分子图建模、时间序列建模、对抗性净化等。
- 此外,扩散模型与其他研究领域有着密切的联系,如稳健学习、表示学习、强化学习。然而,原始的扩散模型也有缺点,它的采样速度慢,通常需要数千个评估步骤才能抽取一个样本;它的最大似然估计无法和基于似然的模型相比;它泛化到各种数据类型的能力较差。如今很多研究已经从实际应用的角度解决上述限制做出了许多努力,或从理论角度对模型能力进行了分析。
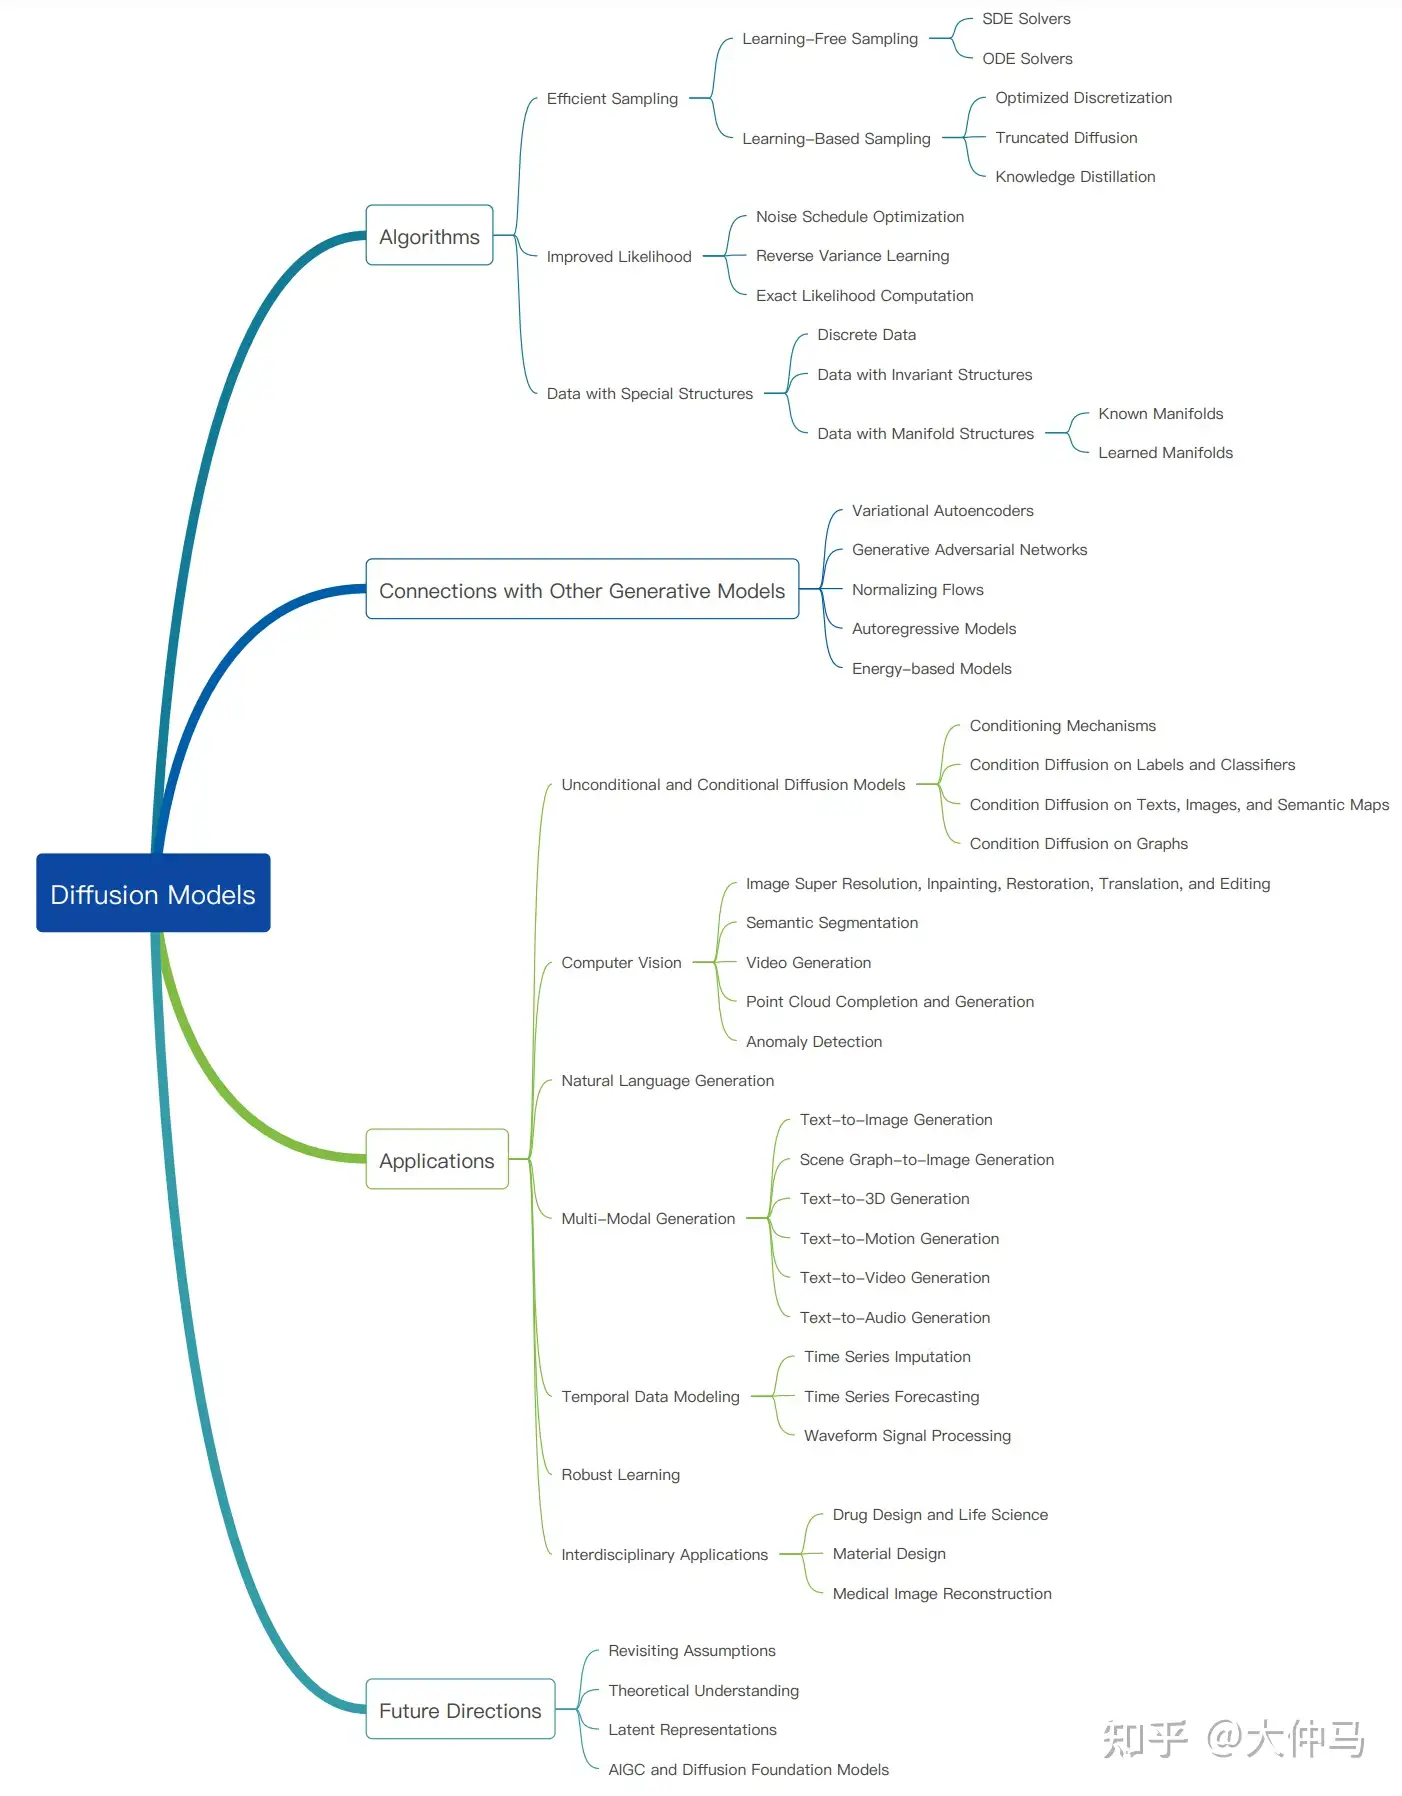
【2024-5-27】 MIT 助理教授 Song Han 的 100多页 DDPM 介绍 ppt
论文
- 【2022-9-20】扩散模型大全
- hugginface 扩散模型包:diffusers,colab笔记
- demo: stable-diffusion
经典论文
- 《Deep Unsupervised Learning using Nonequilibrium Thermodynamics》 2015年 扩散模型起源
- 《Denoising Diffusion Probabilistic Models》 2020年 扩散模型兴起, 对应pytorch实现
- 《Improved Denoising Diffusion Probabilistic Models》 2021年 第二篇论文的改进, 对应pytorch实现
技术文章
- The recent rise of diffusion-based models 可以了解到扩散模型近年比较经典的应用
- Introduction to Diffusion Models for Machine Learning 从中可以了解到一个实现扩散模型的库denoising_diffusion_pytorch,博客中有使用案例
- What are Diffusion Models? 也是扩散模型的一个理论介绍博客,推导挺详细的
- Diffusion Models as a kind of VAE 探究了VAE和扩散模型的联系
- The Annotated Diffusion Model 扩散模型理论和代码实现,代码我进行理解加了注释与理论对应,方便大家理解
- An introduction to Diffusion Probabilistic Models 也是一个介绍性博客,公式也很工整
模型
模型下载
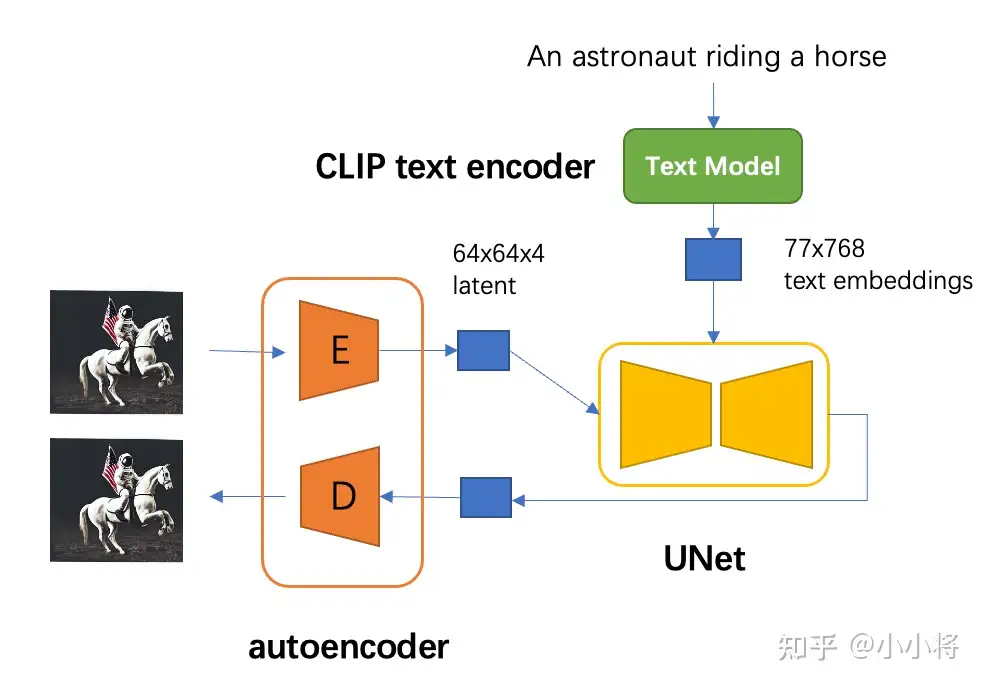
SD模型的主体结构如下图所示,主要包括三个模型:
autoencoder:encoder将图像压缩到latent空间,而decoder将latent解码为图像;CLIP text encoder:提取输入text的text embeddings,通过cross attention方式送入扩散模型的UNet中作为condition;- SD采用CLIP text encoder来对输入text提取text embeddings,具体的是采用目前OpenAI所开源的最大CLIP模型:clip-vit-large-patch14,这个CLIP的text encoder是一个transformer模型(只有encoder模块):层数为12,特征维度为768,模型参数大小是123M。
UNet:扩散模型的主体,用来实现文本引导下的latent生成。- SD的扩散模型是一个860M的UNet
- encoder部分包括3个CrossAttnDownBlock2D模块和1个DownBlock2D模块,而decoder部分包括1个UpBlock2D模块和3个CrossAttnUpBlock2D模块,中间还有一个UNetMidBlock2DCrossAttn模块。
- encoder和decoder两个部分是完全对应的,中间存在skip connection。
- 注意3个CrossAttnDownBlock2D模块最后均有一个2x的downsample操作,而DownBlock2D模块是不包含下采样的。
模型结构
对于SD模型
- autoencoder 模型参数大小为84M
- CLIP text encoder 模型大小为123M
- 而 UNet 参数大小为 860M
所以 SD 模型总参数量约为 1B。
DLM 扩散语言模型
扩散语言模型
详见站内专题: 扩散语言模型
历史
理论基础
2020 DDPM 奠基
2020 年,Ho 等人提出去噪扩散概率模型(Denoising Diffusion Probabilistic Models, DDPM), 首次系统构建了扩散模型的理论框架。
DDPM 的核心思想是将数据生成过程视为一个两阶段的马尔可夫链:
- 前向扩散过程:逐步向初始数据中添加高斯噪声,直至数据分布变为标准高斯分布
- 反向去噪过程:从纯噪声开始,通过学习的去噪模型逐步恢复原始数
DDPM 重要贡献在于证明了扩散模型能够生成与 GAN 相媲美的图像质量,同时训练过程更加稳定,这为后续扩散模型的发展奠定了理论基础。
2021 DDIM
DDIM:确定性采样的突破
2021 年,Song 等人提出去噪扩散隐式模型 (Denoising Diffusion Implicit Models, DDIM) 对 DDPM 进行了重要改进。
DDIM 核心创新
- 将扩散过程推广到非马尔可夫链,实现了确定性采样路径,从而大幅提高了推理效率。
DDIM 主要贡献:
- 实现了确定性采样,大幅减少了生成高质量样本所需的步数 (20 - 50 步即可)
- 证明了扩散模型可以进行隐变量插值,支持图像编辑等高级功能
- 为后续加速采样方法奠定了基础
DDIM 使扩散模型在保持生成质量的同时,推理速度得到显著提升,为其实用化应用铺平了道路。
加速采样与效率提升
2021 基于随机微分方程的统一框架
2021 年,Song 等提出了基于随机微分方程 (SDE) 的统一框架,将扩散模型与分数匹配方法统一起来。
- 论文《Score-Based Generative Modeling through Stochastic Differential Equations》
这一框架的核心贡献:
- 将扩散过程建模为连续时间的随机微分方程,使得 DDPM 可以被视为 SDE 的离散化近似
- 提出了概率流常微分方程 (Probability Flow ODE),实现了更高效的采样过程
为设计更高效的采样方法提供了理论基础
这一框架的重要性: 不仅加深了对扩散模型本质的理解,还为后续加速采样方法提供了理论指导,使得研究者可以从连续时间的角度设计更高效的离散化方案。
2022 潜空间扩散模型与 Stable Diffusion
2022 年,Rombach 等人提出潜空间扩散模型 (Latent Diffusion Models, LDM) 是扩散模型发展历程中的又一重要里程碑。
LDM 核心创新: 将扩散过程从像素空间转移到低维潜空间,从而大幅降低计算成本:
- 引入变分自编码器 (VAE) 将高维图像压缩到低维潜空间
- 在潜空间中进行扩散过程,显著减少计算量和内存需求
- 结合 CLIP 文本编码器,实现了高质量的文本到图像生成
LDM 的重要应用是 Stable Diffusion,这一开源模型使得高质量文本到图像生成成为可能,极大地推动了 AIGC 技术的普及。
Stable Diffusion 的关键优势在于:
- 只需 4GB 显存即可处理 512×512 图像生成
- 生成速度大幅提升,适用于广泛的计算设备
- 开源生态促进了 AIGC 应用的快速发展
LDM 标志着扩散模型从学术研究走向产业应用的重要转折点,为后续更多实用化应用奠定了基础。
2022 DPM - Solver:高阶 ODE 求解器加速
2022 年,Lu 等人提出扩散概率模型求解器 (Diffusion Probabilistic Model Solver, DPM - Solver) 进一步提高了扩散模型的采样效率。
DPM - Solver 核心思想: 将反向去噪过程视为一个常微分方程 (ODE)**,并应用高阶 ODE 求解器来加速采样:
- 提出了基于 Runge - Kutta 方法的高阶求解器,显著减少了生成高质量样本所需的步数
- 证明了仅需 10 - 20 步即可生成与 DDPM 相当质量的样本
- 支持自适应步长控制,进一步提高了效率
DPM - Solver 的重要性在于,不仅大幅提高了扩散模型的推理速度,还使得扩散模型能够适应实时应用场景,如交互式图像编辑和实时视频生成。
可控生成与多模态扩展
无分类器引导技术
2022 年,Ho 和 Salimans 提出无分类器引导 (Classifier - Free Guidance) 技术是提高扩散模型可控性的关键突破。
这一技术的核心思想是:
- 无需额外训练分类器,直接训练条件和无条件扩散模型的联合模型
- 通过在推理时调整条件信号的权重,控制生成样本的质量和多样性
- 实现了对生成过程的精细控制,同时保持了模型的简洁性
意义
- 扩散模型在不增加模型参数的情况下,实现对生成过程的有效控制,为后续可控生成方法奠定了基础。
- DALL・E 2、Stable Diffusion 等知名模型均采用了这一技术。
2023 ControlNet 技术
2023 年,Zhang 等人提出 ControlNet 技术进一步增强了扩散模型的可控性。
ControlNet 的核心创新是:
- 通过额外的控制信号 (如边缘图、深度图、姿态图等) 精细调控生成过程
- 引入零初始化技术,使得预训练模型可以在不大量重新训练的情况下接受新的控制信号
- 实现了姿势控制、结构保持等高级编辑功能
ControlNet 的重要贡献
- 为扩散模型提供了一种灵活的条件控制机制,使得用户可以更精确地控制生成结果,极大地扩展了扩散模型的应用场景。从艺术创作到建筑设计,ControlNet 都展现了强大的应用潜力。
级联扩散模型与高分辨率生成
2022 - 2023 年,Google 研究团队开发的 Imagen 和 eDiff - I 模型代表了级联扩散模型的重要进展。这些模型的核心创新是:
- 采用级联架构,分阶段提高图像分辨率 (如 64→256→1024)
- 结合 T5 - XXL 文本编码器,实现对复杂语义的精确理解
- 通过多阶段生成,显著提高了高分辨率图像的生成质量
Imagen 和 eDiff - I 的主要贡献在于,证明了扩散模型可以生成极高分辨率的图像,并且在语义准确性和细节丰富度方面达到了新的 SOTA 水平。这一突破为扩散模型在专业设计、影视制作等领域的应用开辟了新的可能性。
视频与 3D 生成
视频扩散模型
2023 - 2024 年,视频生成领域取得了重大突破,多家机构推出了基于扩散模型的视频生成技术。代表性工作包括:
- Imagen Video (Google):实现了文本到视频生成,支持 1280×768 分辨率和 24fps 帧率
- Make - A - Video (Meta):无需成对数据训练,学习视频动态先验
- CogVideoX - 5B:通过改进架构设计,提高了视频生成的时空一致性
然而,视频生成仍然面临多项挑战:
- 计算成本高昂,需要大量的计算资源
- 时序一致性优化困难,容易出现闪烁和物体漂移
- 长视频生成的连贯性问题尚未完全解决
2025 年,MIT 团队提出的扩散强制 Transformer (Diffusion Forcing Transformer, DFoT) 算法解决了长视频生成的挑战。DFoT 通过历史引导 (History Guidance) 机制,在不改变原有架构的情况下,使模型能够稳定生成800 帧以上的超长篇视频,将视频生成长度提升了近 50 倍。这一突破使得扩散模型在视频内容创作领域的应用前景更加广阔。
3D 生成技术
2022 - 2024 年,扩散模型在 3D 生成领域也取得了显著进展。代表性工作包括:
- DreamFusion (Google, 2022):实现了从文本到 3D 模型的生成,无需 3D 数据训练
- Stable Diffusion 3D (StabilityAI, 2023):结合扩散模型与显式 3D 表示,提高了 3D 生成质量
- DiffRF:通过辐射场表示,实现了高质量的 3D 场景生成
2025 年,清华大学团队提出的 VideoScene 模型进一步打通了视频到 3D 的生成路径。VideoScene 采用 “一步式” 视频扩散模型,利用 3D - aware leap flow distillation 策略,通过跳跃式跨越冗余降噪步骤,极大地加速了推理过程。这一模型的创新点在于:
- 采用 3D 跃迁流蒸馏策略,直接从含有丰富 3D 信息的粗略场景渲染视频开始生成
- 引入动态降噪策略,充分利用 3D 先验信息
- 在保证高质量的同时大幅提升生成效率,单步生成结果即可媲美传统方法 50 步的效果
这些进展表明,扩散模型在 3D 内容生成领域的应用潜力正在逐步释放,未来有望在游戏开发、虚拟现实等领域发挥更大作用。
前言技术
前沿技术
一致性模型
2023 年,OpenAI 提出的一致性模型 (Consistency Models) 是扩散模型领域的重要创新。这一模型的核心思想
提出了一步生成 (1 - Step Sampling) 方法,挑战传统扩散模型的慢采样问题
通过自洽性 (Consistency) 约束,实现快速推理
扩散 Transformer 架构
2023 年,Meta 团队提出的扩散 Transformer (Diffusion Transformers, DiT) 是对传统 U-Net 架构的重要改进。
DiT 的核心创新是:
- 用 Transformer 替代传统的 U - Net 作为扩散模型的骨干网络
- 引入自适应层归一化 (AdaLN) 技术,有效整合条件信息
- 提高了模型的扩展性,适用于超大规模训练 (10 亿 + 参数)
DiT 的架构设计使得扩散模型能够更好地捕捉全局依赖关系,提高了生成样本的质量和一致性。2025 年,研究者进一步提出了多尺度扩散 Transformer (Multi - Scale Diffusion Transformer, MDiT),通过将 DiT 视为语义自编码器,实现了 3 倍的收敛速度提升和 7 倍的整体训练加速。
此外,DiT 在视频生成领域的应用也取得了重大突破。2024 年,OpenAI 推出的 Sora 模型采用了 DiT 架构,实现了文本到长视频 (60 秒以上) 的生成,并具备物理模拟和世界模型能力。Sora 的成功验证了 DiT 架构在处理复杂时空数据方面的强大能力。
2025 可逆扩散模型
2025 年,北京大学、阿卜杜拉国王科技大学和字节跳动联合提出的可逆扩散模型 (Invertible Diffusion Models, IDM) 是扩散模型领域的最新突破。这一模型针对图像重建任务中的两个关键挑战:
- “噪声估计” 任务与 “图像重建” 任务之间的偏差
- 推理速度慢、效率低的问题
IDM 的核心创新包括:
- 端到端的训练框架:将扩散采样过程重新定义为整体的图像重建网络,直接针对图像重建任务进行优化
- 双层可逆网络设计:通过可逆网络减少内存开销,使得大规模扩散模型的端到端训练成为可能
实验结果表明,IDM 在图像压缩感知重建任务中取得了显著提升:
- 在 PSNR 指标上比其他模型提高了 2dB
- 采样步数从原本的 100 步减少到 3 步,推理速度提升了约 15 倍
在医学影像领域的应用也取得了良好效果
这一成果展示了扩散模型在图像重建领域的巨大潜力,为医学成像、遥感等领域提供了新的解决方案。
扩散模型原理
扩散模型(Diffusion models)定义了正向和逆向两个过程
- 正向过程: 或扩散过程, 从真实数据分布采样,逐步向样本添加高斯噪声,生成噪声样本序列,加噪过程可用方差参数控制,当时,可近似等同于一个高斯分布。

标准的扩散模型(diffusion models)涉及到图像变换(添加高斯噪声)和图像反转。但是扩散模型的生成并不强烈依赖于图像降解的选择。通过实验证明了基于完全确定性的降解(例如模糊、masking 等),也可以轻松训练一个扩散生成模型。
这个工作成功质疑了社区对扩散模型的理解:并非依赖于梯度郎之万动力学(gradient Langevin dynamics)或变分推理(variational inference)。
DDPM叫“渐变模型”更准确,扩散模型这一名字反而容易造成理解上的误解,传统扩散模型的能量模型、得分匹配、朗之万方程等概念,其实跟DDPM及其后续变体都没什么关系。
- DDPM 数学框架其实在ICML2015 论文《Deep Unsupervised Learning using Nonequilibrium Thermodynamics》就已经完成了,但DDPM是首次将它在高分辨率图像生成上调试出来了,从而引导出了后面的火热。由此可见,一个模型的诞生和流行,往往还需要时间和机遇
Stable Diffusion
【2023-4-10】图解Stable Diffusion
- jalammar illustrated-stable-diffusion
Stable Diffusion(简称SD)是AI绘画领域的一个核心模型,能够进行文生图(txt2img)和图生图(img2img)等图像生成任务。
- 与 Midjourney 不同的是,Stable Diffusion 是一个完全开源的项目(模型、代码、训练数据、论文、生态等全部开源),这使得其能快速构建强大繁荣的上下游生态(AI绘画社区、基于SD的自训练AI绘画模型、丰富的辅助AI绘画工具与插件等),并且吸引了越来越多的AI绘画爱好者加入其中,与AI行业从业者一起推动AIGC领域的发展与普惠。
对Stable Diffusion模型的全维度各个细节做一个深入浅出的分析与总结(SD模型结构解析、SD模型经典应用场景介绍、SD模型性能优化、SD模型从0到1保姆级训练教程,SD模型不同AI绘画框架从0到1推理运行保姆级教程、最新SD模型资源汇总分享、SD相关配套工具使用等
【2024-5-18】深入浅出完整解析Stable Diffusion(SD)核心基础知识
Stable Diffusion 发布是AI 绘画领域的一个里程碑事件。它的出现使得普通人也能使用高性能的图像生成模型。
- 生成的图像效果极佳,速度还很快,对硬件资源的要求相对较低。
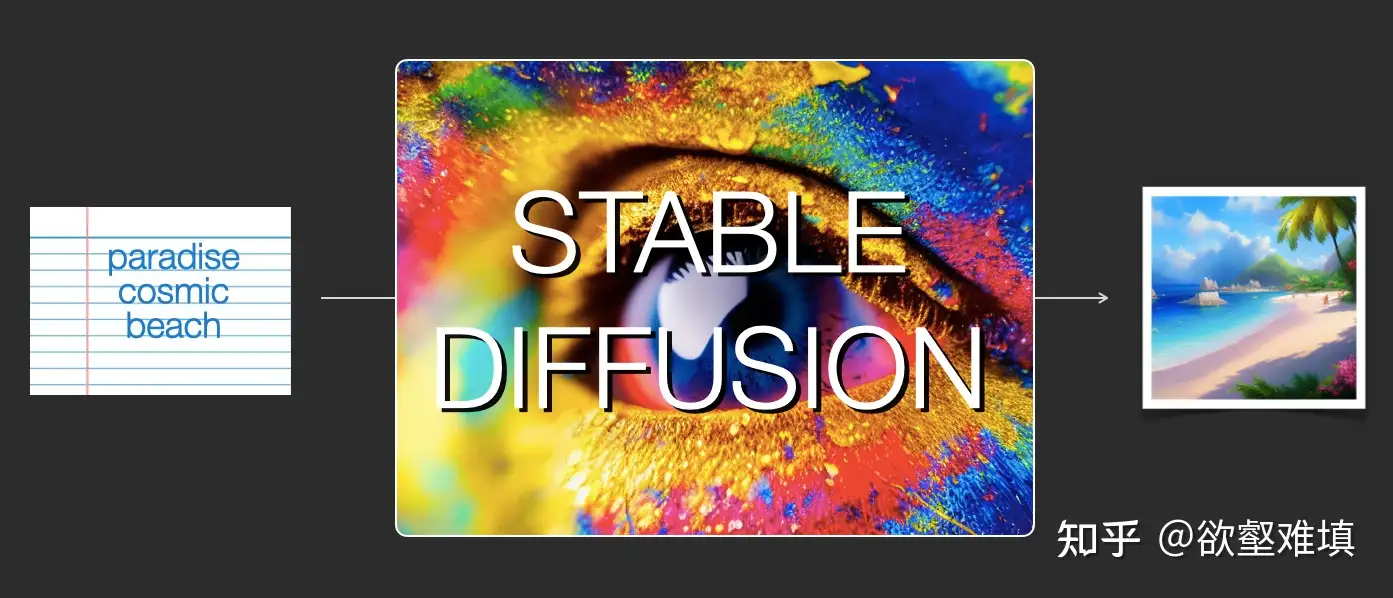
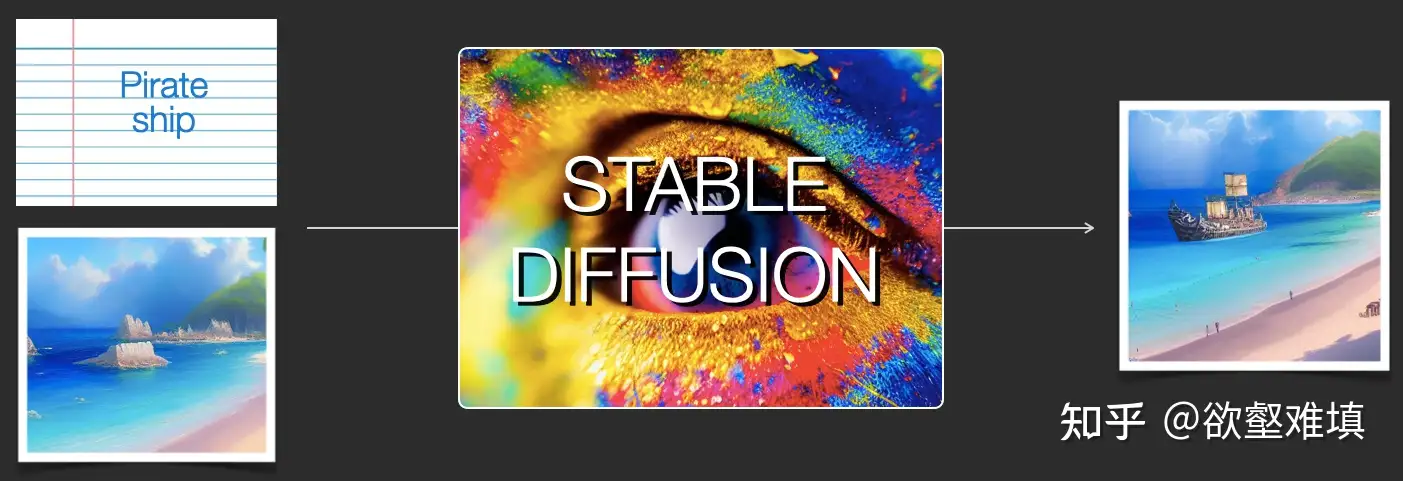
Stable Diffusion 用法
- 文本生成图像 text2image
- 修改图像(此时输入为文本+图像)
扩散模型组件
Stable Diffusion 是由多个组件和模型组成的系统, 而非一个整体的模型。
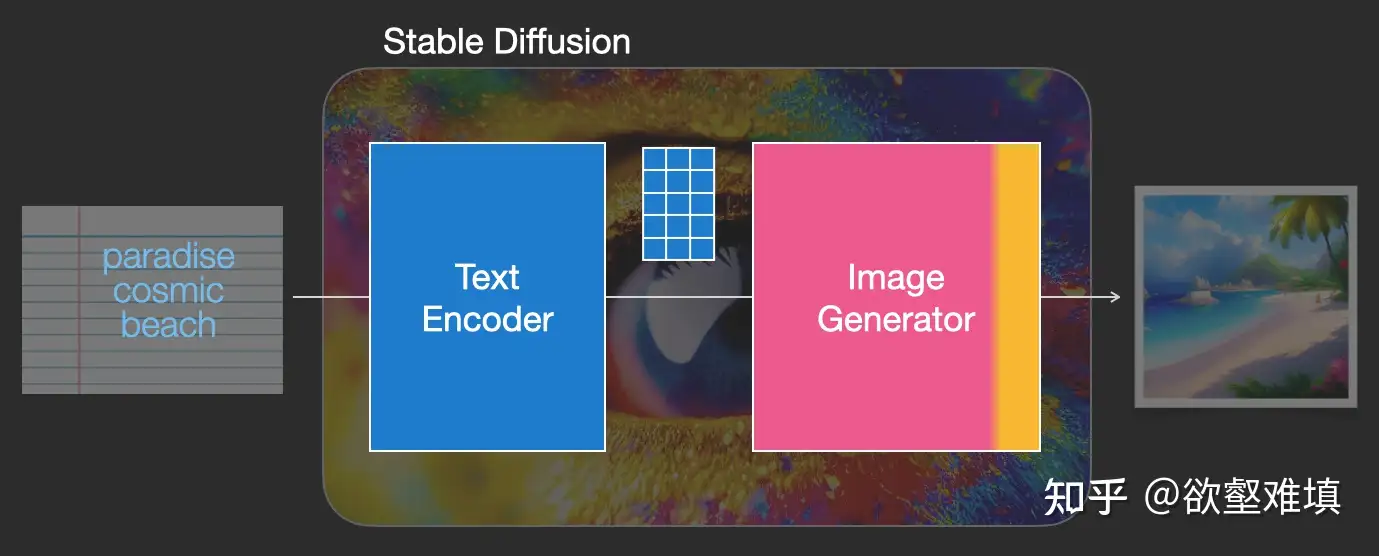
文本理解(text-understanding)组件: 捕捉文本中的意图,将文本信息转换为模型能够理解的数值表示。- 文本编码器是一种特殊的 Transformer 语言模型(CLIP 模型的文本编码器)。 获取输入文本并输出代表文本中每个单词/token 的数值表示(每个 token 由一个向量表示)
图像生成器(Image Generator),也由多个组件组成。由以下两个阶段组成:图像信息生成器(Image Information Creator): Stable Diffusion 成功的秘诀,是性能和效率高于之前工作的原因。运行多步来生成图像信息。步数就是 Stable Diffusion 界面或库中的steps 参数,通常设为 50 或 100。图像信息生成器完全在图像信息空间(或者称为潜层空间 latent space)中进行工作. “扩散(diffusion)”描述的就是该组件的行为。该组件通过一步一步地对信息进行处理,从而得到最终的高质量图像(由接下来的图像解码器组件生成)。图像解码器(Image Decoder): 根据图像信息生成器生成的信息画出图像。不同于多步运行的信息生成器,图像解码器仅运行一次,来生成最终的像素级图像。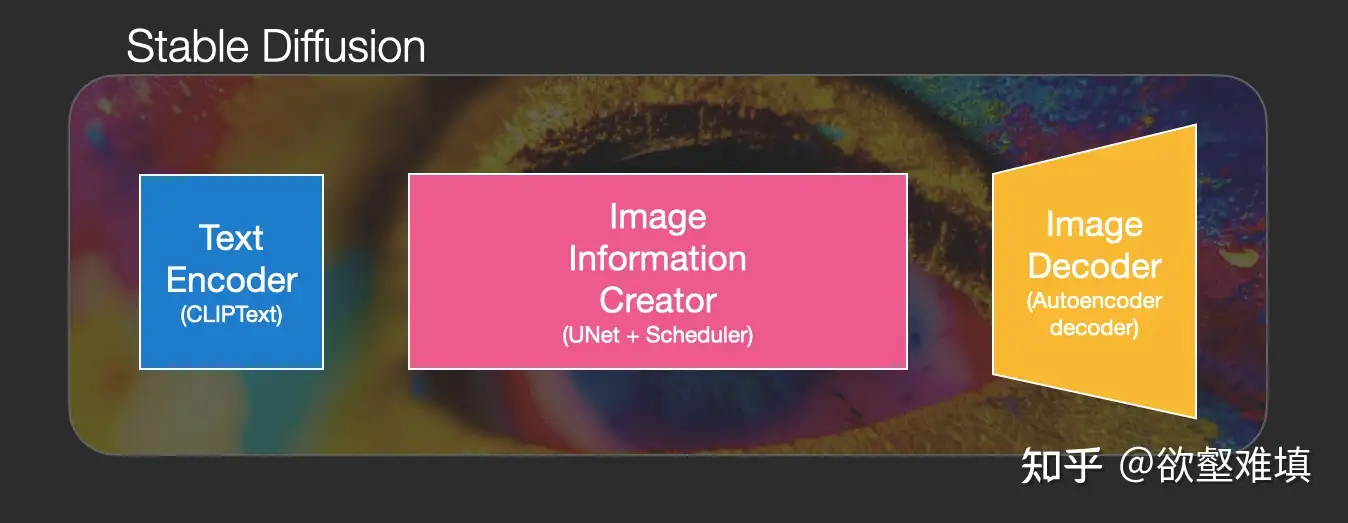
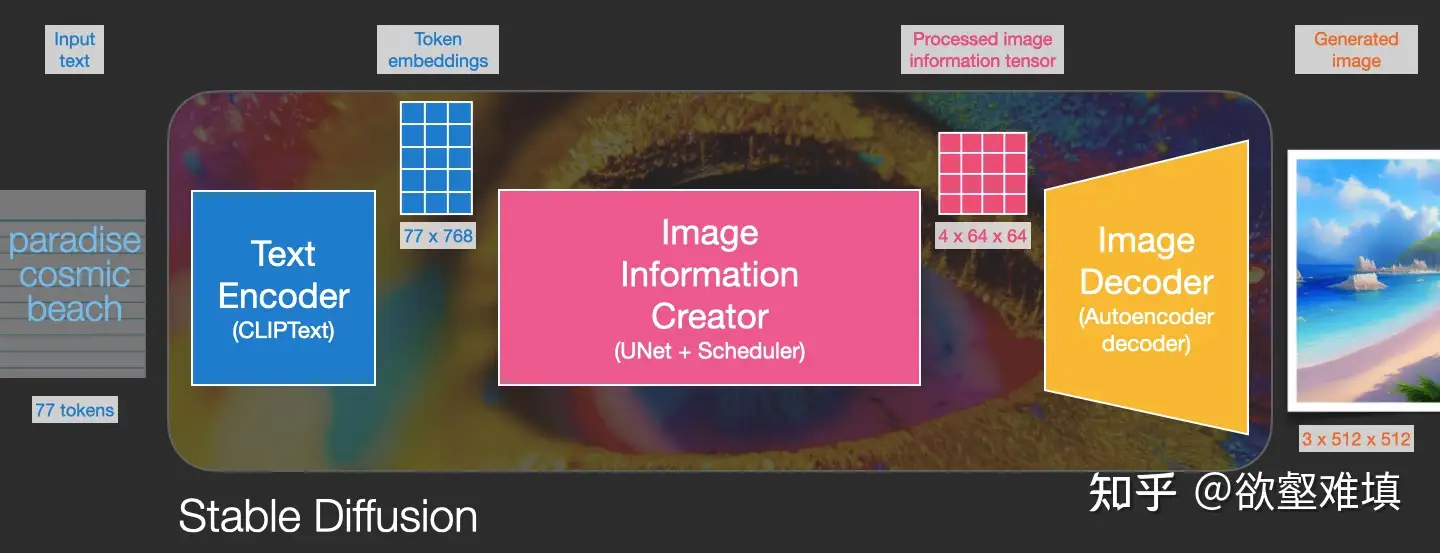
Stable Diffusion 三个主要组件,各自由不同的神经网络组成:
ClipText用于文本编码- 输入:文本
- 输出:77 个 token 嵌入向量,每个向量 768 维
UNet+Scheduler用于在潜层空间中逐步地地处理(或者说扩散)信息- 输入:文本嵌入和一个高维噪声张量
- 输出:经过处理得到的信息张量
AutoEncoder Decoder根据信息张量画出图像- 输入:信息张量(维度 (4, 64, 64))
- 输出:图像(维度:(3, 512, 512))
DDPM 分析
DDPM 缺点
- 设置较长的扩散步数才能得到好的效,这导致生成样本的速度较慢
- 比如扩散步数为1000的话,那么生成一个样本就要模型推理1000次。
DDIM
从最早的 DDPM 开始,一步步还原 Latent Diffusion Model (LDM)的采样算法
DDPM 采样算法:
def ddpm_sample(image_shape):
  ddpm_scheduler = DDPMScheduler() # 维护扩散模型的a,b等变量
  unet = UNet() # unet, 计算去噪过程中的图像应该去除的噪声eps
  xt = randn(image_shape) # 标准正态分布中采样纯噪声图像
  T = 1000
  # 逐步去噪,最终变成一幅图片
  for t in T ... 1: #
    eps = unet(xt, t) # 当前应该去除的噪声
    std = ddpm_scheduler.get_std(t) # 图像方差
    xt = ddpm_scheduler.get_xt_prev(xt, t, eps, std)
  return xt
DDIM(Denoising Diffusion Implicit Models)
- 【2020-10-6】Denoising Diffusion Implicit Models
- 【2023-5-25】扩散模型之DDIM
DDIM 和 DDPM 有相同的训练目标,但不再限制扩散过程必须是一个马尔卡夫链,这使得DDIM可以采用更小的采样步数来加速生成过程
DDIM另一个特点: 从一个随机噪音生成样本的过程是一个确定的过程(中间没有加入随机噪音)。
DDIM 对 DDPM 的采样过程做了两点改进:
- 1) 去噪有效步数可以少于T步,由另一个变量ddim_steps决定;
- 2) 采样方差大小可以由eta决定。
ddim 扩散模型改进,加速,不再随机去噪,而是选定方向
因此,改进后 DDIM算法:
def ddim_sample(image_shape, ddim_steps = 20, eta = 0):
  """
    ddim_steps 去噪循环步数
  """
  ddim_scheduler = DDIMScheduler()
  unet = UNet()
  xt = randn(image_shape)
  T = 1000
  timesteps = ddim_scheduler.get_timesteps(T, ddim_steps) # [1000, 950, 900, ...]
  for t in timesteps:
    eps = unet(xt, t)
    std = ddim_scheduler.get_std(t, eta)
    xt = ddim_scheduler.get_xt_prev(xt, t, eps, std)
  return xt
LDM
DDIM 的基础上,LDM 从生成像素空间上的图像变为生成隐空间上的图像。
- 隐空间图像需要再做一次解码才能变回真实图像。
从代码上来看,使用LDM后,只需要多准备一个VAE,并对最后的隐空间图像zt解码。
def ldm_ddim_sample(image_shape, ddim_steps = 20, eta = 0):
  ddim_scheduler = DDIMScheduler()
  vae = VAE()
  unet = UNet()
  zt = randn(image_shape)
  T = 1000
  timesteps = ddim_scheduler.get_timesteps(T, ddim_steps) # [1000, 950, 900, ...]
  for t in timesteps:
    eps = unet(zt, t)
    std = ddim_scheduler.get_std(t, eta)
    zt = ddim_scheduler.get_xt_prev(zt, t, eps, std)
  xt = vae.decoder.decode(zt)
  return xt
而想用 LDM 实现文生图,则需要给一个额外的文本输入text。
- 文本编码器会把文本编码成张量c,输入进unet。
- 其他地方的实现都和之前的LDM一样。
def ldm_text_to_image(image_shape, text, ddim_steps = 20, eta = 0):
  ddim_scheduler = DDIMScheduler()
  vae = VAE()
  unet = UNet()
  zt = randn(image_shape)
  T = 1000
  timesteps = ddim_scheduler.get_timesteps(T, ddim_steps) # [1000, 950, 900, ...]

  text_encoder = CLIP()
  c = text_encoder.encode(text)

  for t = timesteps:
    eps = unet(zt, t, c)
    std = ddim_scheduler.get_std(t, eta)
    zt = ddim_scheduler.get_xt_prev(zt, t, eps, std)
  xt = vae.decoder.decode(zt)
  return xt
最后, 这个能实现文生图的LDM就是 Stable Diffusion。
Stable Diffusion 采样算法看上去比较复杂,从DDPM开始把各个功能都拆开来看,理解起来就容易了。
UNet
2015 年,Olaf Ronneberger 等人提出一种经典的卷积神经网络(CNN)架构,UNet,专为生物医学图像分割设计。
UNet 因为网络的整体结构形似字母U而得名。
- Unet 以图像作为入口,通过减少采样来找到该图像的低维表示后再通过增加采样将图像恢复回来。
- UNet 在图像分割任务中表现优异,尤其是在需要精细边界的场景中广泛应用,如医学影像分割、卫星图像分割等。
UNet 成功源于其有效的特征提取与恢复机制,特别是跳跃连接的设计,使得编码过程中丢失的细节能够通过解码阶段恢复。
UNet 演变
DDPM会用到一个U-Net神经网络unet,用于计算去噪过程中图像应该去除的噪声eps
U-Net 结构
| U-Net 阶段 | 变化 | 图解 |
|---|---|---|
| DDIM | 早期; 纯卷积 |  |
| DDPM | 1. 卷积层->残差卷积模块,深层还有自注意力 2. 每层还有个短路连接 |
 |
| LDM | 增加额外约束信息,自注意力->交叉注意力(transformer) | |
| Stable Diffusion | 每个大层都有transformer块,不只是深层 |  |
Stable Diffusion 解读(三):原版实现及Diffusers实现源码解读
UNet 网络结构
独特之处
-
编码器-解码器对称结构,多尺度上有效提取特征并生成精确的像素级分割结果。
-
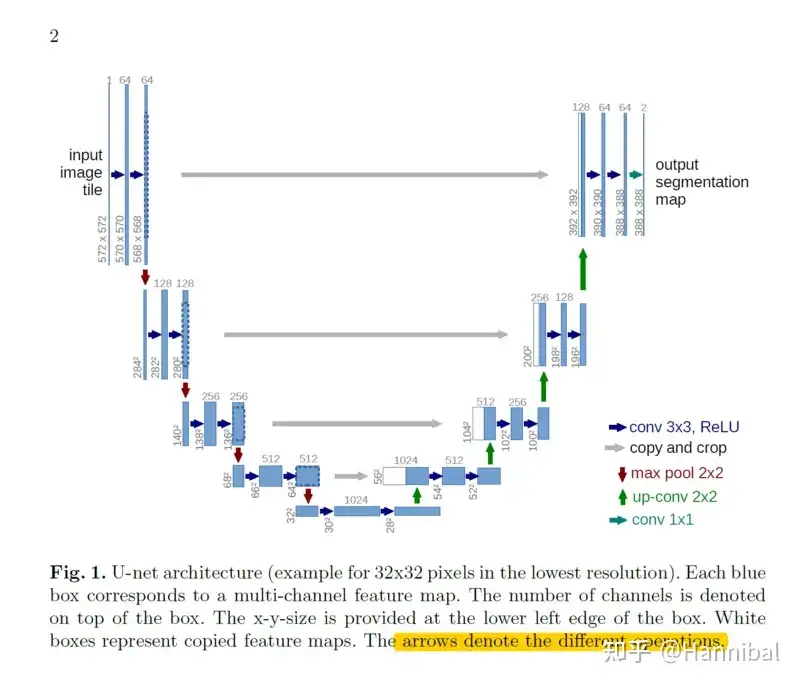
UNet 设计理念:
- 将输入图像经过一系列卷积和下采样操作, 逐渐提取高层次特征(编码路径)
- 然后通过上采样逐步恢复原始的分辨率(解码路径)
- 并将编码路径中对应的特征与解码路径进行
跳跃连接(skip connection), 帮助网络结合低层次细节信息和高层次语义信息,实现精确的像素级分割。
UNet 模型由两部分组成:编码器和解码器,中间通过跳跃连接(Skip Connections)相连。
Unet 整体结构包含了4层编码器和4层解码器。 每层编码器和解码器中,均包含了一个两层的卷积网络
- (1) UNet
编码器任务: 逐渐压缩输入图像的空间分辨率,提取更高层次的特征。编码器具有4层结构,每层由一个双层卷积网络构成。- 经过一层最大池化(max pooling)提取出关键特征之后传递到下一层,每次池化操作都会将图像的空间维度减少一半
- 同时通过 Skip-Connection 将结果传递给对应的解码器。
- (2)
UNet 解码器通过逐渐恢复图像的空间分辨率,将编码器部分提取到的高层次特征映射回原始的图像分辨率。- 同时接收了来自下一层网络的输出,与同层编码器池化前的结果,通过拼接后传递到上一层。
- 解码器包含反卷积(上采样)操作,并结合来
自编码器的相应特征层,以实现精细的边界恢复。
- (3) 跳跃连接: UNet 的关键创新点。
- 每个
编码器层的输出特征图与解码器中对应层的特征图进行拼接,形成跳跃连接。将编码器中的局部信息和解码器中的全局信息进行融合,从而提高分割结果的精度。
- 每个
UNet 实现
UNet 代码示例
class DoubleConv(nn.Module):

    def __init__(self, in_ch, out_ch, mid_ch=None):
        super().__init__()
        if not mid_ch:
            mid_ch = out_ch
        self.conv = nn.Sequential(
            nn.Conv2d(in_ch, mid_ch, kernel_size=3, padding=1),
            nn.BatchNorm2d(mid_ch),
            nn.ReLU(inplace=True),
            nn.Conv2d(mid_ch, out_ch, kernel_size=3, padding=1),
            nn.BatchNorm2d(out_ch),
            nn.ReLU(inplace=True)
        )

    def forward(self, x):
        x = self.conv(x)
        return x

class Down(nn.Module): # 编码器
    """Downscaling with maxpool then double conv"""

    def __init__(self, in_ch, out_ch):
        super(Down, self).__init__()
        self.maxpool_conv = nn.Sequential(
            nn.MaxPool2d(2),  # 先进行maxpool,再进行两层链接
            DoubleConv(in_ch, out_ch)
        )

    def forward(self, x):
        x = self.maxpool_conv(x)
        return x

class Up(nn.Module): # 解码器
    """
    up path
    conv_transpose => double_conv
    """

    def __init__(self, in_ch, out_ch, bilinear=True):
        super(Up, self).__init__()
        if bilinear:
            self.up = lambda x: nn.functional.interpolate(x, scale_factor=2, mode='bilinear', align_corners=True)
            self.conv = DoubleConv(in_ch, out_ch, in_ch // 2)
        else:
            self.up = nn.ConvTranspose2d(in_ch, in_ch // 2, kernel_size=2, stride=2)
            self.conv = DoubleConv(in_ch, out_ch)

    def forward(self, x1, x2):
        """
            conv output shape = (input_shape - Filter_shape + 2 * padding)/stride + 1
        """
        x1 = self.up(x1)
        diffY = x2.size()[2] - x1.size()[2]  # [N,C,H,W],diffY refers to height
        diffX = x2.size()[3] - x1.size()[3]  # [N,C,H,W],diffX refers to width

        x1 = F.pad(x1, [diffX // 2, diffX - diffX // 2,
                        diffY // 2, diffY - diffY // 2])
        x = torch.cat([x2, x1], dim=1)  # 在通道层将skip传递过来的数据与下层传递来的数据进行拼接
        x = self.conv(x)
        return x
网络实现
import torch

import torch.nn as nn
import torch.nn.functional as F
from model.components import DoubleConv, InConv, Down, Up, OutConv


class Unet(nn.Module):

    def __init__(self, in_ch, out_ch, gpu_ids=None, bilinear=False):  # inch, 图片的通道数,1表示灰度图像,3表示彩色图像
        super(Unet, self).__init__()
        if gpu_ids is None:
            gpu_ids = []
        self.loss = None
        self.matrix_iou = None
        self.pred_y = None
        self.x = None
        self.y = None

        self.loss_stack = 0
        self.matrix_iou_stack = 0
        self.stack_count = 0
        self.display_names = ['loss_stack', 'matrix_iou_stack']

        self.gpu_ids = gpu_ids
        self.device = torch.device('cuda:{}'.format(self.gpu_ids[0])) if torch.cuda.is_available() else torch.device(
            'cpu')

        self.bilinear = bilinear
        factor = 2 if bilinear else 1

        self.bce_loss = nn.BCELoss()

        self.inc = (DoubleConv(in_ch, 64))
        self.down1 = Down(64, 128)
        self.down2 = Down(128, 256)

        self.down3 = Down(256, 512)
        self.drop3 = nn.Dropout2d(0.5)

        self.down4 = Down(512, 1024)
        self.drop4 = nn.Dropout2d(0.5)

        self.up1 = Up(1024, 512 // factor, bilinear)
        self.up2 = Up(512, 256 // factor, bilinear)
        self.up3 = Up(256, 128 // factor, bilinear)
        self.up4 = Up(128, 64 // factor, bilinear)

        self.out = OutConv(64, out_ch)

        self.optimizer = torch.optim.Adam(self.parameters(), lr=1e-4)

    def forward(self):
        x1 = self.inc(self.x)
        x2 = self.down1(x1)
        x3 = self.down2(x2)
        x4 = self.down3(x3)
        x4 = self.drop3(x4)
        x5 = self.down4(x4)
        x5 = self.drop4(x5)

        # skip connection与采样结果融合
        x = self.up1(x5, x4)
        x = self.up2(x, x3)
        x = self.up3(x, x2)
        x = self.up4(x, x1)
        x = self.out(x)
        self.pred_y = nn.functional.sigmoid(x)

    def set_input(self, x, y):
        self.x = x.to(self.device)
        self.y = y.to(self.device)
        self.to(self.device)

    def optimize_params(self):
        self.forward()
        self._bce_iou_loss()
        _ = self.accu_iou()
        self.stack_count += 1
        self.zero_grad()
        self.loss.backward()
        self.optimizer.step()

    def accu_iou(self):
        y_pred = (self.pred_y > 0.5) * 1.0
        y_true = (self.y > 0.5) * 1.0

        pred_flat = y_pred.view(y_pred.numel())
        true_flat = y_true.view(y_true.numel())

        intersection = float(torch.sum(pred_flat * true_flat)) + 1e-7
        denominator = float(torch.sum(pred_flat + true_flat)) - intersection + 2e-7

        self.matrix_iou = intersection / denominator
        self.matrix_iou_stack += self.matrix_iou
        return self.matrix_iou

    def _bce_iou_loss(self):
        y_pred = self.pred_y
        y_true = self.y
        pred_flat = y_pred.view(y_pred.numel())
        true_flat = y_true.view(y_true.numel())

        intersection = torch.sum(pred_flat * true_flat) + 1e-7
        denominator = torch.sum(pred_flat + true_flat) - intersection + 1e-7
        iou = torch.div(intersection, denominator)
        bce_loss = self.bce_loss(pred_flat, true_flat)
        self.loss = bce_loss - iou + 1
        self.loss_stack += self.loss

    def get_current_losses(self):
        errors_ret = {}
        for name in self.display_names:
            if isinstance(name, str):
                errors_ret[name] = float(getattr(self, name)) / self.stack_count
        self.loss_stack = 0
        self.matrix_iou_stack = 0
        self.stack_count = 0
        return errors_ret

    def eval_iou(self):
        with torch.no_grad():
            self.forward()
            self._bce_iou_loss()
            _ = self.accu_iou()
            self.stack_count += 1
diffuser
HuggingFace 推出基于 Stable Diffusion 的封装库 diffusers
Diffusers 实现了 safety_checker, 防止冒犯性或有害内容的功能,但该模型改进的图像生成功能仍然可以产生潜在的有害内容
Diffusers 能够生成图像、语音、三维分子结构,且包含SOTA扩散模型的训练、推理工具箱
特性
- DiffusionPipeline 是一个高级端到端类,从预训练的扩散模型中快速生成用于推理样本。
- SOTA 预训练模型架构和模块,可用作创建扩散模型的构件。
- 许多不同的调度器算法可控制如何在训练中添加噪声,以及如何在推理过程中生成去噪图像。
组件
三个主要组件:
DiffusionPipeline(扩散管道):基于预训练扩散模型快速生成样本的封装类Model(模型):预训练模型架构和模块可用作创建扩散系统的构建块。Scheduler(调度器):用于控制如何在训练中添加噪声以及如何在推理过程中生成去噪图像的算法。- 不同的调度器具有不同的去噪速度和质量权衡,可自定义
- 默认: PNDMScheduler
pipeline
常见 pipeline
- AutoPipeline
- 文生图 text2image:
AutoPipelineForText2Image - 图生图 image2iamge:
AutoPipelineForImage2Image - 图像修复 inpainting:
AutoPipelineForInpainting
- 文生图 text2image:
DiffusionPipeline用预训练扩散系统进行推理,最简单。一个包含模型和调度程序的端到端系统。开箱即用的DiffusionPipeline 执行许多任务
| 任务 | 描述 | 管道 |
|---|---|---|
| 无条件图像生成 | 从高斯噪声生成图像 | 无条件图像生成 unconditional_image_generation |
| 文本引导图像生成 | 根据文本提示生成图像 | 条件图像生成 conditional_image_generation |
| 文本引导的图像到图像翻译 | 根据文本提示调整图像 | img2img |
| 文本引导图像修复 | 给定图像、蒙版和文本提示,填充图像的蒙版部分 | inpaint |
| 文本引导深度图像翻译 | 调整由文本提示引导的图像部分,同时通过深度估计保留结构 | depth2img |
text2image
示例代码
from diffusers import AutoPipelineForText2Image
import torch

pipe_txt2img = AutoPipelineForText2Image.from_pretrained(
    "dreamlike-art/dreamlike-photoreal-2.0", torch_dtype=torch.float16, use_safetensors=True
).to("cuda")

prompt = "cinematic photo of Godzilla eating sushi with a cat in a izakaya, 35mm photograph, film, professional, 4k, highly detailed"
generator = torch.Generator(device="cpu").manual_seed(37)
image = pipe_txt2img(prompt, generator=generator).images[0]
image
image2iamge
from diffusers import AutoPipelineForImage2Image
from diffusers.utils import load_image
import torch

pipe_img2img = AutoPipelineForImage2Image.from_pretrained(
    "dreamlike-art/dreamlike-photoreal-2.0", torch_dtype=torch.float16, use_safetensors=True
).to("cuda")

init_image = load_image("https://huggingface.co/datasets/huggingface/documentation-images/resolve/main/diffusers/autopipeline-text2img.png")

prompt = "cinematic photo of Godzilla eating burgers with a cat in a fast food restaurant, 35mm photograph, film, professional, 4k, highly detailed"
generator = torch.Generator(device="cpu").manual_seed(53)
image = pipe_img2img(prompt, image=init_image, generator=generator).images[0]
image
inpainting
from diffusers import AutoPipelineForInpainting
from diffusers.utils import load_image
import torch

pipeline = AutoPipelineForInpainting.from_pretrained(
    "stabilityai/stable-diffusion-xl-base-1.0", torch_dtype=torch.float16, use_safetensors=True
).to("cuda")

init_image = load_image("https://huggingface.co/datasets/huggingface/documentation-images/resolve/main/diffusers/autopipeline-img2img.png")
mask_image = load_image("https://huggingface.co/datasets/huggingface/documentation-images/resolve/main/diffusers/autopipeline-mask.png")

prompt = "cinematic photo of a owl, 35mm photograph, film, professional, 4k, highly detailed"
generator = torch.Generator(device="cpu").manual_seed(38)
image = pipeline(prompt, image=init_image, mask_image=mask_image, generator=generator, strength=0.4).images[0]
image
模型 Models
AutoPipeline
The AutoPipeline supports Stable Diffusion, Stable Diffusion XL, ControlNet, Kandinsky 2.1, Kandinsky 2.2, and DeepFloyd IF checkpoints.
from_pretrained
大多数模型采用噪声样本,并在每个时间步预测噪声残差。
可以混合搭配模型来创建其他扩散系统。
模型用 from_pretrained() 方法启动,本地缓存模型权重,下次加载模型时速度会更快。
加载 无条件图像生成模型(UNet2DModel),带有在猫图像上训练的检查点:
- 访问模型参数,请调用
model.config
from diffusers import UNet2DModel

repo_id = "google/ddpm-cat-256"
model = UNet2DModel.from_pretrained(repo_id, use_safetensors=True)
model.config # 访问模型参数
模型配置是一个🧊冻结的字典,创建后无法更改。有意为之,确保一开始用于定义模型架构的参数保持不变,而其他参数仍然可以在推理过程中进行调整。
一些重要参数:
sample_size: 输入样本高度和宽度尺寸。in_channels: 输入样本输入通道数。down_block_types和up_block_types: 创建 UNet 架构的下采样和上采样模块类型。block_out_channels: 下采样块的输出通道数;也以相反的顺序用于上采样块的输入通道的数量。layers_per_block: 每个 UNet 块中存在的 ResNet 块的数量。
如需推理,首先需要使用随机高斯噪声创建图像(图像往往通过一个复杂的多维张量表示,不同的维度代表不同的含义),这里张量 shape 是 batch * channel * width * height。
batch:一个批次想生成的图片张数channel:一般为3,RGB色彩空间width: 图像宽height: 图像高
import torch

torch.manual_seed(0)
noisy_sample = torch.randn(1, model.config.in_channels, model.config.sample_size, model.config.sample_size)
noisy_sample.shape
对于推理,将噪声图像(noisy_sample)和时间步长(timestep)传递给模型。
- 时间步长表示输入图像的噪声程度,开始时噪声多,结束时噪声少。
这有助于模型确定其在扩散过程中的位置,是更接近起点还是更接近终点。
使用样例方法得到模型输出:
with torch.no_grad():
    noisy_residual = model(sample=noisy_sample, timestep=2).sample
不过,要生成实际示例,要一个调度程序来指导去噪过程。
完整
from diffusers import UNet2DModel
import torch

# 加载模型 load model
repo_id = "google/ddpm-cat-256"
model = UNet2DModel.from_pretrained(repo_id, use_safetensors=True)
model.config

# 噪声输入(噪声图像) noise as input
torch.manual_seed(0)
noisy_sample = torch.randn(1, model.config.in_channels, model.config.sample_size, model.config.sample_size)
noisy_sample.shape

# 推理 inference
with torch.no_grad():
    # 噪声图像和时间步长传进去
    noisy_residual = model(sample=noisy_sample, timestep=2).sample
调度器 Schedulers
给定模型输出,调度程序管理从噪声样本到噪声较小的样本 - 本例中是 noisy_residual.
Diffusers 用于构建扩散系统的工具箱。虽然 DiffusionPipeline 是使用预构建扩散系统的便捷方法,但也可以单独选择自己的模型和调度程序组件来构建自定义扩散系统。
调度程序根据模型的输出结果(示例中模型输出结果就是噪声残差),将噪声样本转换为噪声较小的样本。
用其 DDPMScheduler 的 from_config()
from diffusers import DDPMScheduler

scheduler = DDPMScheduler.from_pretrained(repo_id)
scheduler

# 根据模型的输出结果(噪声残差),将噪声样本转换为噪声较小的样本。
less_noisy_sample = scheduler.step(model_output=noisy_residual, timestep=2, sample=noisy_sample).prev_sample
less_noisy_sample.shape
自定义调度器
from diffusers import EulerDiscreteScheduler

# 自定义调度程序: 默认 PNDMScheduler 替换为 EulerDiscreteScheduler
pipeline.scheduler = EulerDiscreteScheduler.from_config(pipeline.scheduler.config)
💡
- 与模型不同,调度程序没有可训练的权重并且无参数
一些最重要参数:
num_train_timesteps:去噪过程的长度,或者换句话说,将随机高斯噪声处理为数据样本所需的时间步数。beta_schedule:用于推理和训练的噪声计划类型。beta_start和beta_end:噪声表的开始和结束噪声值。
要预测噪声稍低的图像,需要传入: 模型输出(noisy residual)、步长(timestep) 和 当前样本(noisy sample)。
less_noisy_sample = scheduler.step(model_output=noisy_residual, timestep=2, sample=noisy_sample).prev_sample
less_noisy_sample.shape
如果将 less_noisy_sample 作为输入,递归调用,将得到一个噪音更小、质量更好的图像!现在让我们将所有内容放在一起并可视化整个去噪过程。
首先,创建一个函数,对去噪图像进行后处理并将其显示为 PIL.Image:
为了加速去噪过程,请将输入和模型移至 GPU:
model.to("cuda")
noisy_sample = noisy_sample.to("cuda")
创建去噪循环来预测噪声较小的样本的残差,并使用调度程序计算噪声较小的样本:
import tqdm
import PIL.Image
import numpy as np

# 去噪图像后处理
def display_sample(sample, i):
    image_processed = sample.cpu().permute(0, 2, 3, 1)
    image_processed = (image_processed + 1.0) * 127.5
    image_processed = image_processed.numpy().astype(np.uint8)

    image_pil = PIL.Image.fromarray(image_processed[0])
    display(f"Image at step {i}")
    display(image_pil)

# 创建去噪循环,预测噪声较小的样本的残差
sample = noisy_sample
for i, t in enumerate(tqdm.tqdm(scheduler.timesteps)):
    # 1. 预测噪声残差 predict noise residual
    with torch.no_grad():
        residual = model(sample, t).sample
    # 2. 计算噪声图像 compute less noisy image and set x_t -> x_t-1
    sample = scheduler.step(residual, t, sample).prev_sample
    # 3. 定期查看图像 optionally look at image
    if (i + 1) % 50 == 0:
        display_sample(sample, i + 1)
推理
推理 Inference code
模型、调度器、可视化、推理等
单机
from diffusers import DDPMScheduler, UNet2DModel
from PIL import Image
import torch
import numpy as np

scheduler = DDPMScheduler.from_pretrained("google/ddpm-cat-256")
model = UNet2DModel.from_pretrained("google/ddpm-cat-256").to("cuda")
scheduler.set_timesteps(50)

sample_size = model.config.sample_size
noise = torch.randn((1, 3, sample_size, sample_size)).to("cuda")
input = noise

for t in scheduler.timesteps:
    with torch.no_grad():
        noisy_residual = model(input, t).sample
        prev_noisy_sample = scheduler.step(noisy_residual, t, input).prev_sample
        input = prev_noisy_sample

image = (input / 2 + 0.5).clamp(0, 1)
image = image.cpu().permute(0, 2, 3, 1).numpy()[0]
image = Image.fromarray((image * 255).round().astype("uint8"))
image
分布式
Distributed inference 分布式
Accelerate
from accelerate import PartialState
from diffusers import DiffusionPipeline

pipeline = DiffusionPipeline.from_pretrained(
    "runwayml/stable-diffusion-v1-5", torch_dtype=torch.float16, use_safetensors=True
)
distributed_state = PartialState()
pipeline.to(distributed_state.device)

with distributed_state.split_between_processes(["a dog", "a cat"]) as prompt:
    result = pipeline(prompt).images[0]
    result.save(f"result_{distributed_state.process_index}.png")
shell 代码
accelerate launch run_distributed.py --num_processes=2
PyTorch Distributed
import torch
import torch.distributed as dist
import torch.multiprocessing as mp

from diffusers import DiffusionPipeline

sd = DiffusionPipeline.from_pretrained(
    "runwayml/stable-diffusion-v1-5", torch_dtype=torch.float16, use_safetensors=True
)


def run_inference(rank, world_size):
    dist.init_process_group("nccl", rank=rank, world_size=world_size)

    sd.to(rank)

    if torch.distributed.get_rank() == 0:
        prompt = "a dog"
    elif torch.distributed.get_rank() == 1:
        prompt = "a cat"

    image = sd(prompt).images[0]
    image.save(f"./{'_'.join(prompt)}.png")


def main():
    world_size = 2
    mp.spawn(run_inference, args=(world_size,), nprocs=world_size, join=True)


if __name__ == "__main__":
    main()
shell 代码
torchrun run_distributed.py --nproc_per_node=2
训练
单机
训练代码
from accelerate import Accelerator
from huggingface_hub import HfFolder, Repository, whoami
from tqdm.auto import tqdm
from pathlib import Path
import os


def get_full_repo_name(model_id: str, organization: str = None, token: str = None):
    if token is None:
        token = HfFolder.get_token()
    if organization is None:
        username = whoami(token)["name"]
        return f"{username}/{model_id}"
    else:
        return f"{organization}/{model_id}"


def train_loop(config, model, noise_scheduler, optimizer, train_dataloader, lr_scheduler):
    # Initialize accelerator and tensorboard logging
    accelerator = Accelerator(
        mixed_precision=config.mixed_precision,
        gradient_accumulation_steps=config.gradient_accumulation_steps,
        log_with="tensorboard",
        project_dir=os.path.join(config.output_dir, "logs"),
    )
    if accelerator.is_main_process:
        if config.push_to_hub:
            repo_name = get_full_repo_name(Path(config.output_dir).name)
            repo = Repository(config.output_dir, clone_from=repo_name)
        elif config.output_dir is not None:
            os.makedirs(config.output_dir, exist_ok=True)
        accelerator.init_trackers("train_example")

    # Prepare everything
    # There is no specific order to remember, you just need to unpack the
    # objects in the same order you gave them to the prepare method.
    model, optimizer, train_dataloader, lr_scheduler = accelerator.prepare(
        model, optimizer, train_dataloader, lr_scheduler
    )

    global_step = 0
    # Now you train the model
    for epoch in range(config.num_epochs):
        progress_bar = tqdm(total=len(train_dataloader), disable=not accelerator.is_local_main_process)
        progress_bar.set_description(f"Epoch {epoch}")

        for step, batch in enumerate(train_dataloader):
            clean_images = batch["images"]
            # Sample noise to add to the images
            noise = torch.randn(clean_images.shape).to(clean_images.device)
            bs = clean_images.shape[0]

            # Sample a random timestep for each image
            timesteps = torch.randint(
                0, noise_scheduler.config.num_train_timesteps, (bs,), device=clean_images.device
            ).long()

            # Add noise to the clean images according to the noise magnitude at each timestep
            # (this is the forward diffusion process)
            noisy_images = noise_scheduler.add_noise(clean_images, noise, timesteps)

            with accelerator.accumulate(model):
                # Predict the noise residual
                noise_pred = model(noisy_images, timesteps, return_dict=False)[0]
                loss = F.mse_loss(noise_pred, noise)
                accelerator.backward(loss)

                accelerator.clip_grad_norm_(model.parameters(), 1.0)
                optimizer.step()
                lr_scheduler.step()
                optimizer.zero_grad()

            progress_bar.update(1)
            logs = {"loss": loss.detach().item(), "lr": lr_scheduler.get_last_lr()[0], "step": global_step}
            progress_bar.set_postfix(**logs)
            accelerator.log(logs, step=global_step)
            global_step += 1

        # After each epoch you optionally sample some demo images with evaluate() and save the model
        if accelerator.is_main_process:
            pipeline = DDPMPipeline(unet=accelerator.unwrap_model(model), scheduler=noise_scheduler)

            if (epoch + 1) % config.save_image_epochs == 0 or epoch == config.num_epochs - 1:
                evaluate(config, epoch, pipeline)

            if (epoch + 1) % config.save_model_epochs == 0 or epoch == config.num_epochs - 1:
                if config.push_to_hub:
                    repo.push_to_hub(commit_message=f"Epoch {epoch}", blocking=True)
                else:
                    pipeline.save_pretrained(config.output_dir)
安装
安装
- mac, pytorch, python 3.8~3.11
pip install --upgrade diffusers accelerate transformers
#pip install diffusers["torch"] transformers
建议在 GPU 上运行,因为该模型由大约 14 亿个参数组成。通过to(“cuda”)即可将生成器对象移至GPU:
pipeline.to("cuda")
【2024-9-29】Ubuntu + v100s 上执行报错
Failed to import diffusers.loaders.unet because of the following error (look up to see its traceback):
No module named 'peft.tuners.tuners_utils'
示例
简易示例
from diffusers import DiffusionPipeline

# ==== 加载权重 ====
# 下载远程模型,比较大,默认下载目录为 ~/.cache/huggingface,可通过 export HF_HOME=指定目录,最好写入~/.bashrc持久化
pipeline = DiffusionPipeline.from_pretrained("runwayml/stable-diffusion-v1-5", use_safetensors=True)
pipeline = DiffusionPipeline.from_pretrained("./stable-diffusion-v1-5", use_safetensors=True) # 本地权重

# 自定义调度程序: 默认 PNDMScheduler 替换为 EulerDiscreteScheduler
pipeline.scheduler = EulerDiscreteScheduler.from_config(pipeline.scheduler.config)

# ==== GPU ====
pipeline.to("cuda")
# ==== text2image ====
image = pipeline("An image of a squirrel in Picasso style").images[0]
image # 图像输出包装在一个 PIL.Image 对象中
# ==== 保存 ====
image.save("image_of_squirrel_painting.png") # 保存图像
DiffusionPipeline 下载并缓存所有 model、tokenization、scheduling 组件。
示例中, StableDiffusionPipeline 由 UNet2DConditionModel 和 PNDMScheduler 等组成:
# pipeline
StableDiffusionPipeline {
  "_class_name": "StableDiffusionPipeline",
  "_diffusers_version": "0.21.4",
  ...,
  "scheduler": [
    "diffusers",
    "PNDMScheduler"
  ],
  ...,
  "unet": [
    "diffusers",
    "UNet2DConditionModel"
  ],
  "vae": [
    "diffusers",
    "AutoencoderKL"
  ]
}
案例
- 文生图
- 图生图
from diffusers import StableDiffusionPipeline
from diffusers import StableDiffusionImg2ImgPipeline
from PIL import Image
import torch

# --------- 本地模型信息 ----------
model_path = '/mnt/bd/wangqiwen-hl/models/video'
model_id = "runwayml/stable-diffusion-v1-5"

# --------- text2image ---------
#pipe = StableDiffusionPipeline.from_pretrained(model_id, torch_dtype=torch.float16)
pipe = StableDiffusionPipeline.from_pretrained(model_id, torch_dtype=torch.float16, cache_dir=model_path)
pipe = pipe.to("cuda")

prompt = "a man and a woman holding a cat and a dog"
prompt = "sexy lady walking on the bed"
negative_prompt = "distorted faces, low resolution"
images = pipe(prompt, num_images_per_prompt=3, negative_prompt=negative_prompt).images
num = len(images)
print(f"一共生成了{num}张图片, 默认保存第一张")
for i in range(num):
    images[i].save(f"output_{i+1}.png")
#image[0].save("output.png")

# --------- image2image ---------
pipeimg = StableDiffusionImg2ImgPipeline.from_pretrained(model_id, torch_dtype=torch.float16, cache_dir=model_path)
pipeimg = pipe.to("cuda")
# 选取一张来进一步修改
from PIL import Image
init_image = Image.open("output_1.png").convert("RGB").resize((768, 512))
#Image.open("output_1.png").convert("RGB").resize((768, 512))

prompt = "add another girl"
prompt = "add more detail to make it more attractive"
images = pipe(prompt=prompt, num_images_per_prompt=3, negative_prompt=negative_prompt, image=init_image, strength=0.75, guidance_scale=7.5).images
num = len(images)
for i in range(num):
    images[i].save(f"modify_{i+1}.png")
#images[0].save("output_modify.png")
扩散模型微调
Stable Diffusion 由于在多样化的数据集上进行广泛的训练,已经具备了大量概念的知识。
在训练 LoRA 时,充分利用这一点非常重要,并区分“新概念(NC)”和“修改概念(MC)”。
新概念: 在 Stable Diffusion 原始训练中不存在或未得到充分体现的概念或元素。可能是模型之前未遇到过的独特主题、风格或物品。使用 NCs 进行训练涉及向模型引入全新信息。- 目标: 扩展模型对这些新颖元素的“理解”。通常会在数据集中添加“激活标签”来表示它们。
修改概念(MC) 指模型已经识别但可能未准确或以期望方式表示的概念。- 这些可能是现有主题、风格或解释的变体。训练 MCs 涉及调整或精炼模型的现有知识。
- 目的: 不引入新知识,而是微调和精炼模型的现有理解。
训练 LoRA 模型时,需要理解 Stable Diffusion 的基础知识(即模型已经掌握得很好的部分)以及它所缺乏或误解的内容。基于这些知识,精心策划训练数据集,以填补这些空白或纠正错误,无论属于 NC 还是 MC。
然后,可以战略性地使用激活标签来引入新概念。
通过这种对 NC 和 MC 的理解来训练 LoRA,可以更有效地引导 Stable Diffusion 与特定愿景保持一致。
详见 LoRA 训练进阶指南
扩散模型案例
扩散模型有很多应用版本
DALL-E 1
DALLE-1 模型图

- 首先, 图像在第一阶段通过
dVAE(离散变分自动编码机)训练得到图像的 image tokens。文本 caption 通过文本编码器得到 text tokens。 - Text tokens 和 image tokens 会一起拼接起来用作 Transformer 的训练。
- Transformer 的作用是将 text tokens 回归到 image tokens。
- 当完成这样的训练之后,实现了从文本特征到图像特征的对应。
- 生成阶段,caption 通过编码器得到 text tokens,然后通过 transformer 得到 image tokens,最后 image tokens 在通过第一阶段训练好的 image decoder 部分生成图像。
- 因为图像是通过采样生成,这里还使用了
CLIP模型对生成的图像进行排序,选择与文本特征相似度最高的图像作为最终的生成对象。
- 因为图像是通过采样生成,这里还使用了
DALL-E 2
DALLE-2 模型图
DALLE-2 模型结构。
- text encoder 和 image encoder 就是用 CLIP 中的相应模块。在训练阶段通过训练 prior 模块,将 text tokens 和 image tokens 对应起来。
- 同时训练 GLIDE 扩散模型,这一步的目的是使得训练后的 GLIDE 模型可以生成保持原始图像特征,而具体内容不同的图像,达到生成图像的多样性。
- 当生成图像时,模型整体类似在 CLIP 模型中增加了 prior 模块,实现了文本特征到图像特征的对应。然后通过替换 image decoder 为 GLIDE 模型,最终实现了文本到图像的生成。
DALL-E 3
【2023-10-07】DALL-E 3 惊艳发布,完全免费!比肩Midjourney的AI绘图工具
DALL·E 3 没有一个单独网址,要在Bing里面使用它
- 切换代理到其他国家,然后打开bing, 直接输入中文
- 每生成一张照片都消耗电力,初始电力是100点, 目前还是免费
Imagen (未开源)
Imagen模型结构图
Imagen 生成模型还没有公布代码和模型,从论文中的模型结构来看,似乎除了文本编码器之外,是由一个文本-图像扩散模型来实现图像生成和两个超分辨率扩散模型来提升图像质量。
Imagic (未开源)
Imagic原理图
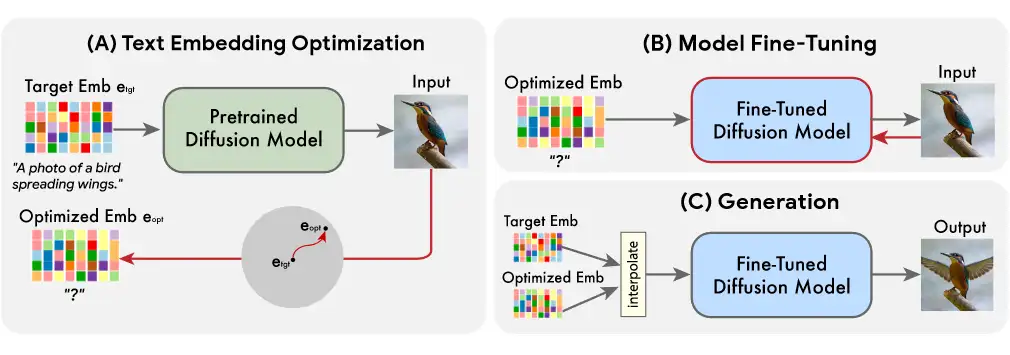
- 最新的 Imagic 模型,号称可以实现通过文本对图像进行 PS 级别的修改内容生成。目前没有公布模型和代码。
- 从原理图来看,似乎是通过在文本-图像扩散模型的基础上,通过对文本嵌入的改变和优化来实现生成内容的改变。如果把扩散模型替换成简单的 encoder 和 decoder,有点类似于在 VAE 模型上做不同人脸的生成。只不过是扩散模型的生成能力和特征空间要远超过 VAE。
Stable diffusion
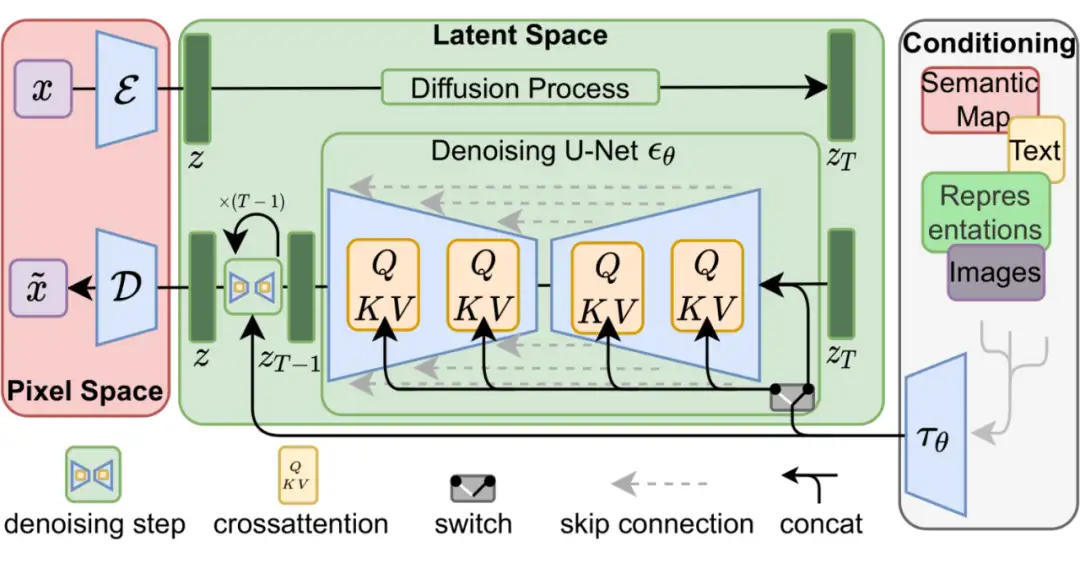
Stable diffusion 结构图
Stable diffusion 是 Stability AI 公司开发并且开源的一个生成模型。
朴素的 DDPM 扩散模型,每一步都在对图像作“加噪”、“去噪”操作。而在 Stable diffusion 模型中,可以理解为是对图像进行编码后的 image tokens 作加噪去噪。而在去噪(生成)的过程中,加入了文本特征信息用来引导图像生成(图右 Conditioning 部分)。跟 VAE 中的条件 VAE 和 GAN 中的条件 GAN 原理是一样的,通过加入辅助信息,生成需要的图像。
进化
扩散模型不足
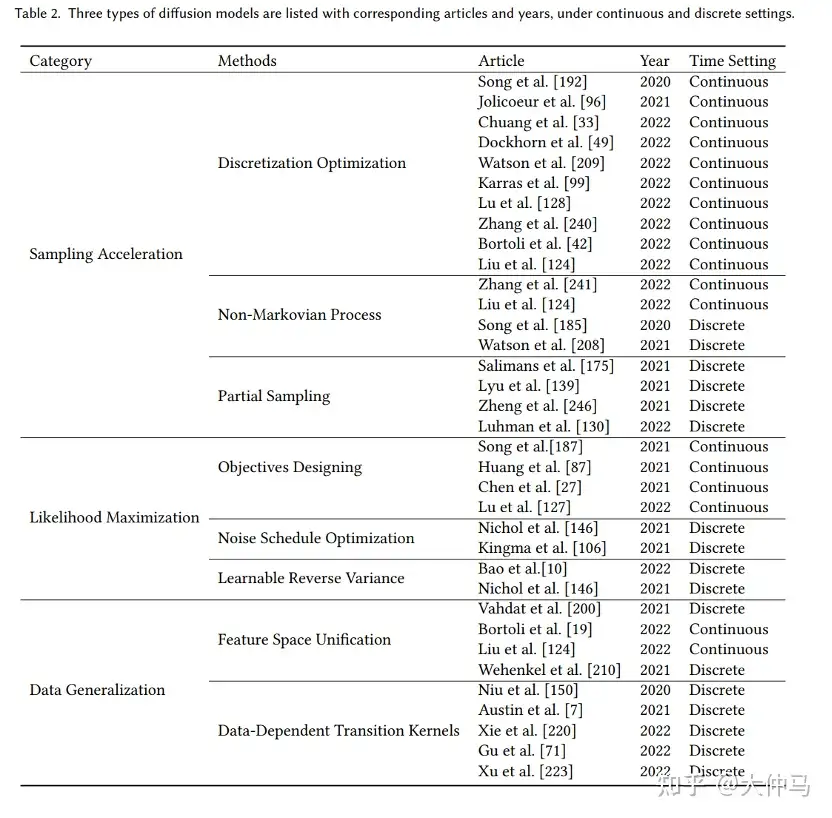
原始扩散模型三个主要缺点:采样速度慢,最大化似然差、数据泛化能力弱
diffusion models 改进研究分为对应的三类:采样速度提升、最大似然增强和数据泛化增强。
首先说明改善的动机,再根据方法的特性将每个改进方向的研究进一步细化分类,从而清楚的展现方法之间的联系与区别。
未来研究方向
- A. 重审假设。需要重新审视和分析扩散模型中的许多典型假设。例如,假设扩散模型的正向过程完全消除了数据中的所有信息并且使其等效于先前分布可能并不总是成立。实际上,完全删除信息是在有限时间内无法实现,了解何时停止前向噪声处理以在采样效率和采样质量之间取得平衡是非常有意义的。
- B. diffusion model 已经成为一个强大的框架,可以在大多数应用中与生成对抗性网络(GAN)竞争,而无需诉诸对抗性训练。对于特定的任务,我们需要了解为什么以及何时扩散模型会比其他网络更加有效,理解扩散模型和其他生成模型的区别将有助于阐明为什么扩散模型能够产生优秀的样本同时拥有高似然值。另外,系统地确定扩散模型的各种超参数也是很重要的。
- C. diffusion model 如何在隐空间中提供良好的latent representation,以及如何将其用于data manipulation的任务也是值得研究的。
- D. 将 diffusion model 和 generative foundation model 结合,探索更多类似于ChatGPT,GPT-4等有趣的AIGC应用
扩散模型 vs 语言模型
【2023-7-1】扩散模型的作图缺点
扩散模型
- 优势
- 控制条件可设置
- 模型规模可控
- 劣势
- 语义控制不够精准:以标签为基准,无法识别标签属性关系,因为 CLIP 模型
- 缺乏语义逻辑性:第一个人在第二个人的左边 — 无法识别
语言模型
- 优势
- 理解语言与动作
- 更友好的交互方式
- 统一的任务框架
- 劣势
- 大量数据资源
- 大量计算资源
- 缺乏多模态控制
从视觉挺近语言模型,详见站内专题:扩散语言模型
实时扩散模型
【2025-7-19】世界首个实时扩散模型诞生
为什么需要实时扩散模型?
2022 年以来,扩散模型(Diffusion Models)在静态图像生成上大放异彩,但要将其应用于实时视频流,则面临:
- 高延迟:传统扩散需要上百个采样步骤;
- 跨帧一致性:视频需保持连续性,避免闪烁和跳帧;
- 无限长度:一次性生成长视频会耗尽显存,且无法实时输出。
目前市面上的视频生成模型,一般有 5-10s 延迟,且每个片段 5-10s, 要想达到实时生成,必须在 40ms 内完成单帧图像生成
Live Stream Diffusion (LSD)
MirageLSD
实时视频内容生成与场景转换成为了众多应用场景的核心需求——从直播互动、游戏开发到动画制作、虚拟试衣,任何需要“场景随心所欲” 的场合都渴望更低延迟、更高质量、更易集成的解决方案。
首个直播流扩散(LSD)AI模型:MirageLSD
- 实时把任意视频流转换成自定义服装风格——虚拟换装新体验
- 体验在线 Demo ,无门槛试玩,每次试玩5min
MirageLSD 是 Decart AI 最新发布的首个 直播流扩散(Live Stream Diffusion, LSD) 模型,能够在 24 FPS 下、端到端延迟 <40ms 的条件下,实时将任意视频流转换成任何场景,并支持无限长度视频的持续输出。
MirageLSD 的出现,突破以上瓶颈,将扩散模型真正带入实时视频应用时代。
- 继 第一款 Oasis 后的新模型
Decart 自研 Live Stream Diffusion(LSD)模型。
- 保持时间连贯性的同时,逐帧生成视频,并支持完全交互式的视频合成。
- 用户可以在视频生成的同时,进行持续提示、变换和编辑,实现了真正的实时交互。
为了实现实时生成,LSD模型采用了多种创新技术。
- 首先,设计自定义的CUDA超大内核,以最大限度地减少开销并提高吞吐量。
- 其次,在快捷蒸馏和模型剪枝的基础上,减少了每帧所需的计算量。
- 最后,优化模型架构以与GPU硬件对齐,实现了最高效率。
这些技术的共同作用,使得 MirageLSD 响应速度比之前的模型提高了16倍,实现了每秒24帧的实时视频生成。
MirageLSD 还解决了以往视频模型在生成长视频时容易出现的误差累积问题。
- 引入了历史增强技术,使模型能够预测并修正输入中的伪影,从而增强了对自回归生成中常见漂移的鲁棒性。
这使得MirageLSD成为首个能够无限生成视频的视频生成模型。
随着MirageLSD的推出,未来的视频娱乐和直播互动将拥有更多的可能性。
用户不再受限于直播设备的性能,即使设备再差,也能通过MirageLSD将直播画面转化为全新场景,实现“完美直播”。
同时,MirageLSD也为科幻电影制作、游戏开发等领域带来了前所未有的创新机遇。
including facial consistency, voice control, and precise object control
接下来,探索增加 audio, emotions, music
MirageLSD 架构
MirageLSD 架构解读
- 时空 U-Net 核心
- 输入:来自摄像头、屏幕捕获、游戏引擎的连续视频帧。
- 编码器:多层 2D 卷积加 3D 卷积混合,提取单帧与相邻帧的时空特征。
- 时空注意力模块:在 U-Net 的每个阶段加入跨帧 self-/cross-attention,保证画面一致性。
- 解码器:基于注意力融合后的 latent,重建成目标场景的 RGB 帧。
- 低延迟采样策略
- 改良 DDIM:由原始 50+ 步骤降至 3–5 步骤,并结合可学习的时间调度器(Time-Step Scheduler),在保证画质的前提下极大缩短采样时间。
- 渐进式分辨率:先用低分辨率快速生成,再通过轻量级超分网络(Super-Resolution Net)恢复至目标分辨率,进一步减小主流程延迟。
- 光流引导与状态保持
- 在线光流估计:通过高效的 FlowNet-lite 计算相邻帧光流,并将其引入时空注意力,提升帧间一致性。
- 隐藏态缓存:维护上一帧的 latent 隐藏态,作为下一帧生成的初始条件,支持无限长度视频的连续推理。
实现
python 工具包
pip install mirage-lsd
使用
import mirage_lsd

# 初始化
engine = mirage_lsd.StreamEngine(
    model="mirage-lsd-v1",
    device="cuda",
    fp16=True,
    max_steps=5,
    resolution=(720, 1280),
)

# 启动摄像头流并渲染到窗口
engine.start(input_source=0, on_frame=engine.render)
去掉 VAE
【2025-10-23】无VAE扩散模型! 清华&可灵团队「撞车」谢赛宁团队「RAE」
长期以来,扩散模型的训练依赖由变分自编码器(VAE)构建的低维潜空间表示。
然而,VAE 潜空间表征能力有限,难以有效支撑感知理解等核心视觉任务,同时「VAE + Diffusion」的范式在训练与推理效率上也存在显著瓶颈。
清华+快手
清华大学智能视觉团队和快手可灵团队联合推出 《Latent Diffusion Model without Variational Autoencoder》与近期爆火的谢赛宁团队 RAE 工作不谋而合,但在总体设计思路与研究重点上有所差异。
【2025-10-17】谢赛宁 SVG
【2025-10-17】谢赛宁团队「RAE」通过直接结合预训练视觉特征编码器(如 DINO、SigLIP、MAE)结合残差信息学习预训练视觉特征编码器丢失的图片重建信息与专门训练的解码器,有效替代了传统 VAE,提升了表示质量与效率。
系统性框架称为 SVG(Self-supervised representation for Visual Generation)。
该论文同样对传统 VAE + Diffusion 的局限性进行了分析,发现其关键问题在于 VAE 空间存在非常明显的语义纠缠现象。VAE 的 latent 空间缺乏清晰语义结构,不同类别特征高度混合(论文通过 t-SNE 可视化验证,普通 VAE latent 中不同语义类别的特征点严重重叠),导致扩散模型需花费大量步数学习数据分布。
导致问题:
- 训练推理效率双低: 如下图中例子所示,如果语义纠缠程度高,那么即使给定了不同的语义条件,平均速度仍是难以区分的,模型在训练时就得花更多力气「理清」语义纠缠的特征。并且如果语义区分度较高,在空间中不同位置的速度方向也将更趋于一致,从而有助于减少采样过程的离散误差,支持少步数采样。
- 通用性差: VAE 依赖于重建损失进行训练,只适合生成任务,在感知理解这些视觉核心任务中的效果远不如专门的特征提取器。
考虑到各类视觉基础模型(如 DINO、SigLIP)已经构建出了具有优良语义结构的空间,研究者认为这类预训练视觉特征空间可能更适合生成模型的训练,同时也具有更强的可通用性。其中 DINO 特征在各种视觉下游任务中已经展现出了良好的性能,并且保留了基础的图像结构信息,具备比较高的重建潜力。
SVG 破局:靠 DINO 搭地基,残差分支补细节
SVG 核心思路简单:用更强的语义结构解锁模型生成潜力,基于自监督特征构建统一特征空间。
SVG 自编码器由「冻结的 DINOv3 编码器」、「轻量残差编码器」、「解码器」三部分组成,核心是通过多组件协作同时实现强判别性的语义结构与图像细节补充。
- 冻结 DINOv3 编码器: 作为语义骨架,提供强判别性特征。DINOv3 通过自监督训练(对比学习 + 掩码建模),天然具备清晰的语义类别边界,同时,DINOv3 的特征已在多种视觉任务中验证有效性,为 SVG 的通用性奠定基础;
- 轻量残差编码器: 弥补色差,补充细粒度细节。DINOv3 虽能捕捉全局语义,但会丢失部分细节(如色彩、纹理),导致重建质量差。SVG 设计了基于 ViT 的轻量残差分支,专门学习 DINOv3 未覆盖的高频细节,并通过「通道级拼接」与 DINO 特征融合;
- 分布对齐机制:避免细节干扰语义。为防止残差特征破坏 DINO 的语义结构,SVG 将残差输出归一化后再根据 DINO 特征的均值和方差进行缩放,使其匹配 DINO 特征的分布,确保拼接后的 latent 空间既具备高保真重建能力,又有利于生成模型训练(消融实验显示,无对齐时生成 FID 从 6.12 升至 9.03,对齐后恢复至 6.11);
- SVG 解码器: 参考传统 LDM 的 VAE 解码器结构,将融合后的 latent 特征映射回像素空间,确保生成图像的分辨率与细节还原度。
二者结合,构成了一个既有良好语义可区分性,又具有强重建能力的潜在空间。
SVG 扩散训练:直接在高维 SVG 特征空间学习
与传统 LDM 在 VAE 的低维(如 16×16×4)latent 空间训练不同,SVG 扩散模型直接在高维特征空间(16×16×392)训练。研究者指出,尽管之前的观点大多认为高维空间训练易导致生成模型收敛不稳定,但实验证明 SVG 空间良好的性质使得在这种高维度情况下,模型训练依旧稳定,甚至效率更高。


 支付宝打赏
支付宝打赏  微信打赏
微信打赏 
