Python GUI
常见 GUI工具包:
- PyQt 的介绍 : http://en.wikipedia.org/wiki/PyQt
- Tkinter 的介绍 : http://en.wikipedia.org/wiki/Tkinter
- wxPython 的介绍 : http://en.wikipedia.org/wiki/WxPython
- PyGTK 的介绍 : http://en.wikipedia.org/wiki/PyGTK
-
PySide 的介绍 : http://en.wikipedia.org/wiki/PySide
- 推荐8款常用的Python GUI图形界面开发框架
总结
| GUI编程对比 | 简介特点 | 优缺点 |
|---|---|---|
| PyQt | Python 对跨平台的 GUI 工具集 Qt 的包装实现了 440 个类以及 6000 个函数或者方法 ,PyQt 是作为 Python 的插件实现的。 | 比较流行的一个 Tkinter 的替代品,功能 非常强大,可以用Qt开发多美漂亮的界面,也就可以用PyQt开发多么漂亮的界面。 跨平台的支持很好,不过在商业授权上似乎存在一些问题。 |
| Tkinter | 绑定了 Python 的 Tk GUI 工具集 ,就是Python 包装的Tcl代码,通过内嵌在 Python 解释器内部的 Tcl 解释器实现, Tkinter的调用转换成 Tcl 命令,然后交给 Tcl 解释器进行解释,实现 Python 的 GUI 界面。 | 对比Tk和其它语言的绑定,比如 PerlTk ,是直接由 Tk 中的 C 库实现的。历史最悠久, Python 事实上的标准 GUI , Python 中使用 Tk GUI 工具集的标准接口,已经包括在标准的 Python Windows 安装中,著名的 IDLE 就是使用 Tkinter 实现 GUI 的创建的 GUI 简单,学起来和用起来也简单。 |
| wxPython | Python 对跨平台的 GUI 工具集 wxWidgets ( C++ 编写)的包装,作为 Python 的一个 扩展模块实现。 | 比较流行的一个 Tkinter 的替代品,在 各种平台下都表现挺好。 |
| PyGTK | 一系列的 Python 对 GTK+ GUI 库的包装。 | 比较流行的一个 Tkinter 的替代品,许多 Gnome 下的著名应用程序的 GUI 都是使用 PyGTK 实现的,比如 BitTorrent , GIMP和 Gedit 都有可选的实现,在 Windows 平台 似乎表现不太好,这点也无可厚非,毕竟使用的是GTK 的 GUI 库。 |
| PySide | 另一个 Python 对跨平台的 GUI 工具集 Qt 的包装,捆绑在 Python 当中,最初由 BoostC++ 库实现,后来迁移到 Shiboken。 | 比较流行的一个 Tkinter 的替代品,和上 面类似,至于两者的区别,这里 有一个介绍。 |
基本概念
概念:窗口和控件、事件驱动处理、布局管理器。
- 窗体控件: 窗体、标签、按钮、列表框、滚动条等。
- 事件驱动:按下按钮及释放、鼠标移动、按回车键等。
- 布局管理:Tk有3种布局管理器:Placer、Packer、Grid
Tkinter
Tkinter(也叫Tk接口)是Tk图形用户界面工具包标准的Python接口。Tk是一个轻量级的跨平台图形用户界面(GUI)开发工具。Tk和Tkinter可以运行在大多数的Unix平台、Windows、和Macintosh系统。
Tkinter 由一定数量的模块组成。Tkinter位于一个名为_tkinter(较早的版本名为tkinter)的二进制模块中 。Tkinter包含了对Tk的低 级接口模块,低级接口并不会被应用级程序员直接使用,通常是一个共享库(或DLL),但是在一些情况下它也被Python解释器静态链接。
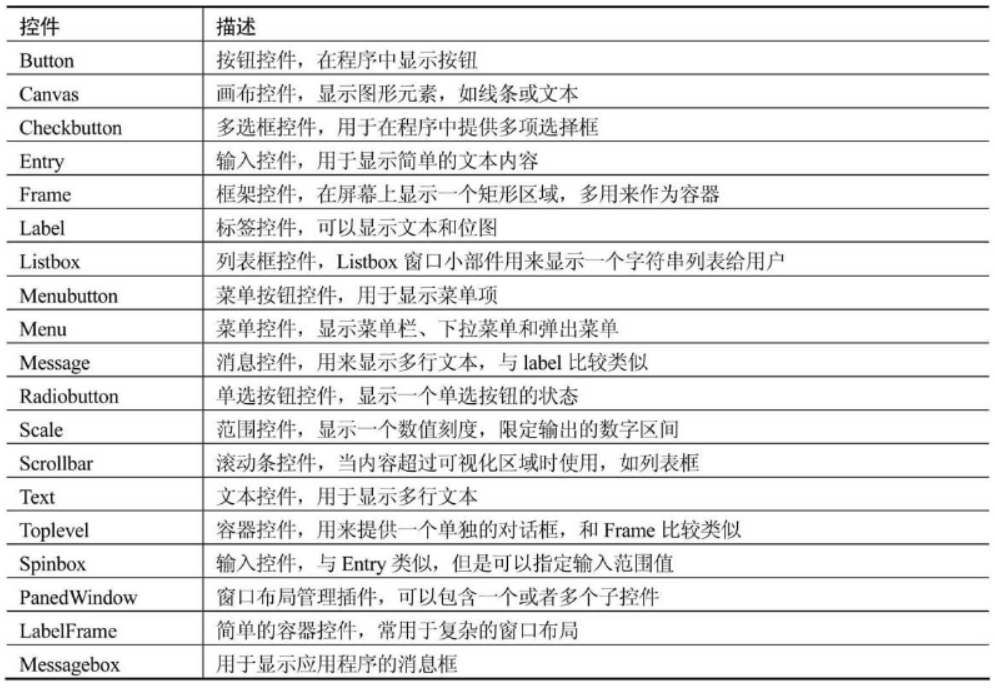
tkinter提供各种控件,如按钮、标签和文本框等,在一个GUI应用程序中使用。这些控件有时也被称为部件。目前有19种tkinter的控件。
语法
from tkinter import *

win = Tk() # 生成根窗体
win.title("Python GUI") # 标题

def _quit():
    win.quit()
    win.destroy()
    exit()

# 创建菜单栏功能
menuBar = Menu(win)
win.config(menu = menuBar)

font = ("黑体", 10, "bold")

fileMenu = Menu(menuBar, tearoff=0, font=font, bg="white", fg="black")
menuBar.add_cascade(label="File", menu=fileMenu)
fileMenu.add_command(labe="New File")
fileMenu.add_separator()
fileMenu.add_command(labe="Exit",command=_quit)

helpMenu = Menu(menuBar, tearoff=0, font=font, bg="white", fg="black")
menuBar.add_cascade(label="Help", menu=helpMenu)
helpMenu.add_command(labe="About")

check_music = IntVar()
check_video = IntVar()

# ---- 准备各类组件 -----
label = Label(win, text = "hello tkinter") # 文字
button = Button(win ,text="第一个按钮") # 按钮
#   Checkbutton控件
check_m = Checkbutton(win,text="Music", variable = check_music, onvalue =1, offvalue =0)
check_v = Checkbutton(win,text="Video", variable = check_video, onvalue =1, offvalue =0)
#   文本控件
text = Text(win,height=5, width=30, font=font, bg="white", fg="black")
text.insert(INSERT,"Hello GUI,")
text.insert(END, "Bye!")

# ---- 组件添加到窗体中 -----
label.pack()
button.pack()
check_m.pack()
check_v.pack()
text.pack()

win .mainloop() # 根窗体(活跃状态?)
案例
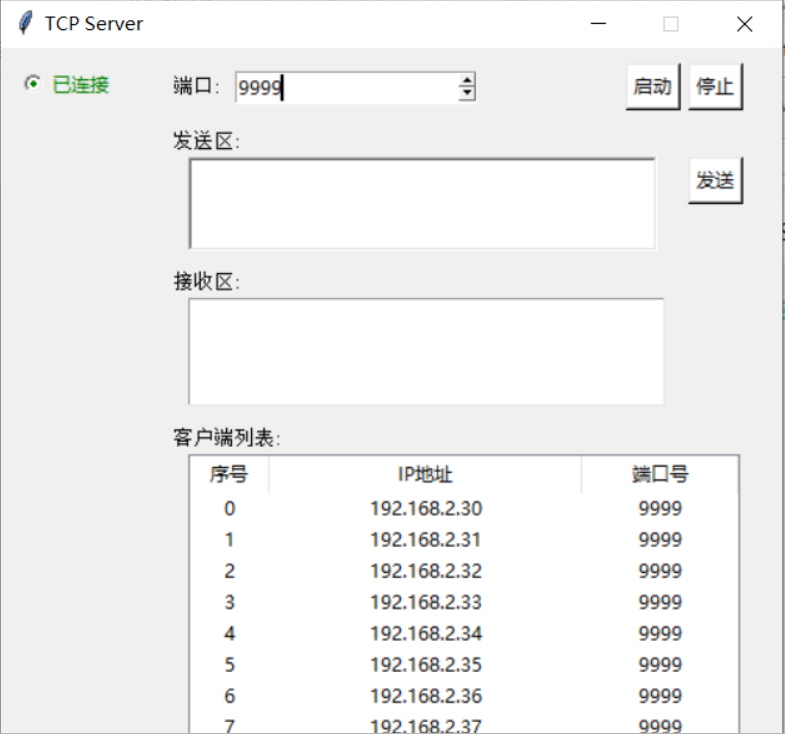
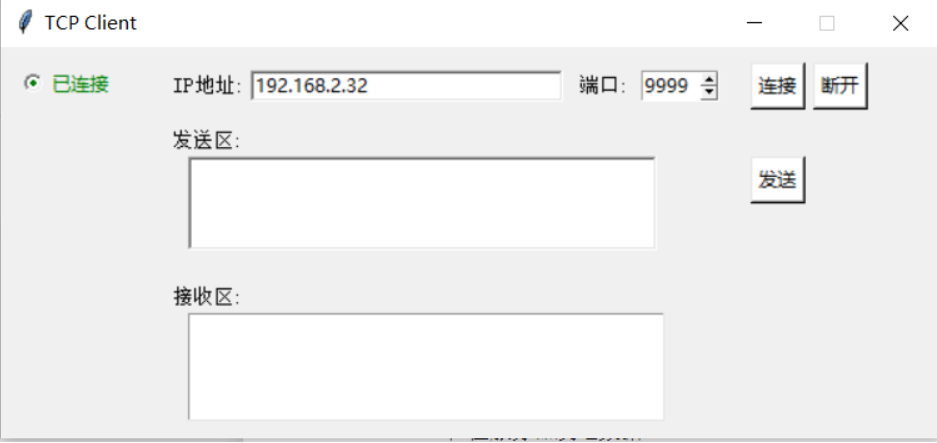
制作TCP通信的Server 和 Client
- 服务端
- 客户端
# -*- coding: utf-8 -*-
"""
Created on Thu Mar 26 15:34:10 2020

@author: sinlearn
"""
import tkinter as tk
import tkinter.ttk as ttk
import socket
import threading
import time

class TCP_Server():
    # 服务端
    def __init__(self):
        winserver = tk.Tk()
        winserver.title("TCP Server")
        winserver.geometry("500x500")
        winserver.resizable(width=False, height=False)
        font = ("宋体", 10)

        self.rbtn = tk.Radiobutton(winserver, text="未连接", fg="red")
        self.label_port = tk.Label(winserver, text=" 端口:", font=font)
        self.label_send = tk.Label(winserver, text=" 发送区:", font=font)
        self.label_recv = tk.Label(winserver, text=" 接收区:", font=font)
        self.label_clist = tk.Label(winserver, text=" 客户端列表:", font=font)
        self.spinbox_port = tk.Spinbox(winserver, from_=1024, to=10000)
        self.btn_start = tk.Button(winserver, text="启动", bg="white", command=self.do_start)
        self.btn_stop = tk.Button(winserver, text="停止", bg="white", command=self.do_stop)
        self.btn_send = tk.Button(winserver, text="发送", bg="white", command=self.send_to_client)
        self.en_send = tk.Entry(winserver, text="Test", bd=2)
        self.text_recv = tk.Text(winserver, height=5, width=43, font=font, bg="white", fg="black")
        self.client_list = ttk.Treeview(winserver, height=10, show="headings",
                                        columns=('col1', 'col2', 'col3'))  # show = "headings" 隐藏默认的col0列
        self.client_list.column('col1', width=50, anchor='center')
        self.client_list.column('col2', width=200, anchor='center')
        self.client_list.column('col3', width=100, anchor='center')
        self.client_list.heading('col1', text='序号')
        self.client_list.heading('col2', text='IP地址')
        self.client_list.heading('col3', text='端口号')

        self.rbtn.place(x=10, y=10)
        self.label_port.place(x=100, y=15)
        self.label_send.place(x=100, y=50)
        self.label_recv.place(x=100, y=140)
        self.spinbox_port.place(x=150, y=15)
        self.btn_start.place(x=400, y=10)
        self.btn_stop.place(x=440, y=10)
        self.btn_send.place(x=440, y=70)
        self.en_send.place(x=120, y=70, width=300, height=60)
        self.text_recv.place(x=120, y=160)
        self.label_clist.place(x=100, y=240)
        self.client_list.place(x=120, y=260)

        for i in range(10):
            self.client_list.insert("", i, values=(i, "192.168.2.3" + str(i), "9999"))  # 插入数据
            self.client_list.bind("<Double-1>", self.onDBClick)
        winserver.mainloop()

    def onDBClick(self, event):
        item = self.client_list.selection()[0]
        print("you clicked on ", self.client_list.item(item, "values"))

    def do_start(self):
        self.rbtn["fg"] = "green"
        self.rbtn["text"] = "已连接"

    def do_stop(self):
        print("正在断开连接....")
        self.rbtn["fg"] = "red"
        self.rbtn["text"] = "未连接"

    def send_to_client(self):
        if self.rbtn["text"] == "已连接":
            print("正在发送数据....")
        else:
            print("连接未建立,不能发送数据....")

    def tcp_link(self, sock, addr):
        print(f" {addr} 正在请求连接........")
        sock.send("欢迎您连接到服务器........".encode('utf-8'))
        while True:
            data = sock.recv(1024)
            time.sleep(1)
            if data and data.decode('utf-8') != "exit":
                print(data.decode('utf-8'))
                self.text_recv["text"] = data.decode('utf-8')
                sock.send("服务器正在接收数据,请稍等........".encode('utf-8'))
            else:
                break


class TCP_Client():
    def __init__(self):
        self.client_socket = socket.socket(socket.AF_INET, socket.SOCK_STREAM)
        winclient = tk.Tk()
        winclient.title("TCP Client")
        winclient.geometry("600x250")
        winclient.resizable(width=False, height=False)
        font = ("宋体", 10)

        self.rbtn = tk.Radiobutton(winclient, text="未连接", fg="red")
        self.label_ip = tk.Label(winclient, text=" IP地址:", font=font)
        self.label_port = tk.Label(winclient, text=" 端口:", font=font)
        self.label_send = tk.Label(winclient, text=" 发送区:", font=font)
        self.label_recv = tk.Label(winclient, text=" 接收区:", font=font)
        self.spinbox_port = tk.Spinbox(winclient, from_=1024, to=10000)
        self.btn_start = tk.Button(winclient, text="连接", bg="white", command=self.do_connect)
        self.btn_stop = tk.Button(winclient, text="断开", bg="white", command=self.do_stopconnect)
        self.btn_send = tk.Button(winclient, text="发送", bg="white", command=self.send_to_server)
        self.en_ip = tk.Entry(winclient, text="IP地址", bd=2)
        self.en_send = tk.Entry(winclient, text="Test", bd=2)
        self.text_recv = tk.Text(winclient, height=5, width=43, font=font, bg="white", fg="black")

        self.label_ip.place(x=100, y=15)
        self.label_port.place(x=360, y=15)
        self.label_send.place(x=100, y=50)
        self.label_recv.place(x=100, y=150)
        self.rbtn.place(x=10, y=10)
        self.btn_start.place(x=480, y=10)
        self.btn_stop.place(x=520, y=10)
        self.btn_send.place(x=480, y=70)
        self.en_ip.place(x=160, y=15, width=200, height=20)
        self.spinbox_port.place(x=410, y=15, width=50, height=20)
        self.en_send.place(x=120, y=70, width=300, height=60)
        self.text_recv.place(x=120, y=170)
        winclient.mainloop()

    def do_connect(self):
        print("正在连接服务器....")
        self.rbtn["fg"] = "green"
        self.rbtn["text"] = "已连接"

    def do_stopconnect(self):
        self.rbtn["fg"] = "red"
        self.rbtn["text"] = "未连接"


    def send_to_server(self):
        print("正在往服务器发送数据.....")

if __name__ == "__main__":
    TCP_Server()
    TCP_Client()
PyQT
pyqt5是一套Python绑定Digia QT5应用的框架。它可用于Python 2和3。Qt库是最强大的GUI库之一。
pyqt5的类别分为几个模块,包括以下:
- QtCore: 包含了核心的非GUI功能。此模块用于处理时间、文件和目录、各种数据类型、流、URL、MIME类型、线程或进程。
- QtGui: 包含类窗口系统集成、事件处理、二维图形、基本成像、字体和文本。
- qtwidgets: 包含创造经典桌面风格的用户界面提供了一套UI元素的类。
- QtMultimedia: 包含的类来处理多媒体内容和API来访问相机和收音机的功能。
- Qtbluetooth: 包含类的扫描设备和连接并与他们互动。描述模块包含了网络编程的类。
- Qtpositioning: 包含类的利用各种可能的来源,确定位置,包括卫星、Wi-Fi、或一个文本文件。
- Enginio: 实现了客户端库访问Qt云服务托管的应用程序运行时。
- Qtwebsockets: 包含实现WebSocket协议类。
- QtWebKit: 包含一个基于Webkit2图书馆Web浏览器实现类。
- Qtwebkitwidgets: 的类的基础webkit1一用于qtwidgets应用Web浏览器的实现。
- QtXml: 包含与XML文件的类。这个模块为SAX和DOM API提供了实现。
- QtSvg: 提供了显示SVG文件内容的类。可伸缩矢量图形(SVG)是一种描述二维图形和图形应用的语言。
- QtSql: 提供操作数据库的类。
- QtTest: 包含的功能,使pyqt5应用程序的单元测试
安装
pip install pyqt5
brew install pyqt # mac下专用
代码
#!/usr/bin/python3
# -*- coding: utf-8 -*-

"""
Py40 PyQt5 tutorial

This example shows a tooltip on
a window and a button.

author: Jan Bodnar
website: py40.com
last edited: January 2015
"""

import sys
from PyQt5.QtWidgets import (QWidget, QToolTip,
    QPushButton, QApplication)
from PyQt5.QtGui import QFont


class Example(QWidget):

    def __init__(self):
        super().__init__()

        self.initUI()


    def initUI(self):
        #这种静态的方法设置一个用于显示工具提示的字体。我们使用10px滑体字体。
        QToolTip.setFont(QFont('SansSerif', 10))

        #创建一个提示,我们称之为settooltip()方法。我们可以使用丰富的文本格式
        self.setToolTip('This is a <b>QWidget</b> widget')

        #创建一个PushButton并为他设置一个tooltip
        btn = QPushButton('Button', self)
        btn.setToolTip('This is a <b>QPushButton</b> widget')

        #btn.sizeHint()显示默认尺寸
        btn.resize(btn.sizeHint())

        #移动窗口的位置
        btn.move(50, 50)

        self.setGeometry(300, 300, 300, 200)
        self.setWindowTitle('Tooltips')
        self.show()


if __name__ == '__main__':

    app = QApplication(sys.argv)
    ex = Example()
    sys.exit(app.exec_())

#!/usr/bin/python3
# -*- coding: utf-8 -*-

"""
ZetCode PyQt5 tutorial

This is a Tetris game clone.

Author: Jan Bodnar
Website: zetcode.com
Last edited: August 2017
"""

from PyQt5.QtWidgets import QMainWindow, QFrame, QDesktopWidget, QApplication
from PyQt5.QtCore import Qt, QBasicTimer, pyqtSignal
from PyQt5.QtGui import QPainter, QColor
import sys, random

class Tetris(QMainWindow):

    def __init__(self):
        super().__init__()

        self.initUI()


    def initUI(self):
        '''initiates application UI'''

        self.tboard = Board(self)
        self.setCentralWidget(self.tboard)

        self.statusbar = self.statusBar()
        self.tboard.msg2Statusbar[str].connect(self.statusbar.showMessage)

        self.tboard.start()

        self.resize(180, 380)
        self.center()
        self.setWindowTitle('Tetris')
        self.show()


    def center(self):
        '''centers the window on the screen'''

        screen = QDesktopWidget().screenGeometry()
        size = self.geometry()
        self.move((screen.width()-size.width())/2,
            (screen.height()-size.height())/2)


class Board(QFrame):

    msg2Statusbar = pyqtSignal(str)

    BoardWidth = 10
    BoardHeight = 22
    Speed = 300

    def __init__(self, parent):
        super().__init__(parent)

        self.initBoard()


    def initBoard(self):
        '''initiates board'''

        self.timer = QBasicTimer()
        self.isWaitingAfterLine = False

        self.curX = 0
        self.curY = 0
        self.numLinesRemoved = 0
        self.board = []

        self.setFocusPolicy(Qt.StrongFocus)
        self.isStarted = False
        self.isPaused = False
        self.clearBoard()


    def shapeAt(self, x, y):
        '''determines shape at the board position'''

        return self.board[(y * Board.BoardWidth) + x]


    def setShapeAt(self, x, y, shape):
        '''sets a shape at the board'''

        self.board[(y * Board.BoardWidth) + x] = shape


    def squareWidth(self):
        '''returns the width of one square'''

        return self.contentsRect().width() // Board.BoardWidth


    def squareHeight(self):
        '''returns the height of one square'''

        return self.contentsRect().height() // Board.BoardHeight


    def start(self):
        '''starts game'''

        if self.isPaused:
            return

        self.isStarted = True
        self.isWaitingAfterLine = False
        self.numLinesRemoved = 0
        self.clearBoard()

        self.msg2Statusbar.emit(str(self.numLinesRemoved))

        self.newPiece()
        self.timer.start(Board.Speed, self)


    def pause(self):
        '''pauses game'''

        if not self.isStarted:
            return

        self.isPaused = not self.isPaused

        if self.isPaused:
            self.timer.stop()
            self.msg2Statusbar.emit("paused")

        else:
            self.timer.start(Board.Speed, self)
            self.msg2Statusbar.emit(str(self.numLinesRemoved))

        self.update()


    def paintEvent(self, event):
        '''paints all shapes of the game'''

        painter = QPainter(self)
        rect = self.contentsRect()

        boardTop = rect.bottom() - Board.BoardHeight * self.squareHeight()

        for i in range(Board.BoardHeight):
            for j in range(Board.BoardWidth):
                shape = self.shapeAt(j, Board.BoardHeight - i - 1)

                if shape != Tetrominoe.NoShape:
                    self.drawSquare(painter,
                        rect.left() + j * self.squareWidth(),
                        boardTop + i * self.squareHeight(), shape)

        if self.curPiece.shape() != Tetrominoe.NoShape:

            for i in range(4):

                x = self.curX + self.curPiece.x(i)
                y = self.curY - self.curPiece.y(i)
                self.drawSquare(painter, rect.left() + x * self.squareWidth(),
                    boardTop + (Board.BoardHeight - y - 1) * self.squareHeight(),
                    self.curPiece.shape())


    def keyPressEvent(self, event):
        '''processes key press events'''

        if not self.isStarted or self.curPiece.shape() == Tetrominoe.NoShape:
            super(Board, self).keyPressEvent(event)
            return

        key = event.key()

        if key == Qt.Key_P:
            self.pause()
            return

        if self.isPaused:
            return

        elif key == Qt.Key_Left:
            self.tryMove(self.curPiece, self.curX - 1, self.curY)

        elif key == Qt.Key_Right:
            self.tryMove(self.curPiece, self.curX + 1, self.curY)

        elif key == Qt.Key_Down:
            self.tryMove(self.curPiece.rotateRight(), self.curX, self.curY)

        elif key == Qt.Key_Up:
            self.tryMove(self.curPiece.rotateLeft(), self.curX, self.curY)

        elif key == Qt.Key_Space:
            self.dropDown()

        elif key == Qt.Key_D:
            self.oneLineDown()

        else:
            super(Board, self).keyPressEvent(event)


    def timerEvent(self, event):
        '''handles timer event'''

        if event.timerId() == self.timer.timerId():

            if self.isWaitingAfterLine:
                self.isWaitingAfterLine = False
                self.newPiece()
            else:
                self.oneLineDown()

        else:
            super(Board, self).timerEvent(event)


    def clearBoard(self):
        '''clears shapes from the board'''

        for i in range(Board.BoardHeight * Board.BoardWidth):
            self.board.append(Tetrominoe.NoShape)


    def dropDown(self):
        '''drops down a shape'''

        newY = self.curY

        while newY > 0:

            if not self.tryMove(self.curPiece, self.curX, newY - 1):
                break

            newY -= 1

        self.pieceDropped()


    def oneLineDown(self):
        '''goes one line down with a shape'''

        if not self.tryMove(self.curPiece, self.curX, self.curY - 1):
            self.pieceDropped()


    def pieceDropped(self):
        '''after dropping shape, remove full lines and create new shape'''

        for i in range(4):

            x = self.curX + self.curPiece.x(i)
            y = self.curY - self.curPiece.y(i)
            self.setShapeAt(x, y, self.curPiece.shape())

        self.removeFullLines()

        if not self.isWaitingAfterLine:
            self.newPiece()


    def removeFullLines(self):
        '''removes all full lines from the board'''

        numFullLines = 0
        rowsToRemove = []

        for i in range(Board.BoardHeight):

            n = 0
            for j in range(Board.BoardWidth):
                if not self.shapeAt(j, i) == Tetrominoe.NoShape:
                    n = n + 1

            if n == 10:
                rowsToRemove.append(i)

        rowsToRemove.reverse()


        for m in rowsToRemove:

            for k in range(m, Board.BoardHeight):
                for l in range(Board.BoardWidth):
                        self.setShapeAt(l, k, self.shapeAt(l, k + 1))

        numFullLines = numFullLines + len(rowsToRemove)

        if numFullLines > 0:

            self.numLinesRemoved = self.numLinesRemoved + numFullLines
            self.msg2Statusbar.emit(str(self.numLinesRemoved))

            self.isWaitingAfterLine = True
            self.curPiece.setShape(Tetrominoe.NoShape)
            self.update()


    def newPiece(self):
        '''creates a new shape'''

        self.curPiece = Shape()
        self.curPiece.setRandomShape()
        self.curX = Board.BoardWidth // 2 + 1
        self.curY = Board.BoardHeight - 1 + self.curPiece.minY()

        if not self.tryMove(self.curPiece, self.curX, self.curY):

            self.curPiece.setShape(Tetrominoe.NoShape)
            self.timer.stop()
            self.isStarted = False
            self.msg2Statusbar.emit("Game over")


    def tryMove(self, newPiece, newX, newY):
        '''tries to move a shape'''

        for i in range(4):

            x = newX + newPiece.x(i)
            y = newY - newPiece.y(i)

            if x < 0 or x >= Board.BoardWidth or y < 0 or y >= Board.BoardHeight:
                return False

            if self.shapeAt(x, y) != Tetrominoe.NoShape:
                return False

        self.curPiece = newPiece
        self.curX = newX
        self.curY = newY
        self.update()

        return True


    def drawSquare(self, painter, x, y, shape):
        '''draws a square of a shape'''

        colorTable = [0x000000, 0xCC6666, 0x66CC66, 0x6666CC,
                      0xCCCC66, 0xCC66CC, 0x66CCCC, 0xDAAA00]

        color = QColor(colorTable[shape])
        painter.fillRect(x + 1, y + 1, self.squareWidth() - 2,
            self.squareHeight() - 2, color)

        painter.setPen(color.lighter())
        painter.drawLine(x, y + self.squareHeight() - 1, x, y)
        painter.drawLine(x, y, x + self.squareWidth() - 1, y)

        painter.setPen(color.darker())
        painter.drawLine(x + 1, y + self.squareHeight() - 1,
            x + self.squareWidth() - 1, y + self.squareHeight() - 1)
        painter.drawLine(x + self.squareWidth() - 1,
            y + self.squareHeight() - 1, x + self.squareWidth() - 1, y + 1)


class Tetrominoe(object):

    NoShape = 0
    ZShape = 1
    SShape = 2
    LineShape = 3
    TShape = 4
    SquareShape = 5
    LShape = 6
    MirroredLShape = 7


class Shape(object):

    coordsTable = (
        ((0, 0),     (0, 0),     (0, 0),     (0, 0)),
        ((0, -1),    (0, 0),     (-1, 0),    (-1, 1)),
        ((0, -1),    (0, 0),     (1, 0),     (1, 1)),
        ((0, -1),    (0, 0),     (0, 1),     (0, 2)),
        ((-1, 0),    (0, 0),     (1, 0),     (0, 1)),
        ((0, 0),     (1, 0),     (0, 1),     (1, 1)),
        ((-1, -1),   (0, -1),    (0, 0),     (0, 1)),
        ((1, -1),    (0, -1),    (0, 0),     (0, 1))
    )

    def __init__(self):

        self.coords = [[0,0] for i in range(4)]
        self.pieceShape = Tetrominoe.NoShape

        self.setShape(Tetrominoe.NoShape)


    def shape(self):
        '''returns shape'''

        return self.pieceShape


    def setShape(self, shape):
        '''sets a shape'''

        table = Shape.coordsTable[shape]

        for i in range(4):
            for j in range(2):
                self.coords[i][j] = table[i][j]

        self.pieceShape = shape


    def setRandomShape(self):
        '''chooses a random shape'''

        self.setShape(random.randint(1, 7))


    def x(self, index):
        '''returns x coordinate'''

        return self.coords[index][0]


    def y(self, index):
        '''returns y coordinate'''

        return self.coords[index][1]


    def setX(self, index, x):
        '''sets x coordinate'''

        self.coords[index][0] = x


    def setY(self, index, y):
        '''sets y coordinate'''

        self.coords[index][1] = y


    def minX(self):
        '''returns min x value'''

        m = self.coords[0][0]
        for i in range(4):
            m = min(m, self.coords[i][0])

        return m


    def maxX(self):
        '''returns max x value'''

        m = self.coords[0][0]
        for i in range(4):
            m = max(m, self.coords[i][0])

        return m


    def minY(self):
        '''returns min y value'''

        m = self.coords[0][1]
        for i in range(4):
            m = min(m, self.coords[i][1])

        return m


    def maxY(self):
        '''returns max y value'''

        m = self.coords[0][1]
        for i in range(4):
            m = max(m, self.coords[i][1])

        return m


    def rotateLeft(self):
        '''rotates shape to the left'''

        if self.pieceShape == Tetrominoe.SquareShape:
            return self

        result = Shape()
        result.pieceShape = self.pieceShape

        for i in range(4):

            result.setX(i, self.y(i))
            result.setY(i, -self.x(i))

        return result


    def rotateRight(self):
        '''rotates shape to the right'''

        if self.pieceShape == Tetrominoe.SquareShape:
            return self

        result = Shape()
        result.pieceShape = self.pieceShape

        for i in range(4):

            result.setX(i, -self.y(i))
            result.setY(i, self.x(i))

        return result


if __name__ == '__main__':

    app = QApplication([])
    tetris = Tetris()
    sys.exit(app.exec_())
wxPython
wxPython 是 Python 语言的一套优秀的 GUI 图形库,允许 Python 程序员很方便的创建完整的、功能键全的 GUI 用户界面。 wxPython 是作为优秀的跨平台 GUI 库 wxWidgets 的 Python 封装和 Python 模块的方式提供给用户的。
就如同Python和wxWidgets一样,wxPython也是一款开源软件,并且具有非常优秀的跨平台能力,能够运行在32位windows、绝大多数的Unix或类Unix系统、Macintosh OS X上。

PyGTK
PyGTK让你用Python轻松创建具有图形用户界面的程序.底层的GTK+提供了各式的可视元素和功能,如果需要,你能开发在GNOME桌面系统运行的功能完整的软件.
PyGTK真正具有跨平台性,它能不加修改地,稳定运行各种操作系统之上,如Linux,Windows,MacOS等.除了简单易用和快速的原型开发能力外,PyGTK还有一流的处理本地化语言的独特功能.
模型快速部署
Pynecone
【2022-12-15】GitHub 上的开源 Python 全栈开发框架:Pynecone
hugginface space
【2022-10-18】huggingface(抱抱脸)支持快速部署模型demo,兼容 gradio、streamlit、静态html页面
- 在 huggingface 上创建 space;
- 如:创建gradio demo
- 添加代码到 app.py 文件中,提交
- 等待几分钟,再次点击即可看到部署效果
gradio
介绍
Gradio 是一个开源的 Python 库,用于构建机器学习和数据科学演示和 Web 应用。
- github
- Gradio is the fastest way to demo your machine learning model with a friendly web interface so that anyone can use it, anywhere!
pip install -q gradio
功能
- Fast, easy setup 简单迅速
- Gradio can be installed with pip. Creating a Gradio interface only requires adding a couple lines of code to your project.
- You can choose from a variety of interface types to interface your function.
- Present and share 便捷分享
- Gradio can be embedded in Python notebooks or presented as a webpage.
- A Gradio interface can automatically generate a public link (生成临时链接,72h) you can share with colleagues that lets them interact with the model on your computer remotely from their own devices.
- Permanent hosting 永久部署
- Once you’ve created an interface, you can permanently host it on Hugging Face.
- Hugging Face Spaces will host the interface on its servers and provide you with a link you can share.
页面组件
【2023-4-20】基于Gradio可视化部署机器学习应用
Interface类:高层API,只需提供输入输出,快速构建纯机器学习应用- Interface 高效但不灵活
Blocks类:低级别API,用于设计布局、数据流更灵活的网络应用。- Blocks 允许控制组件在页面上出现的位置,处理复杂数据流(例如,输出可以作为其他函数的输入),多步应用,并根据用户交互更新组件的属性可见性。
- 如:创建多个Tab页、定制输入输出组件布局、多步交互(一个模型输出作为另一个模型的输入)、根据用户输入更改组件属性
官方提供的几个示例
- Sketch Recognition 你画我猜
- Question Answering 简易文档QA
- Image Segmentation 图像分割
- Time Series Forecasting 时间序列预测
- XGBoost with Explainability 带解释能力的XGB预测
功能组件
Gradio 支持多种输入和输出组件,如:图像、视频、音频、滑动条、复选框等
功能组件
输入输出组件:
- gr.Image(图像):用于处理图像输入和输出。
- gr.Textbox(文本框):用于接收和显示文本输入和输出。
- gr.DataFrame(数据框):用于处理表格数据的输入和输出。
- gr.Dropdown(下拉选项):用于创建下拉选项菜单,方便用户进行选择。
- gr.Number(数字):用于处理数值输入和输出。
- gr.Markdown:用于渲染和显示Markdown格式的文本。
- gr.Files:用于处理文件的输入和输出。
控制组件:
- gr.Button(按钮):用于创建按钮,用户可以点击按钮执行特定的操作。
- gr.Slider(滑块):用于创建可拖动的滑块,用于选择范围内的数值。
- gr.Checkbox(复选框):用于创建复选框,用户可以选择或取消选择。
- gr.Radio(单选框):用于创建单选框,用户可以从多个选项中选择一个。
- gr.Switch(开关):用于创建开关按钮,用户可以切换开关的状态。
- gr.ColorPicker(颜色选择器):用于选择颜色的输入和输出。 等等
布局组件:
- gr.Tab(标签页):用于创建多个标签页,使界面更加有组织和易于导航。
- gr.Row(行布局):用于将组件水平排列在一行中。
- gr.Column(列布局):用于将组件垂直排列在一列中。
Bug
Invalid port
【2023-4-21】
Invalid port
- 升级httpx
pip install httpx==0.23.3
Address already in use
OSError: [Errno 98] Address already in use
- 端口被占用,换端口,或关闭已有服务
# 关闭已有gradio端口
gr.close_all()
公开链接无法分享
gradio无法分享链接的问题:Could not create share link
Could not create share link. Please check your internet connection or our status page: https://status.gradio.app.
【2025-5-14】 CentOS 腾讯云系统报错
Please check your internet connection. This can happen if your antivirus software blocks the download of this file. You can install manually by following these steps:

1. Download this file: https://cdn-media.huggingface.co/frpc-gradio-0.3/frpc_linux_amd64
2. Rename the downloaded file to: frpc_linux_amd64_v0.3
3. Move the file to this location: /home/work/.cache/huggingface/gradio/frpc
解法:
- 从镜像网址下载
frpc_linux_amd64- 注意: 国内无法直接访问 huggingface, 需要将 huggingface.co 替换为 hf-mirror.com,即:
https://cdn-media.hf-mirror.com/frpc-gradio-0.3/frpc_linux_amd64
- 注意: 国内无法直接访问 huggingface, 需要将 huggingface.co 替换为 hf-mirror.com,即:
- 给 frpc_linux_amd64 可执行权限:
chmod +x frpc_linux_amd64_v0.3
Linux
- 给 gradio下的 frpc_linux_amd64_v0.2 加权限
- chmod +x /usr/local/lib/python3.8/dist-packages/gradio/frpc_linux_amd64_v0.2
Windows
- Windows Defender 把 Gradio 挡住了, Gradio 执行 frpc_windows_amd64 被当成垃圾软件
Interface 高级页面
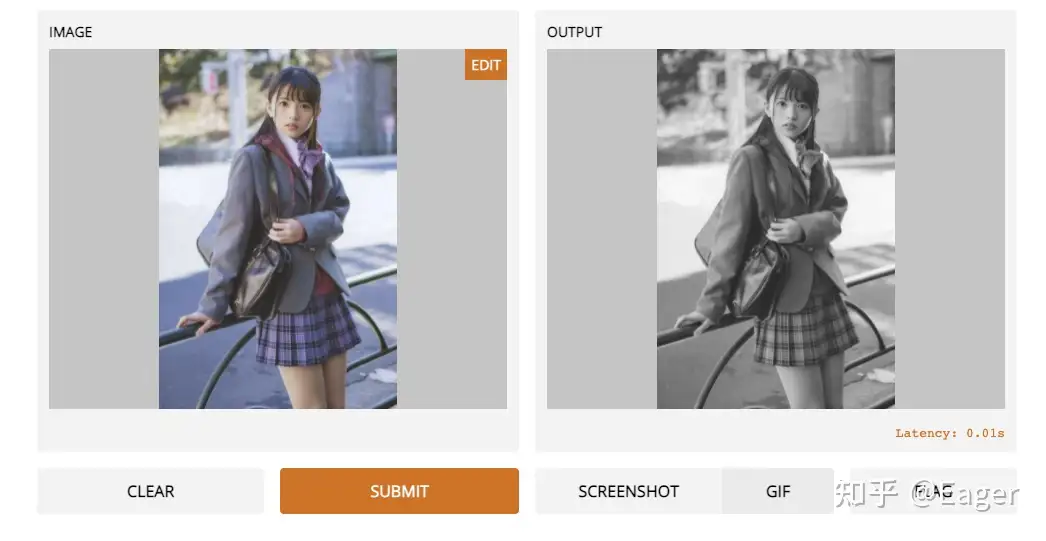
gradio 核心是 gr.Interface 函数,构建可视化界面。
fn:处理函数inputs:输入类型,这里输入的是图像,所以是”image”outputs:输出类型,这里输出的是图像,所以是”image”
import gradio as gr
import cv2

def to_black(image):
    output = cv2.cvtColor(image, cv2.COLOR_BGR2GRAY)
    return output

interface = gr.Interface(fn=to_black, inputs="image", outputs="image")
# 增加示例
interface = gr.Interface(fn=to_black, inputs="image", outputs="image", examples=[["test.png"]])
# 启动
interface.launch()
用 interface.lauch() 把页面发布,一个本地静态交互页面就完成了
launch 功能
share: 创建外部访问链接,只需launch(share=True)即可,在打印信息中会看到外部访问链接。- 免费用户链接可使用24小时,长期需要在gradio官方购买云服务
server_port: 端口
# share 生成外部链接
# server_name 服务器ip
# server_port 服务器端口
iface.launch(debug=True, enable_queue=True, share=False, server_name="0.0.0.0", server_port=7860)  # 写好对象直接launch就行
简易文本示例
import gradio as gr

def greet(name):
    return "Hello " + name + "!"

demo = gr.Interface(fn=greet, inputs="text", outputs="text") # 文本组件
demo = gr.Interface(sepia, gr.Image(shape=(200, 200)), "image") # 图像组件
# 启动服务
demo.launch()
# 密码验证
demo.launch(auth=("admin", "pass1234"))
# 更复杂:账户和密码相同就可以通过
def same_auth(username, password):
    return username == password

demo.launch(auth=same_auth, auth_message="username and password must be the same")
# 分享
demo.launch(share=True, auth=("xfl","xfl"),inline=False, server_port=9999)
# show_error为True表示在控制台显示错误信息。
demo.launch(server_name='0.0.0.0', server_port=8080, show_error=True)
复杂文本示例:document QA
import gradio as gr

def question_answer(context, question):
    pass  # Implement your question-answering model here...
    return ('答案返回', 'hello')

gr.Interface(fn=question_answer,
    # ----- 输入 ------
    inputs=["text", "text"],
    # 自定义 input
    inputs=gr.Textbox(lines=3, placeholder="占位符",label="名称"),
    # ----- 输出 ------
    outputs=["textbox", "text"],
    # outputs=gr.HighlightedText(label="分析结果:", show_legend=True, combine_adjacent=True),  # 输出结果以什么样的形式展示,随意替换
    # 自定义输出名称
    outputs=[ gr.outputs.Textbox(label="抽取式QA"),
       gr.outputs.Textbox(label="小区测评")]
    )
    # ---- 多输入、多输出 ----- 对应函数 question_answer 的输入、输出
    # 按照处理程序设置输入组件
    inputs=["text", "checkbox", gr.Slider(0, 100)],
    # 按照处理程序设置输出组件
    outputs=["text", "number"],
    # 示例
	examples=[['该楼盘的住宅户型60平到239平价格900万到4000万,产品是开间,一居,二居,三居,户型总共17种。园区整体楼间距可达约230米-260米。精装交付。园区整体楼间距可达约230米-260米。项目共有1类产品类型分别为:平层。','该楼盘的装修交付标准是什么?']]
	).launch()
	#).launch(share=True)
有了 Gradio,可围绕机器学习模型或数据科学工作流程快速创建一个漂亮的用户界面,拖放图片、粘贴文本、录制声音来 “试用”,并通过浏览器与你的演示进行互动。
import gradio as gr
import cv2

def to_black(image):
    output = cv2.cvtColor(image, cv2.COLOR_BGR2GRAY)
    return output

# 支持裁剪、拖拽
interface = gr.Interface(fn=to_black, inputs="image", outputs="image")
# 注意:图片目录在当前文件录下下,否则无法识别
interface = gr.Interface(fn=to_black, inputs="image", outputs="image", examples=[["test.png"]]) # 增加图片示例
# 创建公共链接
interface = gr.Interface(fn=to_black, inputs="image", outputs="image", examples=[["test.png"]], share=True) # 链接
interface.launch()
gradio 核心是 gr.Interface 函数,构建可视化界面。
- fn:处理函数
- inputs:输入类型,这里输入图像,所以是”image”
- outputs:输出类型,这里输出图像,所以是”image”
最后用 interface.lauch() 页面发布,一个本地静态交互页面就完成了!
- 在浏览器输入 http://127.0.0.1:7860/, 查收页面

自定义UI
import gradio as gr

def sentence_builder(quantity, animal, place, activity_list, morning):
    return f"""The {quantity} {animal}s went to the {place} where they {" and ".join(activity_list)} until the {"morning" if morning else "night"}"""

iface = gr.Interface(
    sentence_builder,
    [
        gr.inputs.Slider(2, 20),
        gr.inputs.Dropdown(["cat", "dog", "bird"]),
        gr.inputs.Radio(["park", "zoo", "road"]),
        gr.inputs.CheckboxGroup(["ran", "swam", "ate", "slept"]),
        gr.inputs.Checkbox(label="Is it the morning?"),
    ],
    "text",
    examples=[
        [2, "cat", "park", ["ran", "swam"], True],
        [4, "dog", "zoo", ["ate", "swam"], False],
        [10, "bird", "road", ["ran"], False],
        [8, "cat", "zoo", ["ate"], True],
    ],
)

iface.launch()
【2023-3-13】示例
- launch 参数见 官方指南
import gradio as gr

def question_answer(question):
	return question

gr.Interface(fn=question_answer, inputs=["text"], outputs=["textbox"],
	examples=[['小区一周之内发生两次跳楼事件,刚交了三个月房租我是租还是搬走呢?'],
              ['出租出去的房屋家电坏了,应该谁负责出维修费用?'],
              ['女方婚前父母出资买房,登记在女方名下,父母还贷,婚后怎么划分?'],
              ['退租房东不还押金怎么办?'],['小区环境太差,可以找物业吗'],
    ]).launch(share=True)
# 启用 密码
#gr.launch(share=True, auth=("xfl","xfl"),inline=False, server_port=9999)
图像输入、输出
- Image 组件将图像当做NumPy array, 维度是 (width, height, 3)
- 允许裁剪、缩放
import numpy as np
import gradio as gr

def sepia(input_img):
    sepia_filter = np.array([
        [0.393, 0.769, 0.189],
        [0.349, 0.686, 0.168],
        [0.272, 0.534, 0.131]
    ])
    sepia_img = input_img.dot(sepia_filter.T)
    sepia_img /= sepia_img.max()
    return sepia_img

demo = gr.Interface(sepia, gr.Image(shape=(200, 200)), "image")
demo.launch()
多输入、多输出
import gradio as gr

def greet(name, is_morning, temperature):
    salutation = "Good morning" if is_morning else "Good evening"
    greeting = f"{salutation} {name}. It is {temperature} degrees today"
    celsius = (temperature - 32) * 5 / 9
    return greeting, round(celsius, 2)

demo = gr.Interface(
    fn=greet,
    inputs=["text", "checkbox", gr.Slider(0, 100)],
    outputs=["text", "number"], # 默认名称
demo.launch()
加载大模型
import gradio as gr

api = gr.Interface.load("huggingface/EleutherAI/gpt-j-6B")

def complete_with_gpt(text):
    # Use the last 50 characters of the text as context
    return text[:-50] + api(text[-50:])

with gr.Blocks() as demo:
    textbox = gr.Textbox(placeholder="Type here and press enter...", lines=4)
    btn = gr.Button("Generate")
    btn.click(complete_with_gpt, textbox, textbox)

demo.launch()
ChatInterface 聊天页面
对话类样式 ChatInterface,支持集中输出、流式输出
- 先升级 gradio 版本
# pip install --upgrade gradio
启动示例
import gradio as gr

def echo(message, history):
    # 对话逻辑控制
    return message

# 最简单
demo = gr.ChatInterface(echo)
# 提供示例、标题
demo = gr.ChatInterface(fn=echo, examples=["hello", "hola", "merhaba"], title="Echo Bot")
demo.launch(share=True)
ChatInterface 参数
ChatInterface 参数用法
import gradio as gr

def echo(message, history):
    return message["text"]

demo = gr.ChatInterface(
    fn=echo, # 调用函数
    examples=[{"text": "hello"}, {"text": "hola"}, {"text": "merhaba"}], # 示例
    title="Echo Bot", # 标题
    multimodal=True, # 多模态
)
demo.launch()
当 multimodal=True 时,函数 fn 签名会稍微变化。
- 函数的第一个参数应该接受一个包含提交文本和上传文件的字典,比如
{"text": "user input", "file": ["file_path1", "file_path2", ...]}。 - 同样,任何示例也应该是这种形式的字典。函数返回值不变,仍旧返回一个单一的字符串消息。
import gradio as gr
import time

def count_files(message, history):
    num_files = len(message["files"])
    return f"You uploaded {num_files} files"

demo = gr.ChatInterface(fn=count_files, examples=[{"text": "Hello", "files": []}], title="Echo Bot", multimodal=True)

demo.launch()
流式输出
代码
import time
import gradio as gr

def slow_echo(message, history):
    for i in range(len(message)):
        time.sleep(0.05)
        yield "You typed: " + message[: i + 1]

demo = gr.ChatInterface(slow_echo, type="messages")

if __name__ == "__main__":
    demo.launch()
【2024-2-22】搭建Google gamma模型demo
# gamma web demo
# pip install --upgrade gradio

import gradio as gr
# 聊天模型
from test_gamma_bernald import *

def chat(question, history):
    """
        一次性输出
    """
    res = request_llm(question) # [time, answer]
    answer = res[1].replace('[L]', '\n')
    return answer

def chat_stream(question, history):
    """
        流式输出(非真实)
    """
    res = request_llm(question) # [time, answer]
    answer = res[1].replace('[L]', '\n')
    for i in range(len(answer)):
        yield answer[: i+1]

demo = gr.ChatInterface(
    # fn=chat,
    fn=chat_stream,
    examples=["你好", "hola", "merhaba"],
    cache_examples=True,
    title="ChatBot",
    description="""
    - Google 2024年2月21日发布的Gamma系列开源模型, 达到sota
    - 当前版本是Gamma-7b-it,经过指令微调""")
demo.launch(share=True)
高级参数
gr.ChatInterface(
    chat,
    chatbot=gr.Chatbot(height=300),
    textbox=gr.Textbox(placeholder="Ask me a yes or no question", container=False, scale=7),
    title="Yes Man",
    description="Ask Yes Man any question",
    theme="soft",
    examples=["Hello", "Am I cool?", "Are tomatoes vegetables?"],
    cache_examples=True,
    retry_btn=None,
    undo_btn="Delete Previous",
    clear_btn="Clear",
).launch()

# ------- interface 用法 --------
gr.Interface( fn = chat,
    #inputs=gr.Textbox(lines=3, placeholder="占位符",label="名称"),
    inputs = ['textbox'],
    # ----- 输出 ------
    # outputs=["textbox", "text"],
    # outputs=gr.HighlightedText(label="分析结果:", show_legend=True, combine_adjacent=True),  # 输出结果以什么样的形式展示,随意替换
    # 自定义输出名称
    #outputs=[ gr.outputs.Textbox(label="响应时间"), gr.outputs.Textbox(label="回复内容")],
    # inputs=["text", "checkbox", gr.Slider(0, 100)],
    outputs=["number", "text"],
    examples=[['你是谁'], ['你叫什么名字'], ['你多大了']]
).launch(share=True)
引入附加参数
import gradio as gr
import time

def echo(message, history, system_prompt, tokens):
    response = f"System prompt: {system_prompt}\n Message: {message}."
    for i in range(min(len(response), int(tokens))):
        time.sleep(0.05)
        yield response[: i+1]

demo = gr.ChatInterface(echo,
                        additional_inputs=[
                            gr.Textbox("You are helpful AI.", label="System Prompt"),
                            gr.Slider(10, 100)
                        ]
                       )

if __name__ == "__main__":
    demo.queue().launch()
结合 langchain 示例
from langchain.chat_models import ChatOpenAI
from langchain.schema import AIMessage, HumanMessage
import openai
import gradio as gr

os.environ["OPENAI_API_KEY"] = "sk-..."  # Replace with your key

llm = ChatOpenAI(temperature=1.0, model='gpt-3.5-turbo-0613')

def predict(message, history):
    history_langchain_format = []
    for human, ai in history:
        history_langchain_format.append(HumanMessage(content=human))
        history_langchain_format.append(AIMessage(content=ai))
    history_langchain_format.append(HumanMessage(content=message))
    gpt_response = llm(history_langchain_format)
    return gpt_response.content

gr.ChatInterface(predict).launch()
使用OpenAI接口实现流式请求
from openai import OpenAI
import gradio as gr

api_key = "sk-..."  # Replace with your key
client = OpenAI(api_key=api_key)

def predict(message, history):
    history_openai_format = []
    for human, assistant in history:
        history_openai_format.append({"role": "user", "content": human })
        history_openai_format.append({"role": "assistant", "content":assistant})
    history_openai_format.append({"role": "user", "content": message})

    response = client.chat.completions.create(model='gpt-3.5-turbo',
    messages= history_openai_format,
    temperature=1.0,
    stream=True)

    partial_message = ""
    for chunk in response:
        if chunk.choices[0].delta.content is not None:
              partial_message = partial_message + chunk.choices[0].delta.content
              yield partial_message

gr.ChatInterface(predict).launch()
使用开源模型
import gradio as gr
import torch
from transformers import AutoModelForCausalLM, AutoTokenizer, StoppingCriteria, StoppingCriteriaList, TextIteratorStreamer
from threading import Thread

tokenizer = AutoTokenizer.from_pretrained("togethercomputer/RedPajama-INCITE-Chat-3B-v1")
model = AutoModelForCausalLM.from_pretrained("togethercomputer/RedPajama-INCITE-Chat-3B-v1", torch_dtype=torch.float16)
model = model.to('cuda:0')

class StopOnTokens(StoppingCriteria):
    def __call__(self, input_ids: torch.LongTensor, scores: torch.FloatTensor, **kwargs) -> bool:
        stop_ids = [29, 0]
        for stop_id in stop_ids:
            if input_ids[0][-1] == stop_id:
                return True
        return False

def predict(message, history):

    history_transformer_format = history + [[message, ""]]
    stop = StopOnTokens()

    messages = "".join(["".join(["\n<human>:"+item[0], "\n<bot>:"+item[1]])  #curr_system_message +
                for item in history_transformer_format])

    model_inputs = tokenizer([messages], return_tensors="pt").to("cuda")
    streamer = TextIteratorStreamer(tokenizer, timeout=10., skip_prompt=True, skip_special_tokens=True)
    generate_kwargs = dict(
        model_inputs,
        streamer=streamer,
        max_new_tokens=1024,
        do_sample=True,
        top_p=0.95,
        top_k=1000,
        temperature=1.0,
        num_beams=1,
        stopping_criteria=StoppingCriteriaList([stop])
        )
    t = Thread(target=model.generate, kwargs=generate_kwargs)
    t.start()

    partial_message  = ""
    for new_token in streamer:
        if new_token != '<':
            partial_message += new_token
            yield partial_message

gr.ChatInterface(predict).launch()
Block 低级页面
Blocks方式要with语句添加组件,如果不设置布局方式,组件将按照创建顺序垂直出现在应用程序中
import gradio as gr

def greet(name):
    return "Hello " + name + "!"

with gr.Blocks() as demo:
    # 设置输入组件
    name = gr.Textbox(label="Name")
    # 设置输出组件
    output = gr.Textbox(label="Output Box")
    # 设置按钮
    greet_btn = gr.Button("Greet")
    # 设置按钮点击事件
    greet_btn.click(fn=greet, inputs=name, outputs=output)

demo.launch()
行内布局: Row
with gr.Blocks() as demo:
    with gr.Row():
        btn0 = gr.Button("Button 0", scale=0)
        btn1 = gr.Button("Button 1", scale=1) # 组件扩大
        btn2 = gr.Button("Button 2", scale=2) # 组件更大
列向布局及嵌套
- Column
import gradio as gr

with gr.Blocks() as demo:
    with gr.Row():
        text1 = gr.Textbox(label="t1")
        slider2 = gr.Textbox(label="s2")
        drop3 = gr.Dropdown(["a", "b", "c"], label="d3")
    with gr.Row(): # 扩大一倍,并至少600宽
        with gr.Column(scale=1, min_width=600):
            text1 = gr.Textbox(label="prompt 1")
            text2 = gr.Textbox(label="prompt 2")
            inbtw = gr.Button("Between")
            text4 = gr.Textbox(label="prompt 1")
            text5 = gr.Textbox(label="prompt 2")
        with gr.Column(scale=2, min_width=600):
            img1 = gr.Image("images/cheetah.jpg")
            btn = gr.Button("Go").style(full_width=True)

demo.launch()
Image 组件
Gradio Image模块用于处理图像输入和输出。
- 支持多种格式的图像,包括 numpy数组、PIL图像 和 文件路径
实现文件上传、摄像头截屏、内存数据获取
Image 方法: 监听器
- change方法: 当组件值发生改变时触发,无论是由用户输入引起的还是由函数更新引起的。可以用于处理输入组件的值变化,例如调用机器学习模型的预测函数。
- edit方法: 当用户使用内置编辑器编辑图像时触发。可以用于处理图像编辑事件,例如对编辑后的图像进行进一步处理或调用相应的函数。
- clear方法: 当用户点击组件上的X按钮清除图像时触发。可以用于处理图像清除事件,例如重置图像处理的状态或清除相关的输入。
- stream方法: 当用户使用组件进行图像流处理(如实时摄像头)时触发。可以用于处理图像流事件,例如实时处理视频流数据或调用相应的函数。
- upload方法: 当用户上传文件到组件时触发。可以用于处理图像上传事件,例如读取上传的图像文件并进行相应的处理或调用相应的函数。
- select方法: 当用户点击图像中的像素时触发。可以用于处理图像选择事件,例如根据用户选择的像素位置进行相应的处理或调用相应的函数。
通过使用这些监听器方法,可以灵活地处理Image模块中的各种事件,实现与图像相关的交互和处理功能。
import numpy as np
import gradio as gr

def sepia(input_img):
    sepia_filter = np.array([
        [0.393, 0.769, 0.189],
        [0.349, 0.686, 0.168],
        [0.272, 0.534, 0.131]
    ])
    sepia_img = input_img.dot(sepia_filter.T)
    sepia_img /= sepia_img.max()
    return sepia_img

demo = gr.Interface(sepia, gr.Image(), "image")
if __name__ == "__main__":
    demo.launch()
Tab 多页面
多模块:使用tab页
import numpy as np
import gradio as gr

def flip_text(x):
    return x[::-1]

def flip_image(x):
    return np.fliplr(x)

with gr.Blocks() as demo:
    gr.Markdown("Flip text or image files using this demo.")
    with gr.Tab("Flip Text"):
        text_input = gr.Textbox()
        text_output = gr.Textbox()
        text_button = gr.Button("Flip")
    with gr.Tab("Flip Image"):
        with gr.Row():
            image_input = gr.Image()
            image_output = gr.Image()
        image_button = gr.Button("Flip")

    with gr.Accordion("Open for More!"):
        gr.Markdown("Look at me...")

    text_button.click(flip_text, inputs=text_input, outputs=text_output)
    image_button.click(flip_image, inputs=image_input, outputs=image_output)

demo.launch()
tab中植入示例(example)
import gradio as gr

with gr.Blocks() as demo:
    input = gr.Textbox(label="Input")
    output = gr.Textbox(label="Output")
    input.change(lambda s: s, inputs=input, outputs=output)
    with gr.Tab("Examples Page 1"):
        gr.Examples(["a", "b", "c"], inputs=input)
    with gr.Tab("Examples Page 2"):
        gr.Examples(["d", "e", "f"], inputs=input)
    with gr.Tab("Examples Page 2"):
        gr.Examples(["g", "h", "i"], inputs=input)
    with gr.Row()
        # 缓存
        examples = gr.Examples(examples=examples, cache_examples=False)
        textbox = gr.Textbox()
        # 同时包含输入、输出
        examples = gr.Examples(examples=examples, inputs=textbox, outputs=label, fn=predict, cache_examples=True)

demo.launch()
多个Tab页公用:官方【2023-5-18】亲测有效
- 使用gr.Tabs()将页面包起来,子页面使用gr.TabItem
import gradio as gr

def add_text(history, text):
    history = history + [(text, None)]
    return history, ""

def add_file(history, file):
    history = history + [((file.name,), None)]
    return history

def bot(history):
    response = "**That's cool!**"
    history[-1][1] = response
    return history

def flip_text(x):
    return x[::-1]

with gr.Blocks() as demo:
    gr.Markdown("LLM Demo工具集")
    gr.Markdown("""
        # title
        ## content
    """)
    with gr.Tabs():
        with gr.TabItem("Flip Text"):
            text_input = gr.Textbox()
            text_output = gr.Textbox()
            text_button = gr.Button("Flip")

        chatbot = gr.Chatbot([], elem_id="chatbot").style(height=750)

        with gr.TabItem("ChatGLM-6B"):
            with gr.Row():
                with gr.Column(scale=0.85):
                    txt = gr.Textbox(
                        show_label=False,
                        placeholder="Enter text and press enter, or upload an image",
                    ).style(container=False)
                with gr.Column(scale=0.15, min_width=0):
                    btn = gr.UploadButton("?", file_types=["image", "video", "audio"])

            txt.submit(add_text, [chatbot, txt], [chatbot, txt]).then(
                bot, chatbot, chatbot
            )
            btn.upload(add_file, [chatbot, btn], [chatbot]).then(
                bot, chatbot, chatbot
            )
        with gr.Accordion("Open for More!"):
            gr.Markdown("Look at me...")

    text_button.click(flip_text, inputs=text_input, outputs=text_output)

demo.launch(share=True)
对话框: 参考 miniGPT-4 案例
多步输入
多步输入
- 将一个函数的输出作为输入
- 将语音文件转录出来,判断情感
from transformers import pipeline

import gradio as gr

asr = pipeline("automatic-speech-recognition", "facebook/wav2vec2-base-960h")
classifier = pipeline("text-classification")

def speech_to_text(speech):
    text = asr(speech)["text"]
    return text
def text_to_sentiment(text):
    return classifier(text)[0]["label"]

demo = gr.Blocks()

with demo:
    audio_file = gr.Audio(type="filepath")
    text = gr.Textbox()
    label = gr.Label()

    b1 = gr.Button("Recognize Speech")
    b2 = gr.Button("Classify Sentiment")

    b1.click(speech_to_text, inputs=audio_file, outputs=text)
    b2.click(text_to_sentiment, inputs=text, outputs=label)

demo.launch()
颜色区分
【2023-7-27】通过颜色高亮突出文本差异
- NER、PoS序列标准
方法, 官方示例
- gradio.HighlightedText
from difflib import Differ

import gradio as gr


def diff_texts(text1, text2):
    d = Differ()
    return [
        (token[2:], token[0] if token[0] != " " else None)
        for token in d.compare(text1, text2)
    ]

demo = gr.Interface(
    diff_texts,
    [
        gr.Textbox(
            label="Text 1",
            info="Initial text",
            lines=3,
            value="The quick brown fox jumped over the lazy dogs.",
        ),
        gr.Textbox(
            label="Text 2",
            info="Text to compare",
            lines=3,
            value="The fast brown fox jumps over lazy dogs.",
        ),
    ],
    gr.HighlightedText(
        label="Diff",
        combine_adjacent=True,
        show_legend=True,
    ).style(color_map={"+": "red", "-": "green"}),
    theme=gr.themes.Base()
)
if __name__ == "__main__":
    demo.launch()
gradio_client
【2023-11-13】Use a Gradio app as an API – in 3 lines of Python
除了web形式,gradio也支持api形式访问
- Gradio client 与 Gradio Space 一起协作
- gradio token
# $ pip install gradio_client
from gradio_client import Client

client = Client("abidlabs/whisper") # 连接公共的 gradio space地址
client = Client("abidlabs/my-private-space", hf_token="...") # 连接私有的gradio space 地址
client = Client.duplicate("abidlabs/whisper") # 复制公开space当私用,Duplicating a Space for private use
client = Client("https://bec81a83-5b5c-471e.gradio.live") # 使用临时生成的分享链接,使用 .view_api() 查看传参信息

client.predict("audio_sample.wav")
# 多参数
client = Client("gradio/calculator")
client.predict(4, "add", 5)

>> "This is a test of the whisper speech recognition model."
api信息示例(view_api返回)
Client.predict() Usage Info
---------------------------
Named API endpoints: 1

 - predict(input_audio, api_name="/predict") -> value_0
    Parameters:
     - [Audio] input_audio: str (filepath or URL)
    Returns:
     - [Textbox] value_0: str (value)
实测通过
#pip install gradio_client
from gradio_client import Client

client = Client("abidlabs/en2fr")
res = client.predict("Hello")
print('翻译:英语→法语:', res)

client = Client("abidlabs/whisper")
res = client.predict("https://audio-samples.github.io/samples/mp3/blizzard_unconditional/sample-0.mp3")
print('ASR: audio → text:', res)
#>> "My thought I have nobody by a beauty and will as you poured. Mr. Rochester is serve in that so don't find simpus, and devoted abode, to at might in a r—"
DEMO
实用DEMO集合
streamlit
【2022-10-9】streamlit,A faster way to build and share data apps
- Streamlit turns data scripts into shareable web apps in minutes. All in pure Python. No front?end experience required.
- 支持markdown格式,编辑HTML页面
- 支持交互式UI
- 跨平台、终端
- 与github代码库衔接
安装
# 安装
pip install streamlit
# 测试
streamlit hello
#streamlit 运行项目 a.py 指定端口 8000 不指定就是默认端口是 8051
streamlit run project/a.py --server.port 8000
功能
- Streamlit templates
- Science & technology
- NLP & language
- Computer vision & images
- Finance & business
- Data visualization
- Geography & society
- Education
案例
心电图异常诊断界面(PyQT):房颤的诊断和解释,代码
心电图诊断界面(bokeh)
- 在线演示的界面,代码
 支付宝打赏
支付宝打赏  微信打赏
微信打赏